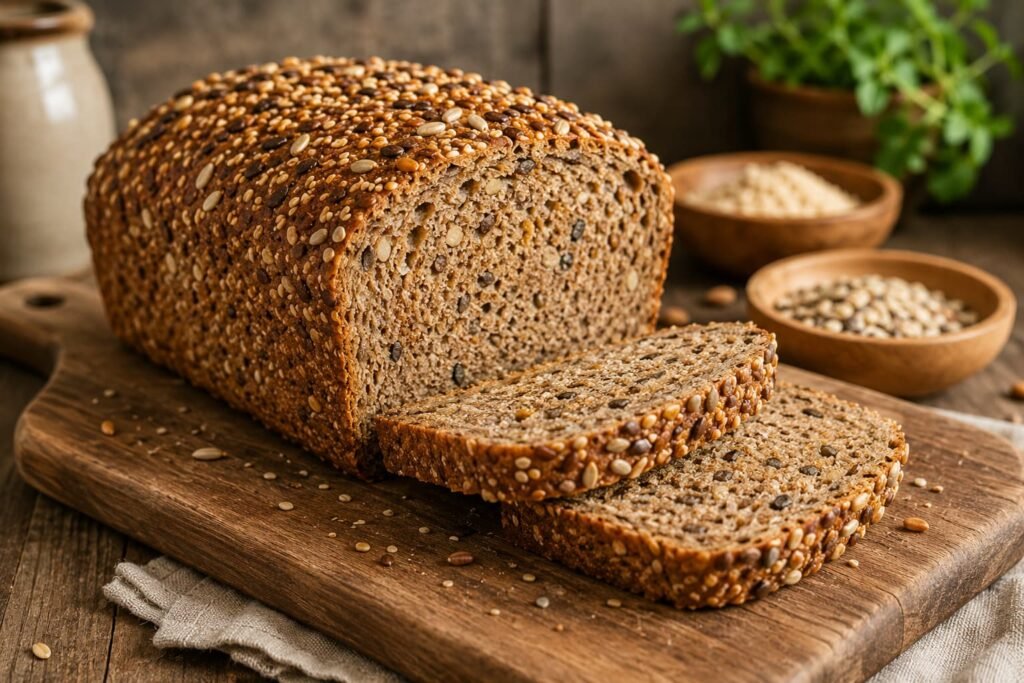
This homemade Ezekiel bread recipe is for anyone who wants a hearty, filling loaf made with real grains and legumes. Instead of using only refined flour, Ezekiel bread combines ingredients like wheat, barley, millet, lentils, beans, and spelt to create a dense, nutty bread that works well for toast, sandwiches, and meal prep.
A good recipe for Ezekiel bread with sprouted grains takes a little more time than regular bread, but the process is simple when you break it down step by step. The grains are soaked until they begin to sprout, then they are ground and mixed into a dough. This gives the bread a deeper flavor, a slightly chewy texture, and a more rustic finish than soft white sandwich bread.
Making Ezekiel bread at home also gives you better control over the ingredients. You can use fresh grains, adjust the sweetness, choose your preferred beans, and avoid unnecessary additives often found in packaged bread. The final loaf is sturdy enough for avocado toast, egg sandwiches, nut butter, hummus, or a simple breakfast slice with butter.
This guide will show you what Ezekiel bread is, which ingredients are usually used, how the sprouting process works, and what to expect from the texture before baking your own loaf.
What Is Ezekiel Bread?
Ezekiel bread is a sprouted grain bread inspired by Ezekiel 4:9, a Bible verse that mentions wheat, barley, beans, lentils, millet, and spelt. Modern Ezekiel bread is not an exact ancient recipe, but it is based on the same idea of combining grains and legumes in one loaf.

Traditional Ezekiel bread usually includes wheat, barley, millet, lentils, soybeans or another type of bean, and spelt. These ingredients give the bread a rich grain flavor and a firm texture. Because it uses whole grains and legumes together, the bread feels more filling than many standard sandwich breads.
The main difference is the sprouting process. Instead of grinding dry grains straight into flour, the grains are soaked and allowed to sprout first. Once tiny sprouts appear, the grains are dried or drained well, then ground into a flour-like mixture for the dough. This step gives homemade Ezekiel bread its natural nuttiness and slightly earthy flavor.
Ezekiel bread is not meant to be light and fluffy like white bread. It has a denser crumb, a chewy bite, and a rustic texture. That makes it a good choice for breakfast toast, open-faced sandwiches, and simple healthy snacks because it holds toppings without falling apart.
It is also important to know that traditional Ezekiel bread is not gluten-free. Since it usually contains wheat, barley, and spelt, it is not suitable for people who need to avoid gluten. For a gluten-free version, the grain blend and method would need to be changed completely.
Why You’ll Love This Homemade Ezekiel Bread Recipe
This homemade Ezekiel bread recipe is filling, practical, and easy to use in everyday meals. The mix of sprouted grains and legumes gives each slice a firm texture and a naturally nutty flavor. It is denser than regular white bread, but that is what makes it useful for toast, sandwiches, and simple meal prep.
It is the kind of bread you can keep ready for different meals during the week. Toast a slice for breakfast, use it for an egg sandwich, spread it with peanut butter, or serve it with hummus and vegetables for a quick lunch. Because the loaf has a sturdy crumb, it holds toppings well and does not become soggy as quickly as softer sandwich bread.
Homemade bread also gives you more control over the final result. You can adjust the sweetness, keep the salt balanced, choose the beans you prefer, and decide how fine or rustic you want the grain texture to be. Once the loaf has cooled, you can slice it and freeze the pieces so they are ready to toast whenever you need a quick breakfast or meal prep option.
Ezekiel Bread Recipes Ingredients
The best Ezekiel bread recipes ingredients are simple, but each one has an important job in the loaf. This bread is built around sprouted grains and legumes, which give it a deeper flavor and a heartier texture than regular sandwich bread. For the best result, drain the sprouted grains well before grinding them. If the grains are too wet, the dough can become sticky and heavy.
| Ingredient | Purpose |
| Sprouted wheat | Gives the bread structure and forms the main body of the loaf |
| Sprouted barley | Adds a mild nutty flavor and deeper grain taste |
| Millet | Brings a gentle flavor that balances the stronger grains |
| Lentils | Add body, texture, and a slightly earthy flavor |
| Soybeans or white beans | Help create a heartier loaf and improve the grain-legume balance |
| Spelt | Adds a softer whole grain base with a light nutty note |
| Yeast | Helps the dough rise and keeps the loaf from becoming overly dense |
| Honey | Adds mild sweetness and helps activate the yeast |
| Olive oil | Keeps the crumb softer and makes the bread easier to slice |
| Salt | Balances the flavor and supports the dough structure |
Exact measurements are listed in the recipe card below, but this ingredient overview helps you understand why each item matters. If you are making Ezekiel bread for the first time, keep the recipe simple before adding extras like seeds, nuts, or dried herbs. Once you understand the dough texture, it becomes easier to adjust the loaf to your taste.
How to Make Ezekiel Bread at Home

Making Ezekiel bread at home takes more planning than a regular loaf because the grains and legumes need time to sprout. Once they are ready, the rest of the method feels similar to making a hearty whole grain bread. The main thing to watch is moisture. Sprouted grains hold water, so the dough should feel soft and slightly tacky, but it should not be wet, loose, or paste-like.
For this homemade Ezekiel bread recipe, do not rush the sprouting stage. Small sprouts are enough. Long sprouts can make the flavor stronger and may change the way the dough handles.
Step 1: Sprout the Grains
Place the wheat, barley, millet, lentils, beans, and spelt in separate bowls or jars. Cover each one with plenty of cool water and let them soak until they soften. Most grains and legumes need several hours of soaking before they begin to sprout.
After soaking, drain the water and rinse everything well. Leave the grains in sprouting jars, fine mesh strainers, or shallow trays so extra moisture can drain away. Rinse and drain them again every few hours. They should stay damp, but they should never sit in standing water.
Most grains begin to show tiny sprouts within 24 to 48 hours. Lentils and beans may take a little longer, depending on freshness and room temperature. If one grain sprouts faster than the others, place it in the refrigerator while the rest finish. This keeps it fresh without letting the sprouts grow too long.
Step 2: Dry and Grind the Sprouted Grains
Once the grains have sprouted, drain them very well. Spread them on a clean towel or tray for a short time so surface moisture can dry. This step is important because wet grains can make the dough heavy, sticky, and difficult to knead.
Grind the sprouted grains using a grain mill if you have one. A high-speed blender or strong food processor can also work, but the texture may be more rustic. The goal is to make a coarse flour-like mixture, not a smooth paste. If the mixture turns pasty, the grains are likely too wet and need more draining time.
Step 3: Mix the Dough
Add warm water, yeast, and honey to a large mixing bowl. Let it sit for a few minutes until the yeast looks slightly foamy. This shows that the yeast is active. Stir in the olive oil, then add the ground sprouted grain mixture and salt.
Mix until the dough begins to come together. Ezekiel bread dough will not look like soft white bread dough. It is heavier because it contains sprouted grains and legumes, so expect a thicker and more rustic texture.
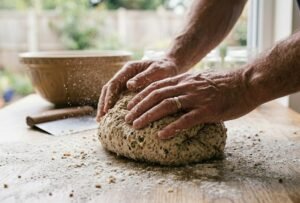
Step 4: Knead the Dough
Knead the dough until it feels soft, firm, and slightly tacky. It should hold together without sticking heavily to your hands. If it feels too wet, add flour one spoonful at a time. If it feels too dry or cracks while kneading, add a small splash of warm water.
The dough does not need to become perfectly smooth. A slightly rough texture is normal for homemade Ezekiel bread because the grain blend is dense and hearty.
Step 5: Let the Dough Rise
Place the dough in a lightly oiled bowl, cover it, and let it rise in a warm spot. The dough should become puffier, but it may not double as much as regular white bread dough. That is normal because sprouted grain dough is heavier.
Give the dough enough time to rise without rushing it. If your kitchen is cool, it may need longer. A slow, steady rise helps the texture develop and keeps the bread from becoming too compact.
Step 6: Shape the Loaf
After the first rise, gently press the dough down and shape it into a loaf. Place it into a lightly greased loaf pan and smooth the top with your hands. The loaf pan helps the bread rise upward and gives it a clean shape for slicing.
Cover the pan and let the dough rest again until it looks slightly lifted and fuller in the pan. It does not need to rise dramatically, but it should look relaxed and lightly puffed before baking.
Step 7: Bake the Bread
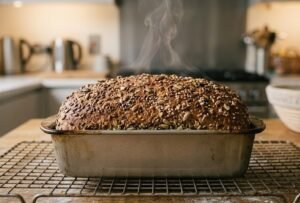
Bake the loaf at 350°F for about 35 to 45 minutes, or until the top is firm and lightly browned. The bread should sound slightly hollow when tapped on top. For a more accurate check, the center of the loaf should reach about 190°F to 200°F on an instant-read thermometer.
Because Ezekiel bread is dense, avoid underbaking it. The center needs enough time to cook through, especially if the sprouted grains were still holding moisture. If the top browns too quickly, cover it loosely with foil during the last part of baking.
Step 8: Cool Before Slicing
Let the bread cool in the pan for a short time, then move it to a wire rack. Do not slice it while it is hot. The inside continues to set as it cools, and cutting too early can make the crumb gummy.
For cleaner slices, wait until the loaf is fully cool. This also makes it easier to freeze individual slices and toast them later.
Bread Machine Option
You can turn this into an Ezekiel bread machine recipe, but it needs a little attention because sprouted grain dough is heavier than regular white bread dough. A bread machine can mix and knead the dough well, but not every machine handles dense whole grain dough the same way, so check your machine manual first.
For an Ezekiel bread recipe for bread machine use, add the wet ingredients first unless your machine instructions say otherwise. Then add the ground sprouted grain mixture, salt, and yeast according to your machine’s order. Choose a whole wheat or basic bread setting.
A bread machine Ezekiel bread recipe may not rise as high as a standard loaf. That is normal. Watch the dough during the first kneading cycle. If it looks too wet, add flour one spoonful at a time. If it looks dry and stiff, add warm water slowly. The dough should move as one soft ball, not smear around the pan or crumble into dry pieces.
For the best shape, you can use the bread machine only for mixing and kneading, then shape the loaf by hand and bake it in a regular loaf pan. This gives you more control over the crust, height, and final slice shape.
Ezekiel Bread Recipe Card
This recipe makes one sturdy loaf of homemade Ezekiel bread with a hearty texture and rich grain flavor. The loaf will be denser than regular sandwich bread because it is made with sprouted grains and legumes, so let it cool completely before slicing for the cleanest crumb.
Prep time: 35 minutes
Sprouting time: 24 to 48 hours
Rise time: 2 to 3 hours
Cook time: 35 to 45 minutes
Total time: About 2 days, including sprouting
Servings: 1 loaf, about 12 slices
Ingredients
2 cups sprouted wheat, measured after sprouting
1/2 cup sprouted barley, measured after sprouting
1/2 cup sprouted millet, measured after sprouting
1/2 cup sprouted lentils, measured after sprouting
1/4 cup sprouted soybeans or white beans, measured after sprouting
1/2 cup sprouted spelt, measured after sprouting
1 cup warm water, plus more only if needed
2 1/4 teaspoons active dry yeast
2 tablespoons honey
2 tablespoons olive oil
1 1/2 teaspoons salt
1/2 to 1 cup whole wheat flour, only if needed for kneading
Instructions
After the grains and legumes have sprouted, check them before using. They should smell fresh and mild. Discard any grains that smell sour, feel slimy, or show mold. Drain the healthy sprouts very well, then spread them on a clean towel for a short time to remove extra surface moisture.
Grind the sprouted grains in a grain mill, high-speed blender, or strong food processor until they look like a coarse flour mixture. The mixture should be damp but not paste-like. If it turns into a wet paste, the grains need more draining time.
In a large bowl, combine the warm water, yeast, and honey. Let it rest for 5 to 10 minutes, until the yeast looks foamy. Stir in the olive oil, then add the ground sprouted grain mixture and salt.
Mix until a thick dough begins to form. Knead by hand or with a stand mixer until the dough feels soft, firm, and slightly tacky. Dough texture matters more than using the full amount of extra flour. If the dough is too wet, add whole wheat flour one spoonful at a time. If it feels dry or cracks while kneading, add warm water slowly.
Place the dough in a lightly oiled bowl, cover it, and let it rise in a warm place until it looks puffier. This may take 1 to 2 hours, depending on your kitchen temperature. Ezekiel bread dough may not double like white bread dough, so look for a softer, lifted dough rather than a dramatic rise.
Gently shape the dough into a loaf and place it in a greased loaf pan. Cover and let it rest again until slightly risen. Bake at 350°F for 35 to 45 minutes, or until the top is firm and the center reaches about 190°F to 200°F on an instant-read thermometer.
Let the bread cool in the pan for 10 minutes, then move it to a wire rack. Cool completely before slicing with a sharp serrated knife.
Notes
This homemade Ezekiel bread recipe has a dense, rustic crumb. That is normal for bread made with sprouted grains and legumes. If the loaf feels gummy after baking, it was likely sliced too early, underbaked in the center, or made with sprouts that were too wet before grinding.
For a softer loaf, grind the sprouted grains more finely and avoid adding too much extra flour. For cleaner slices, cool the loaf fully before cutting. Once sliced, the bread can be frozen and toasted straight from the freezer.
Expert Tips for Better Texture
Texture is the main thing to manage when baking Ezekiel bread at home. Sprouted grains bring extra moisture into the dough, and too much moisture can make the loaf heavy in the center. Drain the sprouts well before grinding, and add extra water only when the dough feels truly dry.
Grinding also changes the final crumb. A finer grind gives the bread a smoother texture, while a rough grind creates a more rustic loaf. If you are using a blender or food processor, work in small batches so the grains break down evenly instead of turning into a wet paste.
Use fresh yeast for the best rise. If the yeast does not foam after sitting with warm water and honey, it may be inactive. Weak yeast can leave the loaf dense even when the dough is mixed correctly.
Do not skip the salt. Salt is not only for flavor; it also helps support the dough structure. Without it, the bread can taste flat and may not hold its shape as well.
A loaf pan gives homemade Ezekiel bread a better shape than free-form baking. Since this dough is heavier than regular bread dough, the pan helps it rise upward and makes the finished loaf easier to slice.
Finally, let the bread cool fully before cutting. Warm bread may smell ready, but the inside needs time to set. Slicing too early can make the crumb sticky, even if the bread is baked through.
Is Ezekiel Bread Gluten Free?
Traditional Ezekiel bread is not gluten-free. It is usually made with wheat, barley, and spelt, and all three contain gluten. Sprouting changes the grain, but it does not remove gluten from the bread.
If you need to avoid gluten, this homemade Ezekiel bread recipe is not suitable unless the grain blend is changed completely. A gluten-free version would need different ingredients, such as buckwheat, quinoa, millet, certified gluten-free oats, or gluten-free flour blends. The texture would also be different from traditional sprouted grain bread.
The simple answer is this: Ezekiel bread is a sprouted grain bread, but it is not gluten-free bread.
How to Store, Freeze, and Thaw Ezekiel Bread Recipes
Homemade Ezekiel bread keeps best when it is stored after cooling completely. If you plan to eat it soon, wrap the loaf well and keep it at room temperature for 1 to 2 days. Keep it away from heat and moisture so the crumb stays firm and fresh.

For longer short-term storage, keep the bread in the refrigerator for about 4 to 5 days. The fridge can make the slices a little firmer, but Ezekiel bread toasts well, so this is usually easy to fix. Wrap the loaf tightly or store slices in an airtight container to keep them from drying out.
Freezing is the best option if you want the bread to last longer. Slice the loaf first, then place parchment paper between slices so they do not stick together. Store the slices in a freezer-safe bag, press out extra air, and freeze for up to 2 to 3 months.
You can toast Ezekiel bread straight from frozen. This works well for breakfast toast, quick sandwiches, and simple snacks. If you want to thaw Ezekiel bread without toasting it, place the slices on a plate at room temperature for 15 to 20 minutes, or leave them wrapped in the refrigerator overnight.
Healthy Ways to Use Ezekiel Bread
Ezekiel bread is sturdy, so it works well with toppings that would make softer bread fall apart. For breakfast, try it as avocado toast, egg toast, peanut butter banana toast, or simple buttered toast with fruit on the side. It also fits well with more healthy breakfast recipes when you want something filling but easy.
For busy mornings, keep a few frozen slices ready and toast them as needed. You can use them with eggs, cottage cheese, nut butter, or fresh fruit for a fast meal. It also works nicely with meal prep breakfast recipes because the slices can be frozen ahead of time.
For lunch, use Ezekiel bread for turkey sandwiches, hummus sandwiches, open-faced tuna toast, or a veggie sandwich with cheese. The firm crumb holds fillings well, which makes it useful for simple sandwich recipes.
You can also use it for snacks. Toast a slice and top it with peanut butter, mashed avocado, hummus, or boiled egg. These ideas fit naturally with high protein snack recipes if you want something more filling between meals.
For a sweeter option, use it for French toast. Ezekiel bread has enough structure to soak up the egg mixture without falling apart too quickly. Cook it slowly so the center warms through and the outside turns golden.
Common Ezekiel Bread Mistakes to Avoid
One of the most common mistakes is slicing the bread too early. Ezekiel bread needs time to cool because the inside continues to set after baking. If you cut it while warm, the crumb can turn sticky or gummy.
Another issue is using sprouts that are too wet. Sprouted grains hold moisture, and extra water can make the dough heavy. Drain the sprouts well before grinding, and avoid turning them into a wet paste.
The grind also matters. If the grains are too coarse, the loaf can feel rough and crumbly. If they are too wet while grinding, the mixture can become pasty. Aim for a coarse flour-like texture that still feels manageable.
Do not rush the rise. Sprouted grain dough is heavier than white bread dough, so it may rise more slowly and may not double dramatically. Give it time to become puffier instead of expecting a very tall loaf.
Adding too much flour can make the bread dry and hard. Add extra flour only a little at a time, and stop once the dough feels soft, firm, and slightly tacky.
Finally, do not expect Ezekiel bread to taste or feel like white sandwich bread. It is denser, nuttier, and more rustic. That texture is part of what makes it good for toast, sandwiches, and freezer-friendly meal prep.
FAQs About Homemade Ezekiel Bread
What is Ezekiel bread made of?
Ezekiel bread is usually made with a mix of grains and legumes, including wheat, barley, millet, lentils, soybeans or beans, and spelt. In this homemade Ezekiel bread recipe, those ingredients are sprouted first, then ground and mixed into a hearty bread dough.
Is Ezekiel bread healthy?
Ezekiel bread can be a good choice if you want a filling bread made with sprouted grains and legumes instead of only refined flour. It works well with balanced meals like egg toast, avocado toast, turkey sandwiches, or hummus toast. Like any bread, it is best enjoyed with the right toppings, portions, and overall meal balance.
Is Ezekiel bread gluten free?
No, traditional Ezekiel bread is not gluten-free. It commonly contains wheat, barley, and spelt, which all contain gluten. Sprouting changes the grain, but it does not remove gluten.
Can I make Ezekiel bread without a bread machine?
Yes, you can make Ezekiel bread without a bread machine. Mix and knead the dough by hand or with a stand mixer, then shape it in a loaf pan and bake it in a regular oven. A bread machine can help with mixing, but it is not required.
Can I freeze homemade Ezekiel bread?
Yes, homemade Ezekiel bread freezes well. Let the loaf cool completely, slice it, and store the slices in a freezer-safe bag for up to 2 to 3 months. You can toast the slices straight from frozen or thaw them at room temperature for 15 to 20 minutes.
What does Ezekiel bread taste like?
Ezekiel bread has a nutty, earthy, and slightly rustic flavor. It is denser and chewier than soft white bread, with deeper grain flavor from the sprouted wheat, barley, millet, lentils, beans, and spelt.
Can I make sourdough Ezekiel bread?
Yes, you can make a sourdough-style Ezekiel bread, but it needs recipe testing because the rise time, moisture, and texture will change. You would need an active sourdough starter, and the loaf may be denser and more tangy than the yeast version.
Can I make Ezekiel bread without yeast?
You can make a yeast-free version, but it will not rise the same way. Without yeast, the bread will be heavier and more compact. For a better texture, this recipe uses active dry yeast to help lift the dense sprouted grain dough.
Conclusion
This homemade Ezekiel bread recipe is a good choice when you want a hearty loaf made with sprouted grains, legumes, and simple pantry ingredients. It takes more time than regular bread because of the sprouting step, but the method is easy to follow once you understand the dough texture.
The finished loaf is dense, nutty, and sturdy, which makes it useful for breakfast toast, egg sandwiches, avocado toast, hummus toast, turkey sandwiches, and freezer-friendly meal prep. Slice it after cooling, store it properly, and toast it whenever you need a filling homemade bread option during the week.
This homemade Ezekiel bread recipe is worth making at home if you enjoy grain-rich bread with real texture and a deeper flavor than regular sandwich bread.


