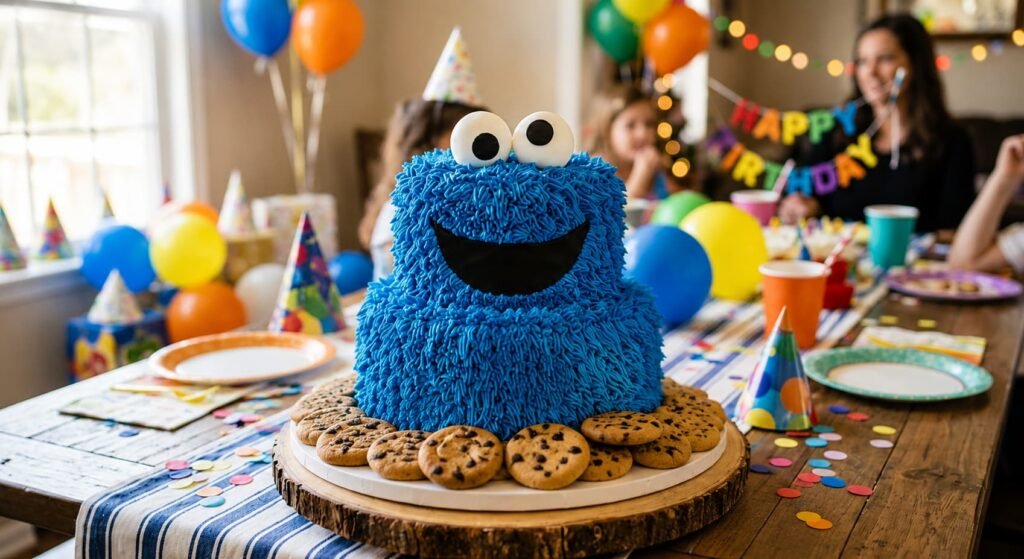
Cookie Monster Cake is one of those birthday cakes that instantly becomes the center of attention. Covered in bright blue frosting, decorated with oversized candy eyes, and topped with chocolate chip cookies, it captures the playful personality of the famous cookie-loving character while delivering a cake that tastes just as good as it looks.
It’s easy to see why a Cookie Monster birthday cake remains a favorite for children’s celebrations. The design is fun, recognizable, and surprisingly forgiving for home bakers. Unlike many themed cakes that require advanced fondant work, a homemade Cookie Monster cake relies mostly on simple buttercream decorating techniques, making it accessible even for beginners.
Every slice combines soft vanilla cake, creamy buttercream frosting, and crunchy chocolate chip cookies. The contrast of textures creates a dessert that feels festive and familiar, which is one reason both kids and adults enjoy it. Whether you’re planning a themed birthday party, a school celebration, or a Cookie Monster 1st birthday cake, this recipe delivers the perfect balance of visual appeal and flavor.
Another reason this cake remains so popular year after year is that perfection isn’t required. In fact, slightly uneven frosting, playful cookie placement, and imperfect piping often make the finished cake look even more like the character itself. For first-time decorators, that can make the process much less intimidating.
In this guide, you’ll learn how to make a Cookie Monster cake from scratch, including the ingredients you’ll need, beginner-friendly decorating techniques, storage tips, common mistakes to avoid, and creative variations such as a Cookie Monster smash cake, Cookie Monster cupcake cake, and birthday party version.
Quick Answer
A Cookie Monster Cake is a character-themed birthday cake inspired by the beloved blue Sesame Street character. It usually consists of moist vanilla or chocolate cake layers covered in blue buttercream frosting and decorated with candy eyes and chocolate chip cookies to create Cookie Monster’s iconic face.
One reason Cookie Monster cakes are so popular is that they combine a playful design with simple decorating techniques. Unlike many specialty birthday cakes, they can be made successfully at home without professional cake decorating experience.
Flavor Profile
Most Cookie Monster cake recipes feature soft vanilla cake paired with rich buttercream frosting and chocolate chip cookies. The flavor is sweet, buttery, and comforting, with a balance of fluffy cake, creamy frosting, and crunchy cookie pieces in every bite.
Prep Time
Approximately 30 minutes for preparing the cake batter, frosting, and decorating ingredients.
Bake Time
25 to 35 minutes, depending on the cake pans and oven used.
Servings
A standard 8-inch two-layer Cookie Monster cake typically serves 10 to 14 people, making it ideal for family birthdays, classroom celebrations, and small children’s parties.
Difficulty Level
Beginner to Intermediate
The baking portion is straightforward and suitable for most home bakers. The decorating stage requires only basic piping skills and simple assembly techniques. Since Cookie Monster’s playful appearance doesn’t require perfect symmetry, many first-time decorators find this cake easier to create than other character-themed birthday cakes.
One of the biggest advantages of this Cookie Monster cake recipe is that it focuses on fun rather than perfection. Small decorating imperfections often add personality and charm, helping the finished cake look more authentic and playful. With a few simple tools, basic ingredients, and a little creativity, even beginner bakers can create a memorable birthday centerpiece that looks impressive and tastes delicious.
Why You’ll Love This Cookie Monster Cake
Some birthday cakes look impressive but require advanced decorating skills, specialty tools, or hours of detailed work. A Cookie Monster cake offers something different. It creates a memorable party centerpiece while remaining simple enough for most home bakers to make successfully.
One reason this Cookie Monster birthday cake is so popular is its visual impact. The bright blue frosting, oversized candy eyes, and chocolate chip cookie decorations instantly capture attention. Before the candles are even lit, guests usually gather around to admire the cake and take photos.
The flavor is just as appealing as the design. Soft vanilla cake layers, creamy buttercream frosting, and crunchy chocolate chip cookies create a combination that feels familiar and comforting. Every bite delivers a balance of fluffy cake, smooth frosting, and cookie texture that both kids and adults enjoy.
Unlike many character cakes that depend on perfect decorating techniques, a homemade Cookie Monster cake is surprisingly forgiving. Slightly uneven frosting, playful cookie placement, and imperfect piping often make the character look even more authentic. For beginner bakers, that removes much of the stress that usually comes with themed cake decorating.
This recipe is also highly adaptable. It works beautifully as a Cookie Monster 1st birthday cake, a larger Cookie Monster birthday cake for family celebrations, or even a Cookie Monster smash cake for memorable first birthday photos.
Perhaps the biggest advantage is that it combines fun and flavor equally well. Many novelty cakes focus heavily on appearance, but this cake delivers a dessert that people genuinely enjoy eating. The result is a birthday cake that looks exciting, tastes delicious, and creates lasting memories.
What Is a Cookie Monster Cake?
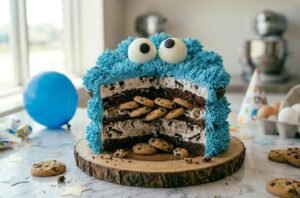
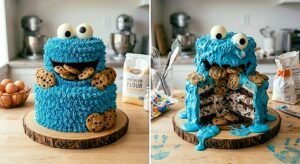
A Cookie Monster cake is a character-themed birthday cake inspired by the famous blue Sesame Street character known for his endless love of cookies. The cake is decorated to resemble Cookie Monster using vibrant blue frosting, oversized candy eyes, and chocolate chip cookies positioned around the face.
The design became popular because it is instantly recognizable while remaining relatively easy to recreate at home. Unlike many character cakes that require fondant sculpting or advanced decorating skills, a Cookie Monster cake can be created with simple buttercream piping techniques and basic decorating supplies.

A typical Cookie Monster cake features blue buttercream frosting piped to resemble fur, large candy eyes placed slightly off-center, and cookies arranged to create Cookie Monster’s signature expression. Interestingly, small decorating imperfections often improve the final appearance because they reflect the playful personality of the character.
Vanilla cake remains the most common choice for the base, but chocolate cake, cookies-and-cream cake, funfetti cake, and even cookie monster cookie cake variations are also popular. The decorating style stays largely the same regardless of the flavor underneath.
This theme works particularly well for birthdays because it combines a beloved childhood character with universally popular flavors. Children are drawn to the playful design, while adults appreciate the familiar taste of homemade cake, buttercream frosting, and chocolate chip cookies. That combination has helped make Cookie Monster cakes one of the most requested themed birthday cakes for young children.
Ingredients You’ll Need

The best Cookie Monster cake recipe starts with simple ingredients that work together to create a moist cake, creamy frosting, and eye-catching decorations. Most of these ingredients are pantry staples, making this a practical project for both experienced bakers and beginners.
Using quality ingredients helps ensure the finished cake tastes as good as it looks.
Cake Ingredients
The cake layers form the foundation of the entire dessert. A soft but sturdy cake is important because it must support the frosting and decorative elements without becoming unstable.
Flour
All-purpose flour provides structure while keeping the cake tender. It creates a stable base that is easy to stack and decorate.
Sugar
Granulated sugar adds sweetness while helping retain moisture. It also contributes to the light texture that makes each slice soft and enjoyable.
Eggs
Eggs provide richness, structure, and stability. They help bind the ingredients together and contribute to a smooth, even crumb.
Butter
Butter delivers a richer flavor than many oil-based cakes. It creates a soft texture and complements the vanilla and cookie flavors throughout the recipe.
Vanilla
Pure vanilla extract enhances the overall flavor profile and helps bring together the cake, frosting, and cookie decorations.
Milk
Milk contributes moisture and helps create a soft, fluffy texture. Whole milk generally produces the richest results, though other varieties can also be used successfully.
Blue Food Coloring
The blue color is what transforms an ordinary cake into a recognizable Cookie Monster cake. Gel food coloring is often the best option because it creates vibrant color without affecting frosting consistency.
Cookie Monster Frosting Ingredients
The frosting is responsible for the cake’s iconic appearance.
Buttercream Frosting
Buttercream is the preferred frosting because it pipes easily and holds its shape well. It creates the furry texture that gives Cookie Monster his signature look.
Blue Coloring
A deep blue gel food coloring produces the most vibrant results. Many decorators prefer gel colors because they create bold shades without thinning the frosting.
Vanilla
A small amount of vanilla extract balances the sweetness of the buttercream and creates a more rounded flavor.
Decoration Ingredients
The decorations bring the character to life and complete the Cookie Monster theme.
Chocolate Chip Cookies
Chocolate chip cookies are the defining decoration. Crisp cookies often work best because they hold their shape during decorating and serving.
Mini Cookies
Mini cookies can be scattered around the cake board or added to the sides for extra visual appeal.
Candy Eyes
Large candy eyes instantly make the design recognizable. Slightly uneven placement often creates a more playful and authentic expression.
Cookie Crumbs
Cookie crumbs add texture, decoration, and additional cookie flavor. They also help tie the entire theme together visually.
Kitchen Tools You’ll Need
Creating a Cookie Monster cake does not require professional bakery equipment, but a few basic tools can make the process easier and produce cleaner results.
Recommended tools include:
- Two 8-inch cake pans
- Mixing bowls
- Electric hand mixer or stand mixer
- Measuring cups and spoons
- Cooling rack
- Offset spatula
- Piping bag
- Grass piping tip
- Cake turntable (optional)
- Serrated cake knife
If you’re decorating a Cookie Monster cake for the first time, the grass piping tip is often the most useful tool. It creates the textured buttercream “fur” that gives the cake its signature appearance. A cake turntable is optional, but many beginner decorators find that it makes frosting and piping significantly easier.
How to Make Cookie Monster Cake
Creating a homemade Cookie Monster cake is much easier than most people expect. The process can be broken down into a few simple stages: baking the cake layers, preparing the blue buttercream frosting, assembling the cake, and adding the signature Cookie Monster decorations.
One reason this Cookie Monster cake recipe is so beginner-friendly is that the design doesn’t require perfect decorating skills. In fact, a slightly playful and imperfect appearance often makes the finished cake look more authentic.
Step 1: Prepare the Cake Batter
Preheat your oven to 350°F (175°C). Grease two 8-inch round cake pans and line the bottoms with parchment paper to help ensure easy removal after baking.

In a medium bowl, whisk together the flour and other dry ingredients. In a separate large bowl, beat the butter and sugar until the mixture becomes pale, light, and fluffy. This step is important because it helps create the soft texture that makes a homemade Cookie Monster cake so enjoyable.
Add the eggs one at a time, mixing after each addition. Stir in the vanilla extract, then alternate adding the dry ingredients and milk until a smooth batter forms.
Avoid overmixing once the flour has been incorporated. Excess mixing can develop too much gluten, resulting in a heavier cake that is more difficult to decorate.
The batter should be thick, smooth, and evenly combined with no visible streaks of flour.
Step 2: Bake the Cake
Divide the batter evenly between the prepared pans and smooth the tops with an offset spatula.
Bake for approximately 28 to 32 minutes, or until the cake springs back lightly when touched and a toothpick inserted into the center comes out with only a few moist crumbs attached.
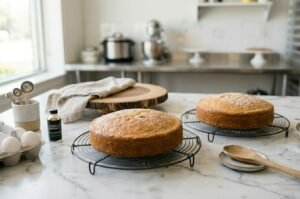
Allow the cakes to cool in their pans for about 10 minutes before transferring them to a wire rack.
One of the most common mistakes when making a Cookie Monster birthday cake is decorating before the layers are fully cooled. Even slightly warm cake can cause buttercream frosting to soften, slide, or become difficult to pipe.
Once completely cool, use a serrated knife to level the tops if needed. Flat layers help create a more stable cake and a cleaner final presentation.
Step 3: Make the Blue Buttercream Frosting
While the cake layers cool, prepare the buttercream frosting.
Beat softened butter until creamy and smooth. Gradually add powdered sugar and continue mixing until the frosting becomes light and fluffy. Add vanilla extract and a small amount of milk or cream until the desired consistency is reached.

Next, add blue gel food coloring a little at a time.
Many home bakers make the mistake of adding too much coloring at once. It’s always easier to darken frosting than to lighten it, so work gradually until you reach the bright blue shade associated with Cookie Monster.
Gel food coloring is generally preferred because it creates vibrant color without thinning the frosting. Deep royal blue or electric blue shades usually produce the most recognizable Cookie Monster appearance.
The finished buttercream should hold a soft peak when lifted with a spatula. This consistency makes it easy to spread while still holding decorative piping details.
Step 4: Frost the Cake
Place the first cake layer on a serving plate or cake board and spread an even layer of buttercream frosting across the top.
Add the second cake layer and apply a thin crumb coat around the entire cake. This first layer traps loose crumbs and creates a smooth foundation for the final frosting layer.
Refrigerate the cake for 15 to 20 minutes to allow the crumb coat to firm up.
Once chilled, apply the final layer of blue buttercream frosting. Don’t worry about achieving a perfectly smooth finish because the textured piping added later will cover most imperfections.
Many experienced decorators consider this one of the easiest character cakes because small imperfections often enhance the final look.
Step 5: Create the Cookie Monster Face
This is the stage where the cake truly begins to resemble Cookie Monster.

Transfer the remaining blue buttercream to a piping bag fitted with a grass piping tip. Pipe short bursts of frosting across the surface of the cake to create the signature furry texture.
Work in small sections rather than attempting to cover the entire cake at once. This approach helps maintain consistent texture and gives better control over the finished appearance.
Position two large candy eyes near the upper center of the cake. Avoid placing them perfectly straight.
Many decorators intentionally position the eyes slightly unevenly because it creates a more playful and expressive Cookie Monster face.
Step 6: Add Cookies and Decorations
No homemade Cookie Monster cake is complete without cookies.
Arrange chocolate chip cookies around the mouth area and along the cake board. A partially inserted cookie can create the illusion that Cookie Monster is actively eating it, which adds personality and visual interest.
For best results, use slightly crisp chocolate chip cookies rather than very soft bakery-style cookies. Firmer cookies generally hold their shape better during decorating and serving.
Mini cookies and cookie crumbs can also be added around the base of the cake for additional texture and decoration.
The most appealing Cookie Monster cakes often look slightly playful rather than perfectly arranged, so don’t be afraid to create a relaxed and natural appearance.
Step 7: Chill Before Serving
After decorating, refrigerate the cake for approximately 30 minutes.
Chilling allows the buttercream frosting to firm up and helps secure the decorations before serving or transporting the cake.

For the cleanest slices, many bakers prefer chilling the cake briefly before cutting. This helps maintain the decorative details and creates a neater presentation.
Remove the cake from the refrigerator about 20 minutes before serving. This allows the buttercream to soften slightly and gives the cake its best flavor and texture.
The finished Cookie Monster birthday cake should be moist, flavorful, visually impressive, and sturdy enough for parties, celebrations, and birthday gatherings.
Expert Decorating Tips
A few simple decorating techniques can make a significant difference in the final appearance of your Cookie Monster cake.
Use Gel Food Coloring
Gel food coloring produces a more vibrant blue shade without affecting the consistency of the buttercream.
Liquid coloring often requires larger quantities to achieve the same result, which can make frosting thinner and more difficult to pipe.
Pipe Fur Texture in Layers
Rather than covering the entire cake randomly, work in small sections.
Layering short bursts of frosting creates a fuller fur texture and helps the finished cake look more realistic. Building the texture gradually also reduces hand fatigue during decorating.
Position the Eyes Naturally
One of the easiest ways to make the cake look authentic is to avoid perfect symmetry.
Cookie Monster’s playful expression comes from slightly uneven eyes. A small amount of asymmetry often makes the character appear more animated and recognizable.
Add Cookies Naturally
When decorating, resist the temptation to place every cookie in a perfectly organized pattern.
Allow some cookies to lean against the cake, rest on top, or partially cover the mouth area. These small details create movement and help bring the character to life.
Chill Between Decorating Stages
If the frosting begins to soften while decorating, place the cake in the refrigerator for 10 minutes before continuing.
This simple step helps maintain sharper piping details and makes decorating significantly easier, especially in warmer kitchens.
The goal is not perfection. The most memorable Cookie Monster cakes capture the playful personality of the character while looking homemade, fun, and inviting.
Best Cookie Monster Cake Variations
One reason the Cookie Monster cake remains a favorite for birthday celebrations is its flexibility. While the classic version is always a crowd-pleaser, there are many creative ways to customize the design based on the age of the birthday child, the party size, and the overall theme.
Whether you’re planning a first birthday, a classroom celebration, or a large family gathering, these Cookie Monster cake ideas can help you create a dessert that feels unique while keeping the playful personality that makes this cake so popular.
Cookie Monster Smash Cake
A Cookie Monster smash cake is one of the most popular choices for first birthdays.

These smaller cakes are designed specifically for babies and are often decorated with a simplified Cookie Monster face, soft blue frosting, and a single cookie accent. Because smash cakes are intended for photos and hands-on fun, many parents prefer lighter frosting and smaller portions.
Some families even use reduced-sugar frosting or a whipped cream and Greek yogurt frosting blend to create a softer, less sweet option for younger children.
The smaller size also makes decorating easier for beginner bakers while creating an adorable centerpiece for birthday photos.
Cookie Monster Cupcake Cake
A Cookie Monster cupcake cake combines the convenience of cupcakes with the visual impact of a character cake.

Individual cupcakes are arranged into a Cookie Monster shape and covered with blue frosting to create the familiar face. This option works especially well for school parties, daycare events, and large gatherings where serving individual slices may be less practical.
Guests can simply take a cupcake, making cleanup easier and serving more efficient.
Cookie Monster Cake and Cupcakes
For larger birthday parties, many bakers pair a central Cookie Monster birthday cake with matching cupcakes.
The cake becomes the focal point of the dessert table while the cupcakes provide additional servings for guests. This setup creates a coordinated display and helps avoid cutting and serving large numbers of slices.
Blue frosting swirls, candy eyes, mini cookies, and cookie crumbs can be used throughout the display to create a cohesive theme.
Cookie Monster Ice Cream Cake
For summer celebrations, a Cookie Monster ice cream cake can be a refreshing alternative to a traditional layer cake.
Layers of cake and ice cream are combined with cookie pieces and decorated with Cookie Monster-inspired frosting and cookies. Cookies-and-cream ice cream is one of the most popular choices because it naturally complements the Cookie Monster theme.
Because ice cream cakes soften quickly outdoors, they are best assembled shortly before serving or kept frozen until party time.
Chocolate Cookie Monster Cake
While vanilla remains the traditional choice, many families prefer a chocolate Cookie Monster cake.
Rich chocolate cake layers create a striking contrast against the bright blue frosting while adding deeper flavor. The combination of chocolate cake, buttercream frosting, and chocolate chip cookies creates a dessert that appeals to both children and adults.
For chocolate lovers, this variation often becomes an instant favorite.
Cookie Monster Cake for First Birthdays
A Cookie Monster 1st birthday cake is usually designed with a softer, more playful appearance.
Many parents choose larger eyes, fewer decorations, and lighter sweetness levels to create a design that feels appropriate for a baby’s first celebration. Some families pair a small smash cake with a larger Cookie Monster birthday cake for guests.
Because Cookie Monster remains one of the most recognizable children’s characters, this theme continues to be one of the most requested first birthday cake ideas.
How to Store Cookie Monster Cake
Proper storage helps preserve both the appearance and flavor of your homemade Cookie Monster cake.
Because buttercream frosting, decorative cookies, and cake layers all react differently to temperature and humidity, proper storage can make a noticeable difference in the final result.
Room Temperature Storage
If the cake will be served within several hours, it can remain at room temperature in a cool environment.
Cover the cake with a cake dome or large container to protect it from dust and drying out. Avoid direct sunlight, warm kitchens, or areas near ovens and windows.
In warmer climates or humid kitchens, refrigeration is often the safer option, even for same-day serving.
For short-term storage, room temperature usually provides the softest cake texture and best flavor.
Refrigerator Storage
For longer storage, place the Cookie Monster cake in the refrigerator.
A covered cake typically remains fresh for three to four days. Refrigeration helps maintain frosting structure and keeps decorative elements secure.
Before serving, allow the cake to sit at room temperature for approximately 20 to 30 minutes. This helps restore the soft texture of both the cake and frosting.
Freezer Storage
Cookie Monster cake freezes surprisingly well.
Wrap unfrosted cake layers tightly in plastic wrap followed by aluminum foil. Properly wrapped cake can maintain excellent quality for up to two months.
Decorated cakes can also be frozen. Place the cake uncovered in the freezer for about one hour to firm the frosting before wrapping.
After thawing, you may notice slight condensation on bright blue frosting. This is normal. Gradual thawing in the refrigerator before bringing the cake to room temperature helps minimize moisture buildup and preserves the decoration.
Make-Ahead Instructions
One of the easiest ways to reduce birthday party stress is to prepare components in advance.
Cake layers can be baked one to two days ahead and stored tightly wrapped. Buttercream frosting can be made several days in advance and refrigerated until needed.
Many experienced bakers assemble and decorate the cake the evening before the party. This allows the frosting to set properly and often results in cleaner decorating details.
Common Mistakes to Avoid
Even simple birthday cakes can become frustrating if a few important details are overlooked.
Avoiding these common mistakes can help ensure your Cookie Monster cake looks impressive and tastes just as good as it looks.
Using Too Much Food Coloring
It can be tempting to add a large amount of coloring immediately, but doing so can affect the frosting’s consistency.
Always add gel food coloring gradually until you achieve the desired shade. This provides better control and helps maintain the ideal texture.
Working With Warm Frosting
Soft buttercream can make decorating difficult.
If the frosting becomes too warm during piping, refrigerate it for several minutes before continuing. Cooler frosting produces sharper fur texture and cleaner details.
Decorating a Warm Cake
One of the most common decorating mistakes is frosting cake layers before they have cooled completely.
Even slightly warm cake can cause frosting to melt, slide, and lose its texture. Always allow the layers to cool fully before assembling and decorating.
Overbaking the Cake
Dry cake layers can reduce the overall quality of the finished dessert.
Begin checking for doneness near the lower end of the baking range. Removing the cake at the right time helps preserve moisture and softness.
Adding Decorations Too Early
Cookies added too far in advance may soften as they absorb moisture from the frosting.
For the freshest appearance and best texture, many decorators add final cookie decorations shortly before serving.
Using Very Soft Cookies
Soft bakery-style cookies can lose their shape during decorating.
Slightly firmer chocolate chip cookies generally hold up better and help maintain the recognizable Cookie Monster appearance throughout the celebration.
Cookie Monster Cake Decorating Ideas
One of the best things about a Cookie Monster cake is how easily it can be personalized.
These decorating ideas can help inspire a version that fits your celebration while still maintaining the classic Cookie Monster theme.
Birthday Party Version
The traditional birthday version features bright blue buttercream frosting, oversized candy eyes, and multiple chocolate chip cookies arranged around the mouth.
This remains the most recognizable and widely requested design.
Two-Tier Cookie Monster Cake
A two-tier Cookie Monster cake creates impressive visual impact for larger celebrations.
Many bakers decorate the lower tier with blue fur texture while placing a custom Cookie Monster cake topper on the upper tier. Mini cookies and cookie crumbs can be scattered across both tiers for a balanced design.
This style works especially well for milestone birthdays.
Simple Beginner Version
Not every Cookie Monster cake needs elaborate decorations.
A single-layer cake with blue frosting, candy eyes, and a few strategically placed cookies can still create a charming and recognizable design.
This approach is perfect for first-time decorators.
Blue Drip Version
A blue drip cake adds a modern twist to the traditional design.
A glossy blue drip running down the sides creates visual interest while maintaining the familiar Cookie Monster appearance. This style is especially popular for older children and themed birthday parties.
Cookie Overload Version
For serious cookie lovers, the cookie overload version takes the theme to another level.
Chocolate chip cookies, mini cookies, cookie crumbs, and cookie pieces are piled generously across the top and sides of the cake. The result is a playful dessert that fully embraces Cookie Monster’s famous love of cookies.
This dramatic variation often becomes the centerpiece of the entire dessert table and is one of the most popular Cookie Monster cake ideas for large birthday celebrations.
Frequently Asked Questions
How Do You Make a Cookie Monster Cake?
Making a homemade Cookie Monster cake starts with baking soft vanilla or chocolate cake layers, preparing a rich blue buttercream frosting, and decorating the cake to resemble the famous cookie-loving character. The signature look is created using piped blue frosting, candy eyes, and chocolate chip cookies placed around the mouth area.
What makes this Cookie Monster cake recipe beginner-friendly is that perfection isn’t required. In fact, slightly uneven eyes and casually placed cookies often make the finished cake look even more playful and authentic. With a few basic decorating tools and some patience, it’s possible to create a birthday cake that looks impressive without advanced baking skills.
Can I Make Cookie Monster Cake Ahead of Time?
Yes, and many bakers find that preparing the cake in advance actually improves the decorating process.
Cake layers can be baked up to two days ahead and stored tightly wrapped at room temperature. Buttercream frosting can be prepared several days in advance and kept refrigerated until needed. When ready to decorate, simply bring the frosting back to a spreadable consistency.
For birthday parties and special events, decorating the Cookie Monster birthday cake the evening before is often a practical choice. This gives the frosting time to set properly and allows the decorations to remain secure during transport and serving.
What Flavor Is Cookie Monster Cake?
There is no official flavor for a Cookie Monster cake, which is part of its appeal.
Most recipes use vanilla cake because it pairs well with buttercream frosting and appeals to both children and adults. However, chocolate cake, funfetti cake, cookies-and-cream cake, and cookie dough-inspired cake layers are also popular options.
The recognizable blue frosting and cookie decorations create the Cookie Monster theme, while the flavor can be customized to suit the occasion and personal preferences.
Can I Freeze Cookie Monster Cake?
Yes. Cookie Monster cake freezes well when stored correctly.
Unfrosted cake layers can typically be frozen for up to two months when wrapped tightly. A fully decorated cake can also be frozen, although it’s best to freeze it uncovered for about an hour first so the frosting firms up before wrapping.
When you’re ready to serve, thaw the cake overnight in the refrigerator and allow it to sit at room temperature for about 30 minutes. This helps restore the soft texture and full flavor of the cake.
What Frosting Works Best for Cookie Monster Cake?
Buttercream frosting is generally the best choice for a Cookie Monster cake because it is easy to color, easy to pipe, and stable enough to hold decorative details.
American buttercream remains the most common option because it creates the thick texture needed for Cookie Monster’s furry appearance. It also holds vibrant blue coloring exceptionally well.
For bakers who prefer a lighter texture, Swiss meringue buttercream can also work beautifully. It creates a smoother finish while still allowing decorative piping, although it requires a little more preparation.
How Long Does Cookie Monster Cake Stay Fresh?
A properly stored Cookie Monster cake typically stays fresh for three to four days in the refrigerator.
To maintain the best flavor and texture, keep the cake covered so it doesn’t absorb refrigerator odors or dry out. Before serving, allow it to sit at room temperature for 20 to 30 minutes. This softens the buttercream and improves the overall eating experience.
Many bakers notice that the cake tastes even better the day after decorating because the flavors have had additional time to develop and blend together.
Can I Make a Cookie Monster Smash Cake?
Absolutely. A Cookie Monster smash cake is one of the most popular choices for first birthday celebrations.
These smaller cakes are designed specifically for babies and are often decorated with a simplified version of the Cookie Monster face. Many parents use softer frosting, reduced sweetness, and minimal decorations while keeping the recognizable blue color and playful eyes.
A smash cake can be served alongside a larger Cookie Monster birthday cake, allowing the birthday child to enjoy their own special cake while guests share the main dessert.
Why Is My Cookie Monster Frosting Turning Green Instead of Blue?
This is a surprisingly common decorating issue.
Some food colorings develop slightly different shades depending on the butter used and the amount of yellow tones already present in the frosting. Using high-quality gel food coloring usually produces a brighter and more consistent blue color.
Allowing the frosting to sit for 15 to 20 minutes after mixing can also help the color deepen naturally before adding more coloring.
Can I Use a Box Cake Mix for Cookie Monster Cake?
Yes. A box cake mix can save time and still produce excellent results.
Many home bakers use vanilla, funfetti, or chocolate cake mix as the base and focus their effort on the Cookie Monster decorations. The success of the cake often comes from the frosting texture and character design rather than whether the cake is made completely from scratch.
For busy parents preparing a birthday party, this can be a practical shortcut without sacrificing appearance.

Final Thoughts
A homemade Cookie Monster cake is more than a themed dessert. It’s a cake that instantly becomes part of the celebration.
Its popularity comes from the combination of playful design, familiar flavors, and beginner-friendly decorating. The bright blue frosting, oversized eyes, and chocolate chip cookies create a birthday centerpiece that children recognize immediately, while the soft cake and creamy buttercream appeal to guests of all ages.
Another reason this Cookie Monster cake recipe continues to be a favorite is its flexibility. Whether you’re making a Cookie Monster smash cake for a first birthday, a Cookie Monster cupcake cake for a classroom party, or a two-tier Cookie Monster birthday cake for a larger celebration, the design can be adapted to fit almost any occasion.


