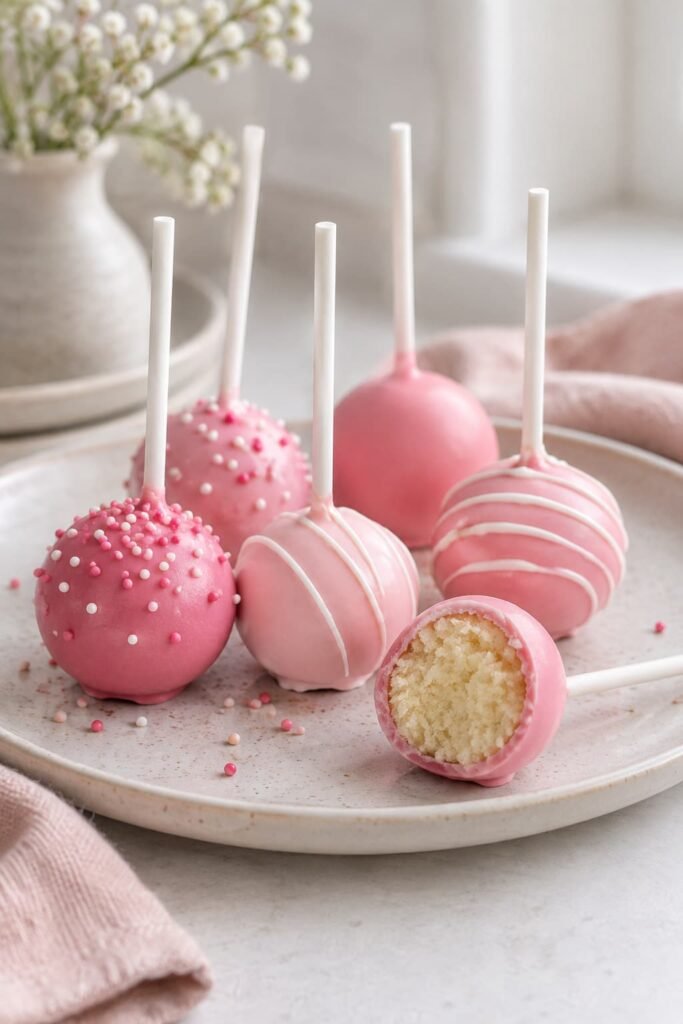
These pink cake pops combine a soft vanilla cake center with a smooth pink candy coating and a simple decorative finish. Each cake pop is small enough to serve easily at birthdays, baby showers, school events, and dessert tables without the need for plates or forks.
This easy pink cake pops recipe is suitable for beginners because it uses a simple bake, crumble, shape, chill, and dip method. No cake-pop mold or advanced decorating experience is required. You can finish the pops with white sprinkles for a classic look, add colorful confetti for birthday cake pops, or use a thin white drizzle for a cleaner party design.
You will also learn how to control the frosting, shape evenly sized cake balls, thin the coating correctly, and stop the pops from cracking or sliding off their sticks. The result is a practical party dessert with a moist vanilla center, a firm coating, and a neat finish that can be prepared ahead of time.
Quick Recipe Overview
| Recipe Detail | Information |
| Flavor | Vanilla cake with a sweet pink candy coating |
| Texture | Moist and tender inside with a firm outer coating |
| Difficulty | Beginner-friendly |
| Preparation Method | Bake, cool, crumble, mix, shape, chill, dip, and decorate |
| Special Equipment | Cake-pop sticks and a tall dipping cup |
| Best For | Birthdays, parties, baby showers, and dessert tables |
| Make-Ahead | Yes, the cake and shaped cake balls can be prepared before decorating |
| Yield | Add the final tested number of cake pops |
| Active Time | Add the final tested hands-on preparation time |
| Total Time | Add the final tested baking, cooling, chilling, and decorating time |
Why You Will Like These Pink Cake Pops

These homemade pink cake pops have a mild vanilla center that balances the sweeter pink candy coating. Their small size makes them easy to display, serve, and package individually for birthdays, baby showers, and other celebrations.
The recipe does not require a cake-pop mold or advanced decorating skills. Once the cake balls are shaped and chilled, you can keep the finish simple with white sprinkles or customize them with drizzle, edible pearls, confetti sprinkles, or different shades of pink.
Because the cake can be baked and the centers can be shaped in advance, most of the work does not need to be completed on the day of the event. The finished pops also fit neatly on dessert tables and can be wrapped individually as party favors.

Ingredients You Will Need
The vanilla cake used for these pink cake pops should be tender enough to crumble easily but not so moist that the shaped centers become greasy or difficult to hold on the sticks. Accurate measuring matters because too much flour can make the mixture dry, while too much fat or liquid can produce overly soft cake balls.
For the Vanilla Cake
All-purpose flour gives the cake enough structure to hold together after it is crumbled and mixed with frosting. Weigh the flour when possible. When using measuring cups, spoon it into the cup and level the top instead of scooping directly from the bag, which can compact the flour and add more than the recipe requires.
Baking powder provides a controlled rise and helps create a soft, even crumb. Fresh baking powder is important because an under-risen cake can become dense, while too much leavening may cause excessive rising, a coarse crumb, or an unpleasant aftertaste.
Salt reduces flat sweetness and makes the vanilla flavor more noticeable. Only a small amount is needed, but it helps balance both the cake and the sweet outer coating.
Unsalted butter adds richness and helps create a tender vanilla cake. It should be softened to cool room temperature so it blends evenly with the sugar. Butter that is melted or greasy can reduce the air incorporated during mixing and may produce a heavier cake.
Granulated sugar sweetens the cake and helps soften its crumb. When beaten with softened butter, it also helps incorporate air into the batter, giving the baked cake a lighter texture that crumbles evenly.
Egg binds the batter and contributes moisture and structure. A room-temperature egg blends more smoothly into the butter mixture and reduces the chance of the batter appearing curdled.
Pure vanilla extract provides the main flavor inside the cake pops. The vanilla should be noticeable enough to remain present after the cake is combined with frosting and dipped in the pink coating.
Milk adjusts the consistency of the batter and adds moisture without making the cake excessively rich. Use room-temperature milk so it combines evenly with the butter and egg mixture. The exact type and quantity should match the tested recipe.
For Binding the Cake Crumbs
Vanilla frosting helps the fine cake crumbs hold together so they can be shaped into firm, smooth balls. Only a small amount is usually needed because the baked cake already contains enough moisture and fat to bind once it is crumbled.
Add the frosting gradually rather than mixing in the full amount at once. After each addition, press a small portion of the mixture between your fingers. It should hold its shape without feeling wet, sticky, or greasy. If the crumbs still fall apart, mix in a little more frosting and test again.
The amount required can vary depending on how moist the cake is and how long it was baked. A slightly drier cake may need more frosting, while a soft, moist cake may need very little. Too much frosting can produce heavy cake balls that are difficult to dip and more likely to slide off the sticks.
For the Pink Coating and Decorations
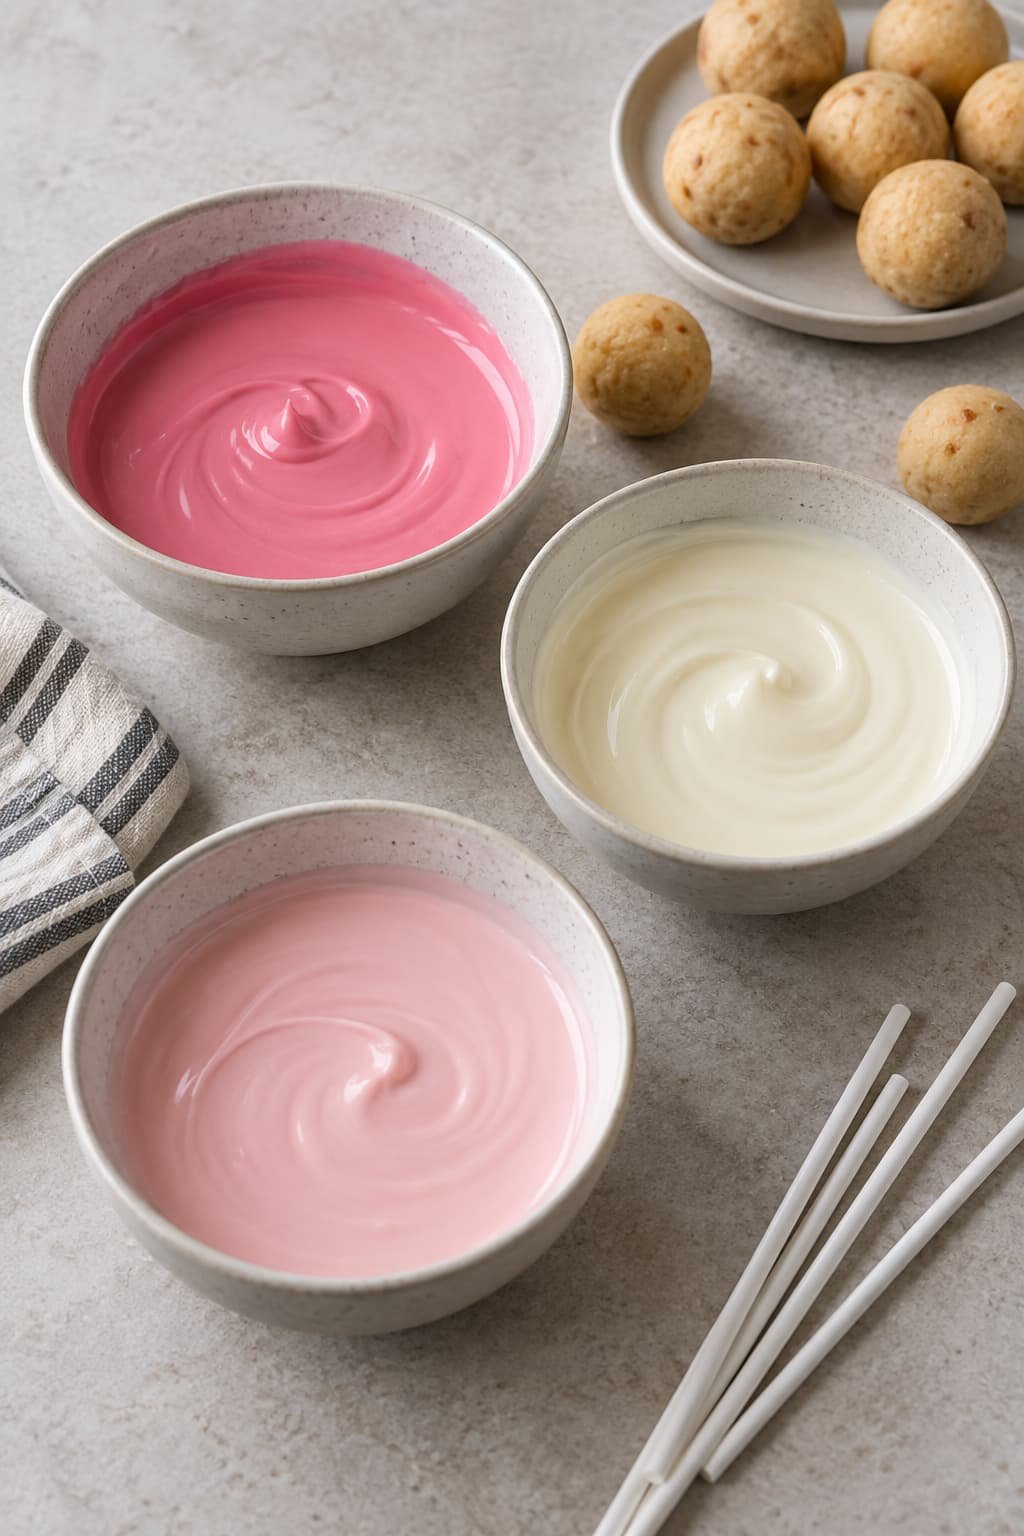
Pink candy melts form the smooth outer coating on the cake pops. They are useful for beginners because they do not require tempering and usually set into a firm finish at room temperature. Melt them in short intervals, stirring well between each one, to prevent overheating.
The coating should be fluid enough to cover a cake pop in one clean dip. If it falls from a spoon in a thick lump rather than a smooth ribbon, follow the package instructions and add a small amount of a compatible thinning ingredient. Refined coconut oil, vegetable shortening, or candy-coating thinning wafers may be suitable, but the best option depends on the product being used.
Add the thinning ingredient gradually. Too much can make the coating overly runny, slow to firm, or softer after setting.
White sprinkles create a simple contrast against the pink surface. Add them immediately after dipping while the coating is still wet. Fine sprinkles and small confetti pieces attach more easily than large, heavy decorations.
For a two-color finish, melt a small amount of white candy coating and drizzle it over the fully set pink layer. Candy coating and white chocolate are not the same product, so the ingredient should only be called white chocolate when it contains cocoa butter and is labeled as chocolate.

Equipment for Making Cake Pops
You do not need a cake-pop machine or professional decorating tools to make these pink cake pops. Basic baking equipment is enough, although a few well-chosen tools make portioning, dipping, and drying much easier.
Use medium mixing bowls for preparing the vanilla cake batter and combining the cooled crumbs with frosting. A separate microwave-safe bowl or cup is needed for melting the pink candy coating.
Bake the vanilla cake in the pan specified in the final recipe. The size and depth of the baking pan affect the baking time, crumb texture, and moisture level, so changing the pan may require adjustments.
A small cookie scoop or kitchen scale helps divide the cake mixture into equal portions. Consistent cake balls look neater, chill evenly, and are less likely to become too heavy for the sticks.
Arrange the shaped balls on a parchment-lined tray before chilling. The paper prevents sticking and allows each ball to be lifted without flattening or damaging its surface.
Use sturdy cake-pop sticks that fit comfortably in your hand and stand securely in the finished display. Dipping the end of each stick in melted coating before inserting it into the cake ball creates a small seal that helps keep the pop attached.
A tall, narrow dipping cup is one of the most useful tools for this recipe. Its depth allows the entire cake ball to be covered in one smooth dip. A wide, shallow bowl requires more coating and often forces you to roll the pop around, which can loosen it from the stick and create an uneven finish.
Place the dipped pops upright in a cake-pop stand until the coating becomes firm. A clean foam block or a sturdy cardboard box with evenly spaced holes can work as a substitute. Make sure the sticks remain upright and the coated cake pops do not touch one another.

How to Make Pink Cake Pops
The easiest way to make smooth, stable cake pops is to complete the recipe in separate stages. Allow the cake to cool fully, add the frosting gradually, shape equal portions, chill the centers until firm, and use one clean dipping motion. Careful temperature control and gentle handling reduce the risk of cracked coating, misshapen centers, and cake pops falling off their sticks.
Step 1: Bake and Cool the Vanilla Cake
Prepare the baking pan and preheat the oven according to the final tested recipe. Mix and bake the vanilla cake until the center is set and the top springs back lightly when touched. A tester inserted into the middle should show the doneness result established during testing.
Allow the cake to cool completely before crumbling it. Warm cake still contains trapped steam, which can make the crumb mixture too wet once frosting is added.
After the cake has cooled, check the outer edges. Trim only sections that are noticeably hard or dry. Soft edges can remain because they will blend into the rest of the crumbs.

Step 2: Crumble the Cake Finely
Break the cooled cake into smaller pieces and crumble them between your fingers until the texture is fine and even. There should be no hard pieces or large chunks remaining.
Fine crumbs absorb the frosting evenly and roll into smoother cake balls. Large pieces can leave bumps beneath the pink coating and make the centers more likely to crack while shaping.
A stand mixer on its lowest setting can be used, but hand crumbling gives you more control and reduces the chance of overworking the cake.
Step 3: Add the Vanilla Frosting Gradually
Add the tested starting amount of vanilla frosting to the crumbs and mix thoroughly. Press a small portion between your fingers before adding more.
The mixture should hold together easily without feeling wet, sticky, or greasy. If it breaks apart when pressed, add a small amount of frosting and test it again.
Avoid adding all the frosting at once. Too much binder creates heavy, overly soft centers that can slide down the sticks or fall apart during dipping. The finished mixture should feel like a firm, workable dough that rolls smoothly without leaving a greasy coating on your hands.

Step 4: Portion and Shape the Cake Balls
Divide the mixture with a small cookie scoop or kitchen scale, using the tested portion size for each pop. Equal portions produce a more consistent appearance and help every cake ball chill at the same rate.
Roll each portion gently between your palms until it is round and smooth. When cracks appear, press the mixture together and reshape it rather than squeezing it tightly.
Over-compressing the mixture can make the centers dense. Use only enough pressure to create a firm ball that holds its shape.
Arrange the finished balls on the parchment-lined tray with enough space between them for easy handling.
Step 5: Chill the Cake Balls Until Firm
Cover the tray and refrigerate the shaped cake balls for the tested chilling time. They should feel firm when lifted but should not be frozen solid.
Proper chilling helps the centers keep their shape during dipping. However, dipping extremely cold cake balls into warm coating can create a large temperature difference that may contribute to cracking.
If the cake balls have been frozen, move them to the refrigerator first and let their temperature balance before coating them. Keep their surfaces dry because condensation can prevent the candy coating from attaching smoothly.

Step 6: Attach the Cake-Pop Sticks
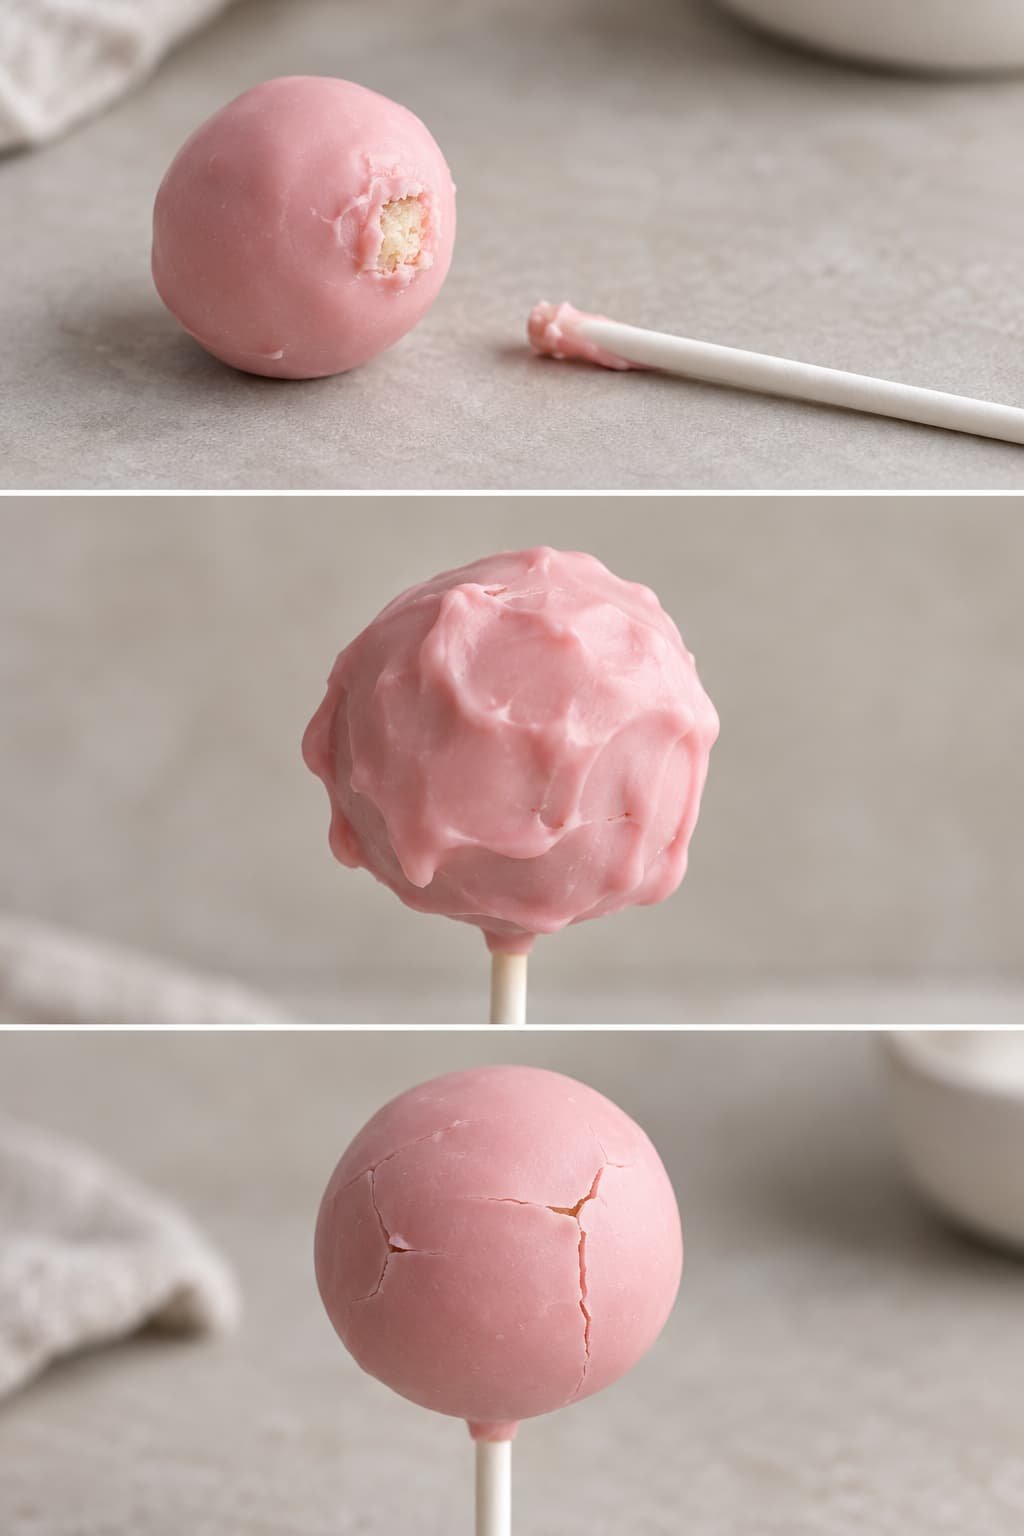
Melt a small amount of the pink coating. Dip about ½ inch of one end of each cake-pop stick into the melted coating, then insert it halfway into the center of a chilled cake ball.
Do not push the stick completely through the ball. The dipped coating should form a small ring around the insertion point and act as an edible adhesive.
Allow this seal to become firm before dipping the entire pop. If the attachment is still soft, the cake ball may rotate or pull away from the stick.

Step 7: Melt the Pink Candy Coating
Place the pink candy melts in a clean, dry microwave-safe cup. Heat them in short intervals, stirring thoroughly after each one. Stirring distributes the heat and helps the remaining pieces melt without overheating the coating.
The melted coating should flow from a spoon in a smooth ribbon rather than falling in thick clumps. When it is too thick, follow the package instructions and mix in a small amount of a compatible thinning ingredient.
Add the thinning ingredient gradually. Too much can make the coating runny, slow to firm, or softer after setting.
Do not add water, milk, or water-based coloring. Moisture can cause some candy coatings to thicken or seize.
Step 8: Dip the Pink Cake Pops
Transfer the melted coating to a tall, narrow cup deep enough to cover one cake ball completely. Hold the stick upright and lower the cake pop straight into the coating in one smooth motion.
Once the center is covered, lift it vertically from the cup. Avoid stirring, twisting, or repeatedly dipping the pop because unnecessary movement can weaken the attachment and create a thick, uneven layer.
Hold the pop over the cup and gently tap the hand holding the stick against your opposite wrist. Slowly rotate the pop while the excess coating falls back into the cup.
Do not strike the stick directly against the rim. A hard impact can loosen the center or cause it to fall off.
Step 9: Add Sprinkles or Drizzle
Add white sprinkles immediately after dipping while the pink coating is still wet. Work over a tray or bowl to collect the extra decorations.
Small sprinkles attach more easily than large or heavy pieces. Avoid placing too many decorations on one side, as their weight may pull through the soft coating.
For a two-color design, allow the pink layer to set completely. Melt the white candy coating separately, then apply a thin drizzle with a small piping bag, spoon, or fork.
Step 10: Allow the Cake Pops to Set
Place each finished pop upright in the prepared stand without allowing the coated surfaces to touch. Leave enough space around every cake pop so the shell can set without marks or dents.
Allow the coating to become fully firm before wrapping, moving, or serving the pops. Handling it too early can leave fingerprints or damage the smooth surface.
If the room is very warm, move the stand to a cooler, dry area. Avoid placing freshly dipped pops directly into an extremely cold environment, as rapid temperature changes can encourage condensation and may affect the finish.

How to Decorate Pink Cake Pops
Once the pink coating is in place, the cake pops can be finished in several simple ways for birthdays, baby showers, school events, and party favors. Prepare the sprinkles, drizzle, and other decorations before you begin so each finish can be added at the correct stage.
Sprinkles and pearls should usually be added while the coating is still wet or slightly tacky. Drizzle and piped details work better after the base layer has set.
Classic Pink Cake Pops with White Sprinkles
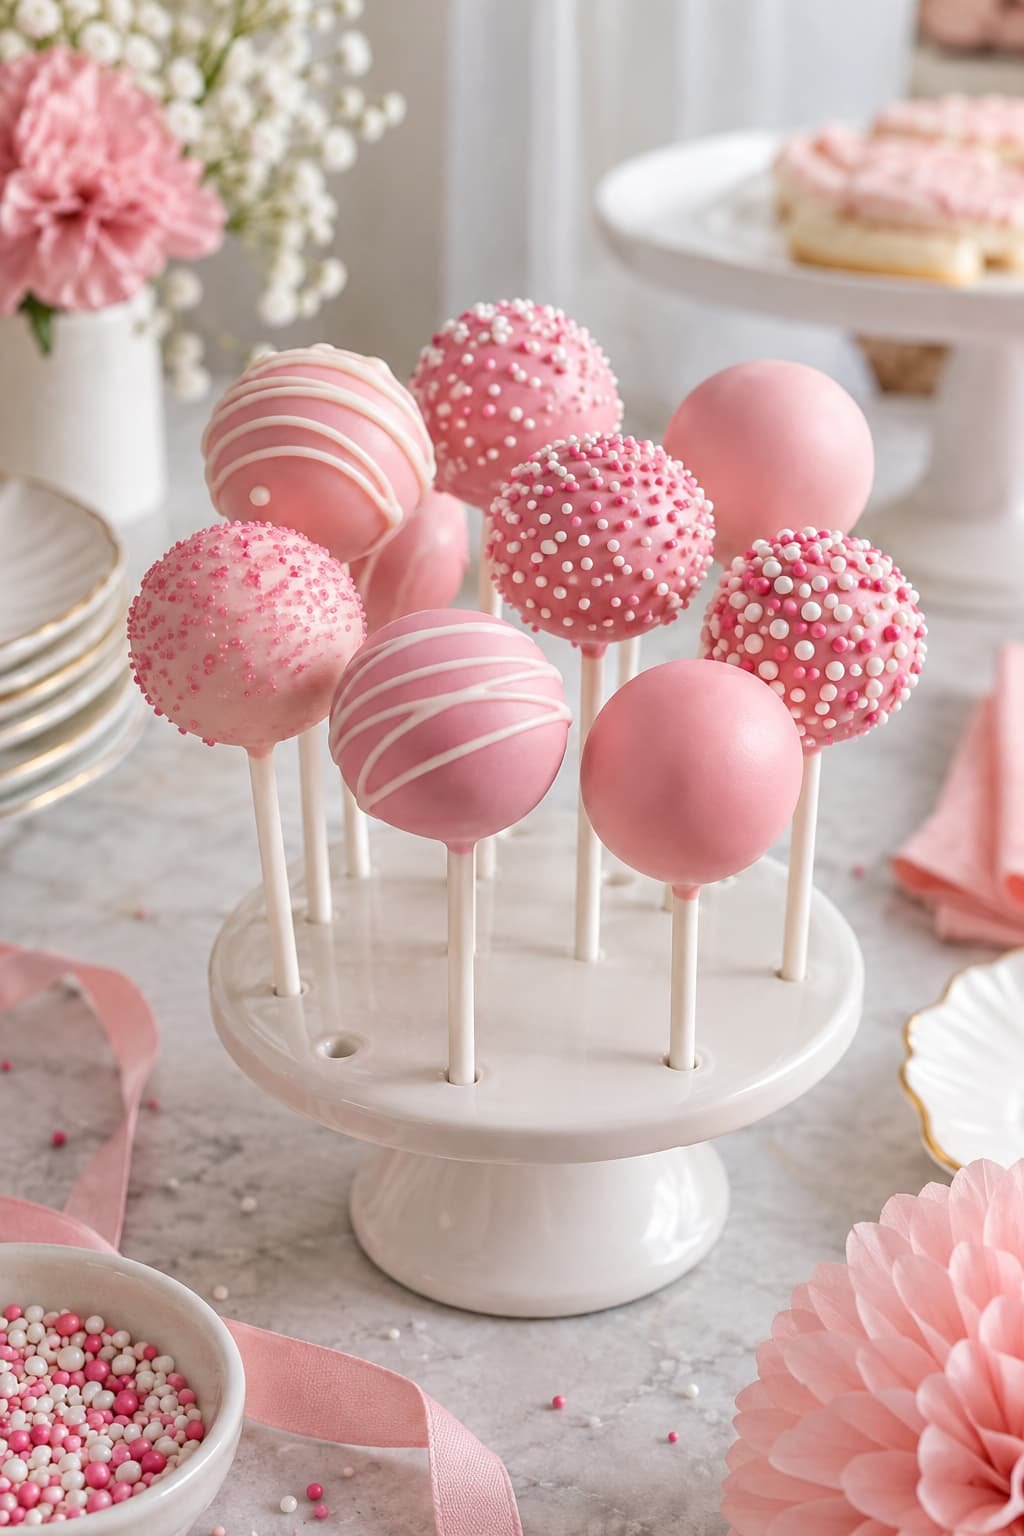
The simplest finish uses a smooth pink coating with a light layer of white sprinkles. This design is easy for beginners and creates a consistent look across a full batch.
Add the sprinkles immediately after dipping. Fine nonpareils, sanding sugar, or small confetti pieces attach more easily than large decorations. Applying them to the top or one side keeps the pink coating visible and gives the pops a cleaner finish.
Pink and White Drizzle Cake Pops
A thin white drizzle adds contrast without requiring advanced cake pop decorating skills. Let the pink coating set completely before applying the second color so the lines remain visible on the surface.
Transfer melted white candy coating to a small piping bag, spoon, or fork. Move it across each pop in thin passes while slowly rotating the stick. Allow the drizzle to firm before arranging or wrapping the finished pops.
Pink Birthday Cake Pops with Confetti Sprinkles
Colorful confetti sprinkles are an easy way to turn the basic recipe into pink birthday cake pops. Choose a sprinkle mix that matches the party colors and use the same blend across the batch for a more coordinated display.
Apply a light layer while the pink coating is wet. Too many sprinkles can hide the base color and add unnecessary sweetness, so a small amount is usually enough.
Elegant Pink Cake Pops with Edible Pearls
Edible pearls create a simple, polished design for baby showers, bridal showers, and formal parties. Place a small cluster near the top of each pop or arrange a narrow row around the center.
Because pearls are heavier than fine sprinkles, press them gently into the coating while it is still tacky. Use only a few on each pop so they remain secure and do not pull on the soft surface.
Cute Pink Bow Cake Pops
Pink bows are one of the more detailed cake pop designs and are best treated as an optional variation. They take longer to apply and require lighter decorations that will stay attached after the coating sets.
Small ready-made edible bows are the simplest option. Attach one near the top while the surface is still slightly soft, keeping the decoration proportional to the size of the pop. Large or heavy bows can make the cake pop lean or detach during storage.
For beginners exploring different cake pop decorating ideas, sprinkles and drizzle are the most reliable choices. Pearls and bows work well when a more decorative finish is needed, but they should remain simple enough for the cake pops to handle and display easily.
Important Cake Pop Decorating Tips
Clean cake pop decorating starts with properly sized centers, fluid coating, and a drying stand that is ready before dipping begins. Good preparation matters more than complicated decorations.
Keep the melted coating deep enough to cover one cake ball in a single dip. A tall, narrow cup works better than a wide bowl because it provides greater depth without requiring a large amount of coating. One smooth dip also reduces the risk of loosening the cake ball from the stick.
Sprinkles should be added immediately while the coating is still wet. For drizzle, wait until the pink base layer has set so the second color stays visible instead of blending into the surface.
When coloring plain candy coating, use an oil-based or fat-soluble color that is compatible with the product. Water-based coloring may cause candy melts to thicken or seize. Pre-colored pink candy melts do not need additional coloring.
Keep every cake ball close to the same size. Even portions chill consistently, coat more evenly, and place less strain on the sticks. Once the sticks are attached, handle the pops gently and avoid unnecessary turning, pressing, or repeated dipping.
Prepare the cake-pop stand before melting the coating. Each decorated pop should be placed upright as soon as the excess coating has drained away. This prevents dents, smudges, and freshly coated pops from touching one another.
Common Cake Pop Problems and Solutions
Most problems with an easy pink cake pops recipe come from an overly wet cake mixture, poorly balanced temperatures, or coating that is too thick. Use this table to identify the likely cause before attempting a fix.
| Problem | Likely Cause | Practical Fix |
| Cake pops fall off the sticks | Balls are too large, too wet, or not secured | Use smaller portions, reduce the frosting, and secure each stick with melted coating |
| Coating cracks | Centers are too cold compared with the coating | Let chilled cake balls sit until firm but not ice-cold, and avoid overheating the coating |
| Coating is too thick | It has cooled, was overheated, or is naturally thick | Stir well, warm cooled coating briefly, or add a compatible thinning ingredient |
| Cake pops look lumpy | Crumbs are too coarse or the balls were not smoothed | Crumble the cake finely and roll each portion until even |
| Oil leaks through the shell | The cake mixture contains too much frosting or fat | Reduce the binder and avoid adding excess fat to the center mixture |
| Sprinkles do not stick | The coating set before decorating | Add sprinkles immediately after dipping |
| Coating slides off | Moisture or condensation is present | Keep the cake balls dry and avoid dipping frozen or damp centers |
| Cake balls crack while rolling | The mixture is too dry or uneven | Break up large crumbs and add frosting in very small amounts |
| Pops lean in the stand | The centers are too heavy or sticks are off-center | Use equal portions and insert each stick straight into the middle |
| Coating pools near the stick | Too much coating remains after dipping | Tap gently and rotate until the excess drains back into the cup |
Cracking, falling, and thick coating are easier to prevent than repair. Consistent portion size, controlled frosting, dry cake balls, and fluid coating will solve most cake-pop problems before decorating begins.
Recipe Variations
The basic pink cake pops recipe can be adapted with different cake flavors, coatings, and serving styles. Keep the portions close to the original size so the centers remain easy to dip and the finished yield stays reasonably consistent.
Strawberry Pink Cake Pops
For a strawberry variation, mix finely ground freeze-dried strawberry powder into the cake crumbs or vanilla frosting. It adds concentrated berry flavor without the extra moisture found in fresh strawberries or fruit puree.
Add the powder gradually and mix well before adjusting the frosting. Because freeze-dried fruit can absorb moisture, the cake mixture may need a little more frosting to hold together smoothly. Test the texture by pressing a small portion in your hand before shaping the full batch.
A pale pink coating complements the strawberry flavor and helps distinguish these pops from the standard vanilla version. Add exact strawberry powder and frosting amounts only after testing the variation with the complete recipe.
Chocolate-Centered Pink Cake Pops
A chocolate cake center creates a richer contrast beneath the sweet pink coating. Use fully cooled chocolate cake with a soft, even crumb, then add chocolate or vanilla frosting gradually until the mixture holds together without becoming sticky or greasy.
The finished pops will look similar on the outside, but the dark center creates a noticeable contrast when they are cut or bitten open. Keep the same portion size used for the vanilla version so the cake pops remain stable on the sticks.
Pink Cake Pops Using Boxed Cake Mix
A boxed vanilla cake mix can be used as a shortcut. Bake it according to the package directions, cool it completely, and weigh the baked cake before crumbling. Use the same weight of cake required for the homemade version rather than assuming the entire box will match the recipe.
Boxed cakes can vary in moisture depending on the brand, pan, and baking time. Begin with less frosting than the homemade recipe requires, then add more only if the crumbs do not hold together when pressed.
The yield should stay close to the original recipe when the same cake weight and portion size are used. Before publication, include the tested baked-cake weight, starting frosting amount, and expected number of cake pops.
Cake Balls Without Sticks
The same centers can be prepared as vanilla cake balls without cake-pop sticks. Shape and chill the mixture as directed, then lower each ball into the melted coating with a dipping fork or regular fork.
Lift the coated ball, tap gently to remove the excess, and place it on parchment paper to set. A small flat base may form underneath, but the flavor and texture remain unchanged.
Cake balls are useful when you do not have a display stand or prefer a dessert that can be placed in small paper cases and arranged on a serving tray.
Different Pink Shades
The coating color can be adjusted to suit the event. Light pink works well for birthdays and baby showers, blush pink creates a softer finish, and bright pink gives the cake pops a bolder appearance.
The easiest method is to buy candy melts in the shade you need. For a lighter color, combine pink melts with white candy coating of the same type. For a deeper shade, add a small amount of concentrated oil-based or fat-soluble pink color.
Add color gradually and mix thoroughly before using more. Water-based food coloring can cause some candy coatings to thicken or seize, so check the product instructions before tinting.

Make-Ahead, Storage and Freezing Instructions
These pink cake pops are easy to prepare in stages, which can make party planning much less rushed. The baked cake, shaped centers, and decorated pops each need slightly different storage, so keep them covered and protected according to the stage you have completed.
The exact storage time should match the tested recipe, especially when the frosting contains ingredients that require refrigeration.
Making the Cake in Advance
Bake the vanilla cake and allow it to cool completely before storing it. Wrapping a warm cake traps steam, which can leave the crumb damp and change how much frosting is needed when the cake is crumbled.
Once cool, wrap the cake tightly or place it in an airtight container. Keeping the cake whole helps protect more of the crumb from drying out than storing it already broken apart.
Store the wrapped cake using the method and time confirmed for the final recipe. Before crumbling, make sure it is fully thawed when frozen and cool enough to handle without feeling damp or sticky.
Storing Undipped Cake Balls
Arrange the shaped cake balls on a parchment-lined tray and chill them until they are firm. Once set, transfer them to an airtight container, placing parchment between layers to prevent sticking or flattening.
For refrigerator storage, keep the container sealed so the centers do not absorb odors or form a dry outer surface. Use them within the refrigerated storage time confirmed during recipe testing.
To freeze the undipped centers, first place them on a tray until firm. Transfer them to a freezer-safe container or bag, remove as much excess air as possible, and keep the portions protected from pressure.
Thaw frozen cake balls in the refrigerator while they remain covered. Before dipping, they should be firm and dry but no longer frozen solid.
Storing Finished Cake Pops
Allow the pink coating and decorations to set completely before packing the finished pops. Moving or wrapping them too early can leave fingerprints, dents, or smudges on the surface.
Store the cake pops in an airtight container with enough space to stop the decorations from rubbing together. They may be kept upright when space allows, or laid carefully between sheets of parchment if the design is sturdy enough.
Keep the container away from direct sunlight, heat, and humidity. Warm conditions can soften the candy coating, while moisture may make the surface sticky or cause sprinkle colors to bleed.
The correct storage location depends on the frosting and decorations used. Cake pops made with ingredients that require refrigeration should remain chilled, even when the outer coating has set firmly.
Freezing Cake Pops
Undipped cake balls are usually easier to freeze than fully decorated pops because there is no finished coating to crack, dull, or collect moisture during thawing.
Fully coated cake pops should only be frozen when the exact cake, frosting, coating, and decorations have been tested successfully. Some candy coatings remain smooth after thawing, while others may develop condensation, fine cracks, or color changes.
When freezing finished pops, allow the coating to set completely first. Pack them in an airtight freezer-safe container and protect the decorated surfaces from pressure.
Move frozen cake pops to the refrigerator for gradual thawing. Avoid leaving them uncovered on the counter while still frozen, particularly when the filling or frosting requires cold storage.
Avoiding Condensation
Condensation forms when cold cake pops are exposed too quickly to warmer, humid air. It can make the coating sticky, dull the surface, soften decorations, or cause colors to run.
Thaw frozen pops in the refrigerator while the container remains sealed. Once thawed, let the closed container sit until it moves closer to room temperature before opening it.
This gradual temperature change allows most moisture to collect on the container instead of directly on the candy coating. Unwrap or display the cake pops only when the surface appears dry.
Do not dip cake balls that are visibly damp. Leave them covered in the refrigerator until the moisture has disappeared and the surface is dry enough for the coating to adhere properly.

How to Serve Pink Cake Pops at a Birthday Party
Arrange the finished pink cake pops in a sturdy cake-pop stand so the decorations remain visible and the coated surfaces do not touch. Space the sticks evenly and place the stand where guests can remove a pop without disturbing the rest of the display.
For a more organized birthday table, group the pops by shade or decoration. Light pink, blush, and bright pink pops can be arranged in separate sections, while sprinkle, drizzle, pearl, and bow designs can be displayed in small matching groups.
These birthday cake pops can also be wrapped individually in clear food-safe bags and tied near the stick. Allow the coating and decorations to set completely before wrapping so they do not smudge. Individually wrapped pops work well as party favors and are easier for guests to take home.
When serving more than one flavor, add a small label for each filling, such as vanilla, chocolate, or strawberry. Keep the party cake pops away from direct sunlight, warm windows, outdoor heat, and hot serving dishes. Excess heat can soften the candy coating, while humidity may leave the surface sticky or dull.
Frequently Asked Questions
Can I Make Pink Cake Pops Without Candy Melts?
Yes. Properly melted white chocolate can replace candy melts, but the two coatings behave differently. White chocolate may need tempering to produce a firm, smooth finish and should only be tinted with an oil-based or fat-soluble color.
Avoid water-based food coloring because even a small amount of moisture can cause melted white chocolate to thicken or seize.
Can I Use a Boxed Vanilla Cake Mix?
Yes. Bake the vanilla cake mix according to the package directions and allow it to cool completely. Use [tested weight] of baked cake rather than automatically using the entire cake.
Begin with [tested frosting amount] because boxed cakes can be softer and moister than homemade cake. Add more frosting only when the crumbs do not hold together when pressed. This amount should produce approximately [tested yield] cake pops when divided into equal portions.
How Much Frosting Should I Add to Cake Pops?
Start with [tested amount] of vanilla frosting for [tested weight] of cake crumbs. Mix thoroughly before adding more.
The mixture should hold together when pressed and roll into a smooth ball without feeling wet, sticky, shiny, or greasy. Too much frosting can make the centers heavy and more likely to slide from the sticks.
Why Are My Cake Pops Falling Off the Stick?
Cake pops usually fall off because the balls are too large, the mixture contains too much frosting, or the sticks were not secured properly.
Keep each portion close to [tested weight or scoop size]. Dip about ½ inch of the stick into melted coating, insert it halfway into the cake ball, and allow the seal to firm before dipping the entire pop.
Why Did My Pink Cake Pops Crack?
Pink cake pops often crack when very cold centers are dipped into much warmer coating. The temperature difference can cause the center to expand beneath the firm outer layer.
Let chilled cake balls sit for [tested resting time] before dipping so they remain firm but are no longer ice-cold. Thick or overheated coating can also contribute to cracking, so keep it fluid and warm rather than excessively hot.
How Do I Thin Candy Melts for Cake Pops?
Use a thinning ingredient recommended for the candy coating, such as candy-coating thinning wafers, vegetable shortening, or refined coconut oil.
Begin with [tested amount] per [tested coating quantity], stir completely, and add more only when necessary. The coating should fall from a spoon in a smooth ribbon. Too much thinning fat can make it runny, slow to set, or soft after firming.
How Long Should Cake Pops Chill Before Dipping?
Chill the shaped cake balls for [tested chilling time]. They should feel firm when lifted and hold their shape on the stick, but they should not be frozen solid.
If they become extremely cold, allow them to rest for [tested resting time] before dipping to reduce the temperature difference between the center and coating.
Can I Make Cake Pops Without Sticks?
Yes. Shape and chill the same centers, then dip them with a fork or dipping tool. Once coated, they are usually called cake balls.
Place them on parchment paper to set. They may develop a small flat base underneath, but the flavor and texture remain the same.
How Far Ahead Can I Make Cake Pops for a Party?
The baked cake can be prepared [tested time] in advance and stored tightly wrapped once completely cool. Undipped cake balls can be refrigerated for [tested time] or frozen for [tested time] in an airtight container.
Finished cake pops can be prepared [tested time] before serving when stored according to the frosting and coating used. Wrap them only after the coating and decorations have set completely.
Can I Freeze Pink Cake Pops?
Undipped cake balls are the easiest stage to freeze. Store them in an airtight freezer-safe container for [tested freezing time], then thaw them gradually in the refrigerator while covered.
Finished coated pops should only be frozen when the exact coating and decorations have been tested successfully. Some finishes may crack, become dull, or collect condensation after thawing.
What Is the Best Cake Flavor for Pink Cake Pops?
Vanilla is the classic choice because its mild flavor pairs well with the sweet pink coating and its pale center creates a clean appearance.
Chocolate produces a richer contrast, while strawberry adds a fruitier flavor that suits the pink theme. Whichever flavor you choose, the cake should have an even crumb and should not be so moist that the shaped centers become greasy or unstable.