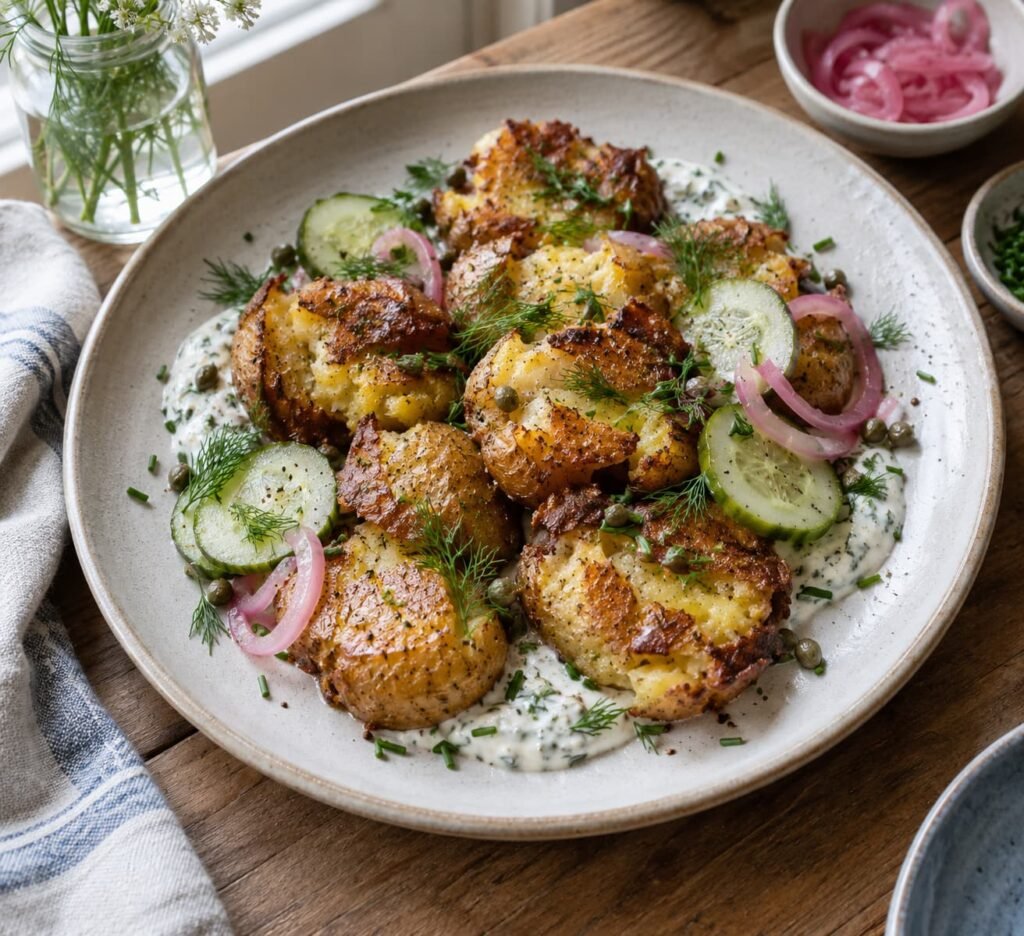
This easy crispy potato salad gives the classic side dish a more interesting mix of textures. Instead of soft potatoes coated completely in mayonnaise, this version uses smashed baby potatoes with deeply golden edges, crisp ridges, and tender, fluffy centers.
The potatoes are paired with a creamy dill-pickle herb dressing made with fresh herbs, Dijon mustard, lemon, and finely chopped pickles. Its tangy flavor balances the richness of the roasted potatoes without covering every crunchy surface.
This crispy smashed potato salad is a practical side dish for summer barbecues, picnics, potlucks, family dinners, and relaxed weekend meals. It feels familiar enough for traditional potato salad fans, but the roasted texture makes it noticeably different. Some bites are creamy and tangy, while others remain warm, crisp, and deeply browned.
What Is Crispy Potato Salad?
Crispy potato salad is made by boiling small potatoes until fork-tender, gently flattening them, and roasting them until the rough edges turn golden and crisp. After cooling briefly, the potatoes are served with a thick, creamy dressing. Adding the dressing selectively instead of fully coating every potato helps preserve more crispness at serving time.

Ingredients You Will Need
This recipe has two main parts: seasoned baby potatoes that become crisp in the oven and a thick dill-pickle dressing that adds creaminess, acidity, and fresh herb flavor. The ingredients are simple, but each one affects the final texture and balance of the salad.
Baby Potatoes and Seasonings
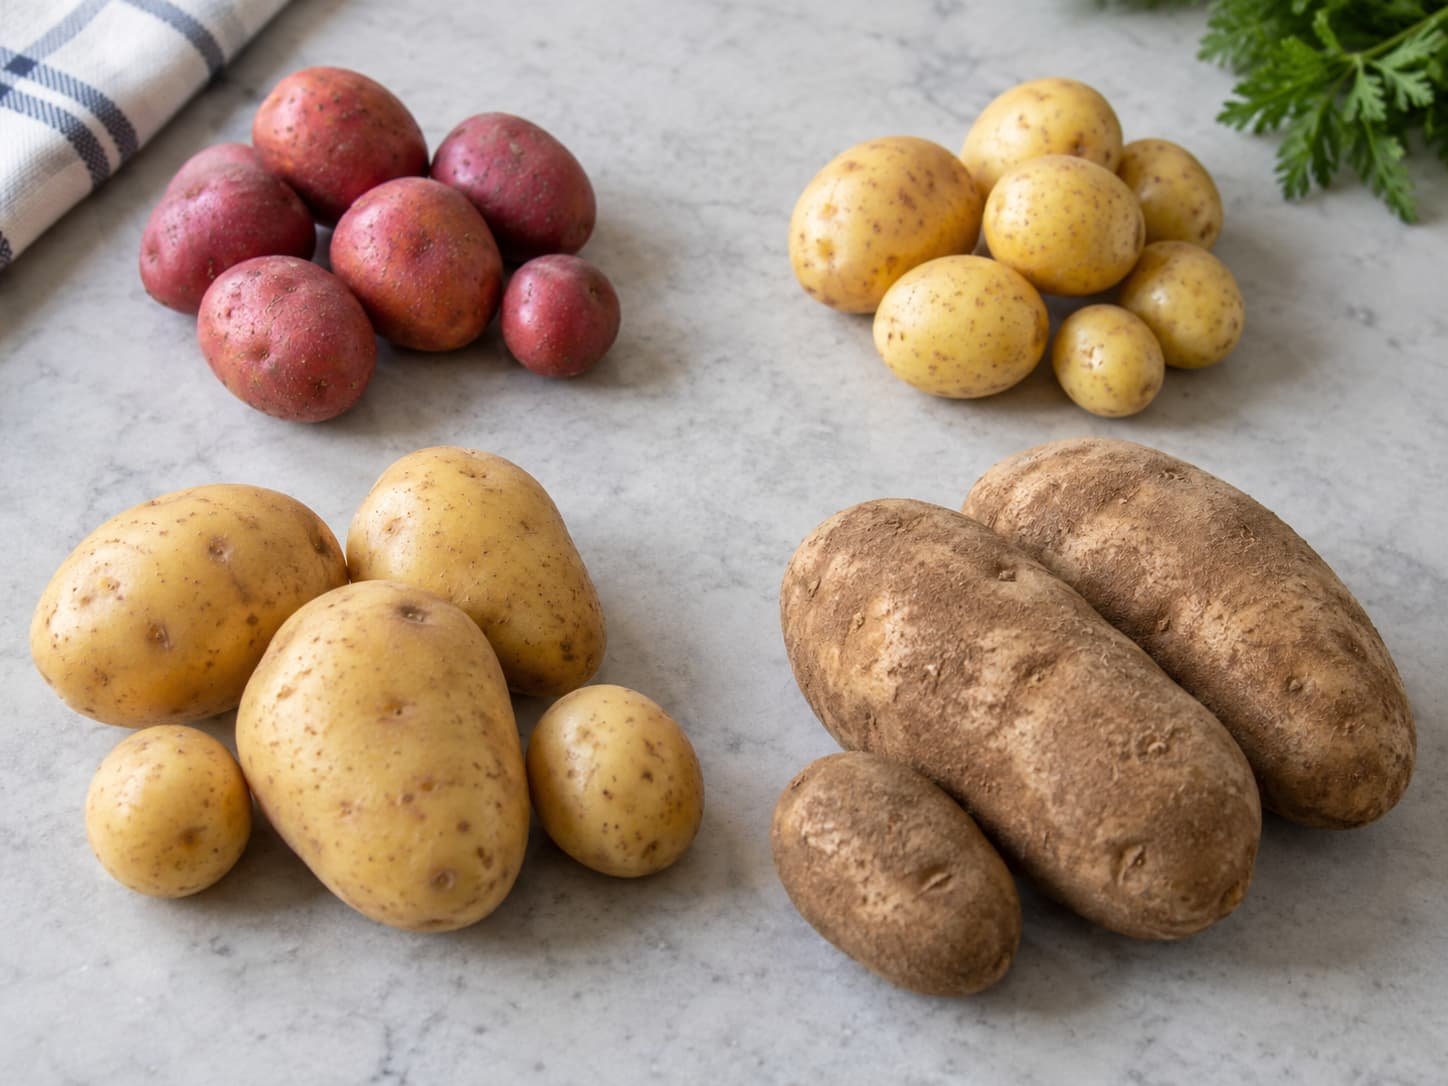
Baby Yukon Gold potatoes work especially well because their thin skins crisp easily while their creamy flesh stays tender after roasting. They are also sturdy enough to hold together when boiled and gently pressed.
Baby red potatoes are a good alternative. They have a slightly firmer texture and usually keep their shape well, although the centers may be less creamy than Yukon Gold potatoes.
Olive oil helps the rough edges and exposed surfaces brown evenly. The potatoes should be lightly coated rather than sitting in excess oil, which can make them feel greasy instead of crisp.
Garlic powder adds savory flavor without leaving small pieces that may burn. Fresh chopped or grated garlic is less reliable during a long roast at high heat because it can darken before the potatoes are fully browned and may develop a bitter taste.
Smoked paprika adds warm color and a mild smoky note. Use it lightly so it supports the roasted flavor without competing with the dill, pickle, and lemon in the dressing.
Salt seasons the potatoes from the outside, while black pepper adds a gentle sharpness. Seasoning before roasting is important because the dressing will not fully cover every crisp surface.
Creamy Dill Pickle Dressing
The crispy potato salad dressing should be thick enough to cling to the potatoes without quickly soaking into every roasted edge. Greek yogurt and mayonnaise create a useful balance between tanginess, richness, and body.
Greek yogurt keeps the dressing fresh and slightly sharp, while mayonnaise gives it a smoother texture and helps it coat the potatoes more evenly. Using both prevents the dressing from tasting too heavy or too sour.
Dijon mustard adds sharpness and balances the richness of the creamy ingredients. Lemon juice provides fresh acidity, while pickle brine deepens the dill-pickle flavor. Add the brine gradually because its saltiness varies between brands and too much can make the dressing thin.
Finely chopped dill pickles add small bursts of crunch and reinforce the tangy flavor throughout the salad. Fresh dill gives the dressing its main herbal note, while chives add a milder onion flavor.
Finely diced red onion is optional. When used, it should be cut very small so it does not overpower the herbs. Rinsing the chopped onion briefly under cold water can soften its sharpness.
The finished creamy herb dressing should taste tangy, fresh, and lightly salty. It should be thick enough to sit on the potatoes rather than run to the bottom of the serving dish.
What Potatoes Are Best for Crispy Smashed Potato Salad?
Baby Yukon Gold potatoes are the preferred choice for crispy smashed potato salad because they combine creamy flesh with thin skins and a structure that holds up well during boiling, smashing, and roasting.
Baby red potatoes are the next-best option. They remain firm, keep their shape reliably, and work well when Yukon Gold potatoes are unavailable. Their texture is slightly waxier, but they still produce a good smashed potato salad.
Large russet potatoes are less reliable for this method. Their floury flesh can crack or crumble after boiling and pressing, especially when the pieces are too large or overcooked. They are better suited to baked, mashed, or fluffy potato dishes than a salad built around whole smashed pieces.
Whichever variety you choose, select potatoes that are close to the same size. Similar-sized potatoes cook at a more even rate, reducing the chance that some remain firm while others become too soft to smash properly.
Quick Recipe Facts
| Recipe detail | Information |
| Total time | About 1 hour |
| Yield | 6 servings |
| Oven temperature | 425°F or 220°C |
| Best potato type | Baby Yukon Gold potatoes |
| Serving temperature | Warm or room temperature |
Why This Crispy Potato Salad Recipe Works
A successful crispy potato salad recipe depends on moisture control, proper potato texture, and careful assembly. Boiling creates tender centers, smashing forms thin edges that brown well, steam-drying removes excess surface water, and partial dressing helps preserve more crispness when the salad is served.
Each step solves a different texture problem. Skipping the drying stage can leave the potatoes pale, while overcrowding the baking sheet can cause them to steam instead of roast. Adding too much dressing too early can also soften the crisp edges before the salad reaches the table.
Boiling Creates Tender, Creamy Centers
Boiling cooks the potatoes through before roasting, allowing the centers to become tender and creamy while the outside later develops a crisp surface.
The potatoes are ready when a fork slides easily into the center but the skins and flesh still hold together. They should feel soft enough to flatten gently without requiring much pressure.
Undercooked potatoes are difficult to smash and may split unevenly. Overcooked potatoes can collapse, stick to the glass or pressing tool, or break into small pieces before roasting. Cooking them only until fork-tender gives the potatoes enough structure to hold their shape while keeping the centers soft.
Smashing Creates More Surface Area for Browning
Whole baby potatoes have smooth, rounded skins, so only a small part of each potato rests against the baking sheet. Gently flattening them creates cracks, ridges, and thin exposed edges.
These uneven surfaces hold a light coating of oil more effectively and lose moisture faster during roasting. The thinner edges become deeply golden and crisp, while the thicker center remains tender.
This contrast is what makes a potato salad with crispy potatoes different from a classic boiled version. Instead of having one uniformly soft texture, each serving contains creamy centers, crisp ridges, and browned edges.
Steam-Drying Helps the Potatoes Crisp
Freshly drained potatoes still carry moisture on their skins. If they are smashed and roasted immediately, that water turns into steam and slows the browning process.
Let the potatoes rest uncovered for several minutes after draining. Their surfaces should look dry rather than wet or glossy before the oil and seasonings are added.
A dry surface begins roasting sooner and allows the oil to coat the potatoes more evenly. Even properly dried potatoes can remain soft if they are crowded together, so leave enough space between them on the baking sheet. Use a second sheet if needed rather than forcing the entire batch onto one pan.
Partial Dressing Preserves More Crispness
Freshly roasted potatoes soften quickly when they are tossed completely in a large bowl of creamy dressing. The dressing settles into the cracks and coats the thin edges that became crisp in the oven.
A better method is to spread some of the dressing across the serving platter, arrange the warm potatoes over it, and spoon a smaller amount over selected areas. This gives each serving enough creamy, tangy flavor while leaving some browned surfaces exposed.
The potatoes will gradually soften as the salad sits, so the best texture comes from serving it soon after assembly. Partial dressing will not keep the potatoes crisp indefinitely, but it preserves more golden edges and creates a better balance between the roasted potatoes and creamy dressing.

How to Make Crispy Potato Salad
Learning how to make crispy potato salad comes down to three things: removing excess moisture, creating rough edges for browning, and adding the dressing without covering every crisp surface. The method is straightforward, but the order of the steps matters.
Preheat the oven to 425°F or 220°C before the potatoes finish boiling. Line one or two large baking sheets with parchment paper, or lightly grease them if you prefer stronger contact browning.
Step 1: Boil the Baby Potatoes
Place the baby potatoes in a large pot and cover them with cold water by about 1 inch. Starting with cold water allows the centers and outer layers to cook at a more even rate.
Add the salt listed in the recipe card, then bring the water to a gentle simmer over medium-high heat. Once simmering, reduce the heat slightly and cook the potatoes for about 15 to 20 minutes, depending on their size.
The potatoes are ready when a fork slides easily into the center but the skins and flesh still hold together. A few small wrinkles are normal, but avoid cooking them until the skins split badly or the potatoes begin falling apart.
Undercooked potatoes resist pressure and may break unevenly. Overcooked potatoes can collapse when smashed and become difficult to move onto the baking sheet.

Step 2: Drain and Steam-Dry
Drain the potatoes thoroughly in a colander. Leave them uncovered for about 5 to 8 minutes, or until the skins look dry rather than wet and glossy.
Do not rinse them after boiling. Water left on the surface turns into steam in the oven and delays browning. A dry potato also holds oil and seasoning more evenly.
Step 3: Smash the Potatoes
Arrange the dried potatoes on the prepared baking sheet, leaving enough room between them to spread as they are flattened.
Use the flat bottom of a drinking glass, measuring cup, or small jar to press each potato gently. Flatten it until it is wider and lower, but still mostly intact.
Do not press the potatoes into smooth, paper-thin disks. Uneven cracks, rough ridges, and thin edges are useful because these areas lose moisture quickly and become the crispiest parts during roasting.
Press slowly to avoid breaking the potatoes apart. When one splits, leave the pieces close together and roast them as they are rather than trying to force them back into shape.

Step 4: Season and Roast Until Crispy
Drizzle the smashed potatoes with olive oil, then gently spread it over the tops, exposed edges, and cracked surfaces. Season evenly with garlic powder, smoked paprika, salt, and black pepper.
Leave visible space around each potato. If the full batch does not fit comfortably on one tray, divide it between two baking sheets. Crowded potatoes trap steam and remain softer.
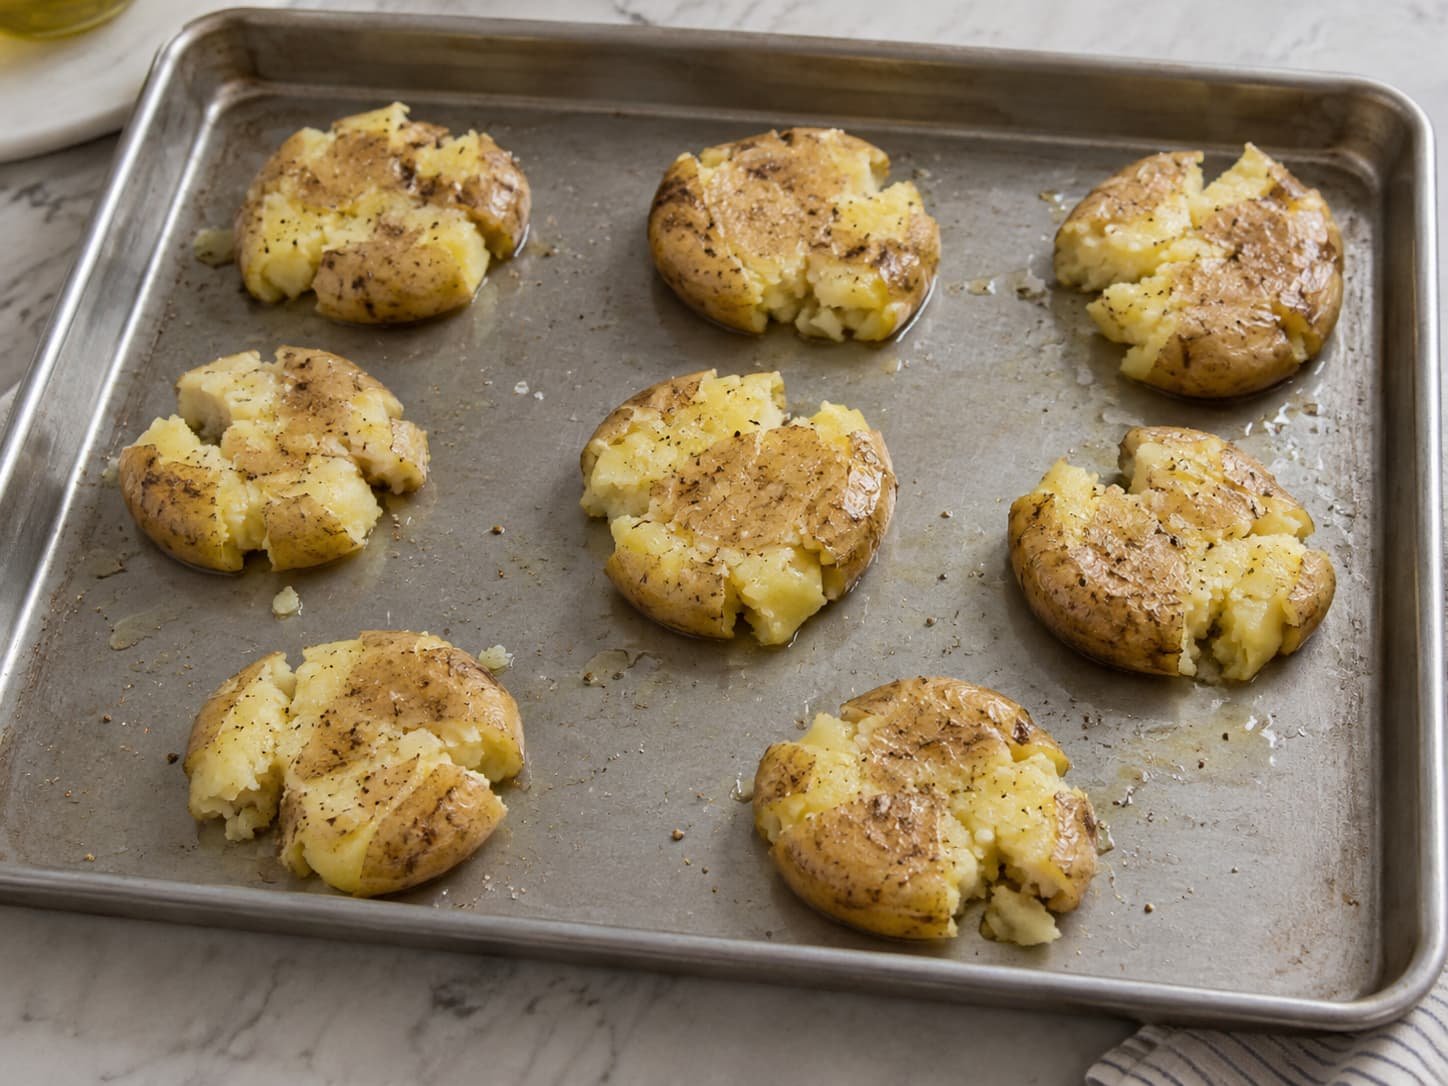
Roast for approximately 30 to 40 minutes, or until the thin edges are deeply golden and the bottoms feel firm. Oven performance, potato size, tray material, and spacing can affect the exact cooking time, so rely on color and texture as well as the clock.
The potatoes are ready when the ridges are crisp and browned while the thicker centers remain tender. That contrast gives this crispy roasted potato salad its distinctive texture.

Step 5: Make the Dressing
While the potatoes roast, prepare the dressing in a medium bowl. Stir together the Greek yogurt, mayonnaise, Dijon mustard, chopped dill pickles, fresh dill, and chives until smooth.
Add the lemon juice and pickle brine gradually, stirring after each addition. Pickle brine varies in saltiness, and too much liquid can make the dressing thin.
The finished dressing should be thick enough to cling to a spoon rather than run off immediately. Taste it before adding more salt because the mustard, mayonnaise, pickles, and brine may already provide enough seasoning.
The creamy, tangy dressing balances the roasted potatoes without covering their flavor or texture.

Step 6: Cool and Assemble
Remove the potatoes from the oven and let them cool on the baking sheet for 8 to 10 minutes, or until they are warm but no longer releasing strong steam.
Before assembling, set aside a few of the crispiest pieces for the top. Spread part of the dressing across the base of a serving platter, then arrange the remaining warm potatoes over it.
Spoon or drizzle a smaller amount of dressing over selected areas rather than tossing every potato in the bowl. Leaving some surfaces uncovered preserves more of the crisp texture.
Add the reserved potato pieces on top, then finish with extra dill, chives, black pepper, or finely chopped pickles. Serve the crispy smashed potato salad warm or at room temperature, preferably soon after assembly.
How to Keep the Potatoes Crispy
Crispy potatoes will gradually soften once they are combined with dressing, but the right preparation and serving method can preserve more texture.
After boiling, drain the potatoes thoroughly and leave them uncovered until the skins look dry rather than wet or glossy. Surface moisture turns into steam in the oven, which slows browning and keeps the edges soft.
Give the smashed potatoes enough room on the baking sheet. When they sit too close together, moisture becomes trapped between them and they steam instead of roast. Use a second tray when necessary rather than crowding the entire batch onto one pan.
Coat the cracks, ridges, and raised edges with a light, even layer of olive oil. Too little oil can leave the potatoes dry and pale, while too much can make the surface greasy. The goal is to cover the exposed areas without allowing oil to pool around them.
Do not remove the potatoes from the oven as soon as they are tender. The thin edges should be deeply browned and feel firm when lifted with a spatula. Pale potatoes may be cooked through, but they usually have not roasted long enough to become properly crisp.
Let the potatoes cool briefly before adding the dressing. They should remain warm, but strong steam should no longer rise from the surface. Heavy steam can loosen the dressing and soften the crust more quickly.
Use a thick dressing that clings to the potatoes instead of running into every crack. Assemble the salad shortly before serving, and set aside a few completely undressed potato pieces for the top. These pieces add extra crunch after the dressed potatoes begin to soften.
Why Are My Smashed Potatoes Not Crispy?
Smashed potatoes usually stay soft because they contain too much surface moisture, are packed too closely on the tray, or do not have a light, even coating of oil.
Low oven heat and insufficient roasting time can also prevent proper browning. The potatoes should not leave the oven while the edges are still pale. Roast until the ridges are deeply golden, the bottoms feel firm, and the centers remain tender.
Adding dressing while the potatoes are extremely hot is another common problem. Strong steam quickly softens the surface and can thin a yogurt or mayonnaise-based dressing. Allow the potatoes to cool briefly, then add the dressing shortly before serving.
Oven and Air Fryer Instructions
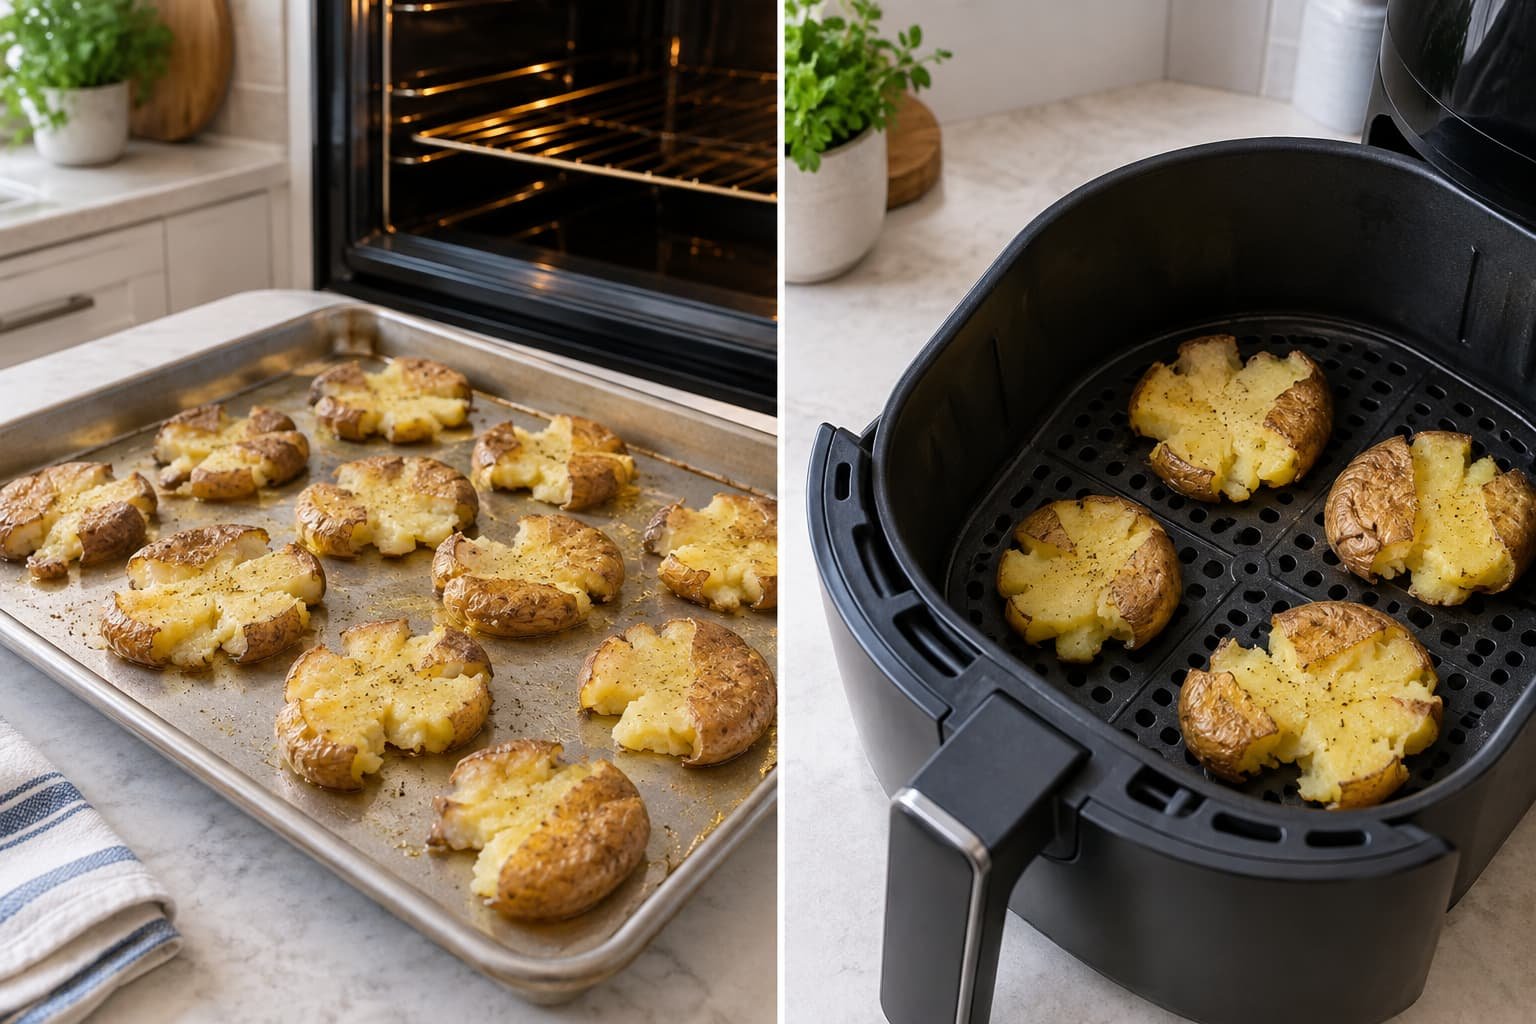
Both methods can produce crisp smashed potatoes, but the oven is more practical for a full batch, while the air fryer works best for smaller portions or reheating.
Oven Method
The oven is the better choice for a six-serving batch because large baking sheets provide enough space to arrange the potatoes in a single layer.
This method is especially convenient for barbecues, picnics, potlucks, and family meals because more potatoes can roast at the same time. When one tray becomes crowded, divide the potatoes between two baking sheets so they brown evenly.
Air Fryer Method
For an air fryer crispy potato salad, cook the smashed potatoes in small batches and arrange them in a single layer. Leave visible space around each piece so the hot air can circulate across the ridges and edges.
Air fryers vary in size and heating strength, so begin checking the potatoes earlier than you would with the oven method. Remove them when the edges are deeply browned and the bottoms feel crisp rather than relying only on a fixed cooking time.
The air fryer is best for a smaller salad because several batches may take longer than roasting one large tray in the oven. It is also useful for reheating potatoes that were stored separately from the dressing. Reheat until the edges become crisp again, cool briefly, and assemble the salad just before serving.
Easy Recipe Variations
These four variations change the dressing or final toppings without altering the basic roasted potato method. Keep the potatoes crisp and well seasoned, then adjust the finishing ingredients to suit the flavor you want.
No-Mayo Crispy Potato Salad
For a no-mayo crispy potato salad, replace the mayonnaise with additional thick, strained Greek yogurt. The dressing will be lighter, tangier, and less rich than the original version, but it should still cling well when the yogurt is properly strained.
Add the lemon juice and pickle brine gradually. Yogurt-based dressings can loosen quickly, especially when the pickles release extra moisture.
Taste before adding more salt because Greek yogurt, mustard, and pickle brine can create a sharper flavor than a mayonnaise-based dressing.
Vegan Crispy Potato Salad
To make vegan crispy potato salad, use plain unsweetened plant-based yogurt and vegan mayonnaise. A strained-style soy or oat yogurt usually works better than a thin or sweetened variety because the dressing needs enough body to sit on the potatoes.
Check the labels on the mayonnaise, Dijon mustard, pickles, and other prepared ingredients. Look for non-vegan additions such as egg, dairy, honey, or animal-derived flavorings.
The finished dressing should remain thick and neutral enough to carry the dill, lemon, mustard, and pickle flavors without adding sweetness.
Crispy Potato Salad with Bacon
For a smoky, savory version, add cooked bacon shortly before serving. Cook it until crisp, drain away the excess fat, and chop it into small pieces.
Sprinkle the bacon over the assembled salad instead of mixing it into the dressing. This keeps it crisp and prevents the creamy sauce from becoming greasy.
Because bacon adds both salt and smoke, taste the dressing before adding extra seasoning. This variation pairs especially well with burgers, grilled chicken, and barbecue dishes.
Spicy Crispy Potato Salad
For a spicy crispy potato salad, use chili flakes, hot sauce, or a small amount of chili oil.
Chili flakes can be added to the potato seasoning before roasting for a dry, even heat. Hot sauce works best stirred into the dressing because it adds both spice and acidity. Chili oil is better used sparingly as a finishing drizzle so it does not make the dressing too loose.
Start with a small amount, taste, and increase the heat gradually. The spice should support the dill-pickle flavor rather than cover it.
Honey mustard, Buffalo-style, gochujang, and feta versions would each create a noticeably different flavor profile. They are better developed as separate recipes rather than compressed into one short variation section.

What to Serve with Crispy Potato Salad
Crispy potato salad pairs best with grilled meats, seafood, sandwiches, and vegetable-based meals. Its creamy dill-pickle dressing adds a fresh, tangy contrast to rich or smoky main dishes.
Grilled chicken is one of the easiest options because the dressing balances the savory flavor of the meat without competing with it. Burgers and BBQ beef also work well, especially when served with simple cookout sides.
For a lighter meal, serve the salad with crispy fish, roasted vegetables, or a fresh green salad. The creamy dressing adds enough richness to make fish or vegetables feel more satisfying without requiring another heavy side dish.
Grilled corn is a natural summer pairing, while sandwiches and wraps make the salad practical for picnics and casual lunches.
Served warm or at room temperature, it works well as a BBQ potato salad, summer potato salad, picnic side dish, or cookout side dish.
Make-Ahead Instructions
The best way to prepare this salad ahead is to keep the potatoes and dressing separate until shortly before serving.
The dressing can be prepared up to one day in advance and stored in an airtight container in the refrigerator. Stir it well before using because the lemon juice and pickle brine may separate slightly as it rests.
The potatoes can also be boiled and smashed earlier in the day. Once completely cool, arrange them in a single layer on a tray or in a large covered container and refrigerate them until you are ready to roast.
For the best texture, roast the potatoes close to serving time. This produces better results than roasting, dressing, and refrigerating the finished salad for several hours.
If the potatoes were roasted earlier, reheat them in the oven or air fryer until the edges feel firm and crisp again. Let them cool briefly before adding the dressing so rising steam does not thin the sauce or soften the surface too quickly.
A fully assembled salad can be refrigerated, but the potatoes will gradually absorb moisture from the dressing and lose some of their crisp texture. The flavor remains similar, but the contrast between the creamy dressing and roasted edges will be less noticeable.
Because the dressing contains yogurt and mayonnaise, keep the salad chilled until close to serving time and return leftovers to the refrigerator promptly.

Storage and Reheating
Crispy potato salad has its best texture when freshly assembled. Leftovers can be refrigerated, but the potatoes will gradually absorb moisture from the dressing and become softer.
Refrigerator Storage
Transfer leftovers to an airtight container and refrigerate them promptly. Store the salad for up to three days only if it was handled properly and was not left at room temperature for an extended period.
Expect the roasted edges to soften during storage. The salad may still be enjoyable, but it will not have the same contrast as a freshly assembled batch.
When possible, keep extra roasted potatoes and dressing in separate containers. This makes the potatoes easier to reheat and gives you a better chance of restoring some firmness before serving.
For picnics, barbecues, and outdoor meals, keep the salad chilled until close to serving time. Do not save leftovers that have remained warm for an unsafe length of time.
How to Reheat Crispy Potato Salad
Potatoes stored separately from the dressing are the easiest to reheat. Arrange them in a single layer in the oven or air fryer and warm them until they are hot throughout and the edges feel firmer.
If the potatoes are only lightly dressed, move them to a separate tray and remove any loose excess dressing where practical. Heating a large amount of yogurt or mayonnaise-based dressing can cause it to loosen, separate, or develop an uneven texture.
Avoid overcrowding during reheating because trapped moisture will keep the potatoes soft. Once heated, let them cool briefly before adding fresh or reserved dressing.
Fully dressed leftovers will not return to their original crisp texture. They can still be warmed, but the potatoes will remain softer than freshly roasted ones.
A microwave is the quickest option, but it will make the potatoes soft rather than crisp. Use it only when speed matters more than texture.
Can You Freeze Crispy Potato Salad?
Freezing the assembled salad is not recommended. Cooked potatoes can become grainy, watery, or crumbly after thawing, while dressings made with yogurt or mayonnaise may separate.
For better results, prepare the components ahead and refrigerate them separately. Freezing individual parts should only be recommended after the method has been tested, since the texture can vary after thawing.
Frequently Asked Questions
Is crispy potato salad served hot or cold?
Crispy potato salad is best served warm or at room temperature. Slightly warm potatoes give the best contrast between the roasted edges and creamy dressing. Once fully chilled, the potatoes become softer and lose more of their crisp texture.
Do I have to boil potatoes before smashing them?
Yes. Boiling softens the centers and makes the potatoes easy to flatten without using excessive pressure. Raw potatoes are too firm to smash cleanly and would require a different cooking method.
Can I make crispy potato salad ahead of time?
Yes, but keep the components separate. Prepare the dressing in advance and refrigerate it, then boil and smash the potatoes earlier if needed. Roast and assemble the salad as close to serving time as possible for the best texture.
Can I make it without mayonnaise?
Yes. Replace the mayonnaise with additional thick, strained Greek yogurt. The dressing will be lighter, sharper, and tangier than the original version, but it will still cling well if the yogurt is thick enough.
Why did my potatoes fall apart?
The potatoes may have been overcooked, pressed too firmly, or made with a very floury variety. Cook them only until fork-tender and press slowly with a flat-bottomed glass. Baby Yukon Gold and red potatoes are generally more reliable for this method than large russets.
Why did my potatoes become soggy?
Soggy potatoes are usually caused by excess surface moisture, overcrowding, insufficient roasting, or adding dressing while the potatoes are still releasing strong steam.
Drain and steam-dry them thoroughly, leave space between each piece, and roast until the edges are deeply browned before assembling the salad.
Can I use regular-sized potatoes?
Yes, but cut them into evenly sized chunks before boiling and expect a more rustic result. Cut pieces may not stay together as neatly as whole baby potatoes, so handle them gently when smashing and transferring them.
Can I use an air fryer?
Yes. Use the same seasoning, but cook the smashed potatoes in smaller batches and keep them in a single layer. Begin checking early because air fryers vary in size and heating strength.
How long does crispy potato salad last?
Crispy potato salad can be refrigerated in an airtight container for up to three days, provided it was chilled promptly and was not left out for an extended period. The texture is best on the first day because the potatoes gradually absorb moisture from the dressing.

Final Serving Notes
Serve this crispy potato salad shortly after assembly for the best texture. Finish with extra dill, chopped pickles, and a few reserved crispy potato pieces. It works well for BBQs, picnics, and family meals. After trying it, leave an honest rating and mention whether you used the oven or air fryer.
Recipe Card Publishing Checklist
Add the complete recipe through a WordPress recipe-card plugin that produces valid Recipe structured data. The card should work as a standalone recipe, with complete measurements, timings, temperatures, and instructions.
Recipe structured data may help search engines understand the dish and make the page eligible for enhanced recipe results. It does not guarantee rankings or rich-result visibility. The visible recipe, photographs, and structured information must describe the same dish.
Recipe Name and Description
Recipe name: Easy Crispy Potato Salad with Smashed Baby Potatoes
Recipe description: Golden smashed baby potatoes with crisp roasted edges and tender centers, served with a creamy dill-pickle dressing. This easy potato salad is best served warm or at room temperature.
Keep the description factual and concise. Do not add ingredients, flavors, cooking methods, or dietary claims that are not part of the final recipe.
Author and Publication Information
Use the real name of the author or recipe developer responsible for the recipe. Link the byline to a complete author page when the recipe plugin supports it.
Add the original publication date. Change the updated date only after a meaningful revision, such as retesting the method, changing ingredient quantities, replacing photographs, or correcting important instructions.
Recipe Times and Yield
Enter each time field separately and ensure the final numbers agree with the visible article.
| Recipe-card field | Information |
| Preparation time | Confirmed hands-on preparation time |
| Cooking time | Tested boiling and roasting time |
| Resting time | Steam-drying and cooling time, where supported |
| Total time | Preparation, cooking, resting, and assembly combined |
| Yield | 6 servings |
| Serving size | One-sixth of the finished recipe or another tested portion |
Do not list “about one hour” in the article if the actual preparation, cooking, cooling, and assembly take significantly longer.
Ingredients and Measurements
List ingredients in the order they are used and divide them into clear groups.
For the Crispy Smashed Potatoes
Include tested quantities for:
- Baby Yukon Gold potatoes
- Olive oil
- Garlic powder
- Smoked paprika
- Salt
- Black pepper
For the Creamy Dill-Pickle Dressing
Include tested quantities for:
- Greek yogurt
- Mayonnaise
- Dijon mustard
- Lemon juice
- Pickle brine
- Chopped dill pickles
- Fresh dill
- Chives
- Optional red onion
Every ingredient mentioned in the instructions must appear in the ingredient list. Every listed ingredient should also appear in the method unless it is clearly identified as an optional garnish.
Use exact measurements instead of vague wording such as “some oil” or “a little salt.” Add both US customary and metric measurements when the plugin supports reliable unit conversion.
Complete Recipe Instructions
The recipe-card method should remain understandable without the longer article explanation.
Use this chronological order:
- Place the potatoes in cold salted water and simmer until fork-tender.
- Drain thoroughly and steam-dry until the skins no longer look wet.
- Arrange the potatoes on the prepared baking sheet and smash them gently.
- Add oil and seasonings, then roast until the edges are deeply golden.
- Mix the creamy dill-pickle dressing and keep it thick enough to cling.
- Cool the roasted potatoes briefly and assemble the salad shortly before serving.
Each step should include the tested time, temperature, and a useful visual or texture cue. Avoid weak instructions such as “cook until ready” or “roast until done.”
Add step images only when they clarify an important stage, such as the correct smashed thickness, final roasted color, or dressing consistency. Repetitive photographs that add no instructional value are unnecessary.
Recipe Classification
Use only classifications that accurately describe the finished recipe.
| Field | Recommended value |
| Recipe category | Side Dish or Salad |
| Cuisine | Leave blank unless a specific cuisine is genuinely supported |
| Cooking method | Boiling and roasting, when the plugin provides this field |
| Recipe keywords | crispy potato salad, smashed baby potatoes, dill-pickle dressing |
Do not use competitor names, unrelated variations, or a long list of keyword combinations.
Recipe Images
Use a high-quality main image showing the actual finished recipe. The potatoes, dressing, herbs, pickles, and serving style should match the published ingredients and instructions.
Prepare useful image versions in common formats such as:
- 1:1 for square presentation
- 4:3 for recipe and article layouts
- 16:9 for wider search and social placements
Use original process images where possible. Do not use bacon, feta, chili oil, or other variation ingredients in the primary photograph unless they are part of the main recipe.
The structured image URL must point to an image that is visible on the page.
Nutrition Information
Add calories and other nutrition values only after calculating them from the final ingredient quantities and confirmed number of servings.
Do not guess the nutrition values to complete the recipe card. Leave the field empty until a reliable calculation is available.
Keep serving size and nutrition information consistent. Calories calculated for six servings should not be displayed beside a serving yield of four.
Ratings and Reviews
Enable ratings only for genuine reader submissions.
Do not add:
- A fabricated five-star rating
- A fake review count
- Invented testimonials
- Ratings copied from another recipe
- Manually improved averages
Moderate obvious spam, but do not alter legitimate negative or neutral feedback simply to make the recipe look better.
A new recipe with no ratings is more trustworthy than a recipe displaying fabricated social proof.
Final Validation Before Publishing
Confirm that the recipe card and article agree on:
- Recipe name
- Description
- Ingredient quantities
- Optional ingredients
- Oven temperature
- Boiling time
- Roasting time
- Cooling time
- Total time
- Yield
- Serving size
- Storage duration
- Main image
- Step images
- Dietary claims
- Nutrition values
Check the structured data after publishing with an appropriate validation tool. Fix errors and important warnings, but do not add information merely to fill optional fields.
Valid schema can help search engines interpret the page, but it cannot compensate for an inaccurate, incomplete, or untested recipe.