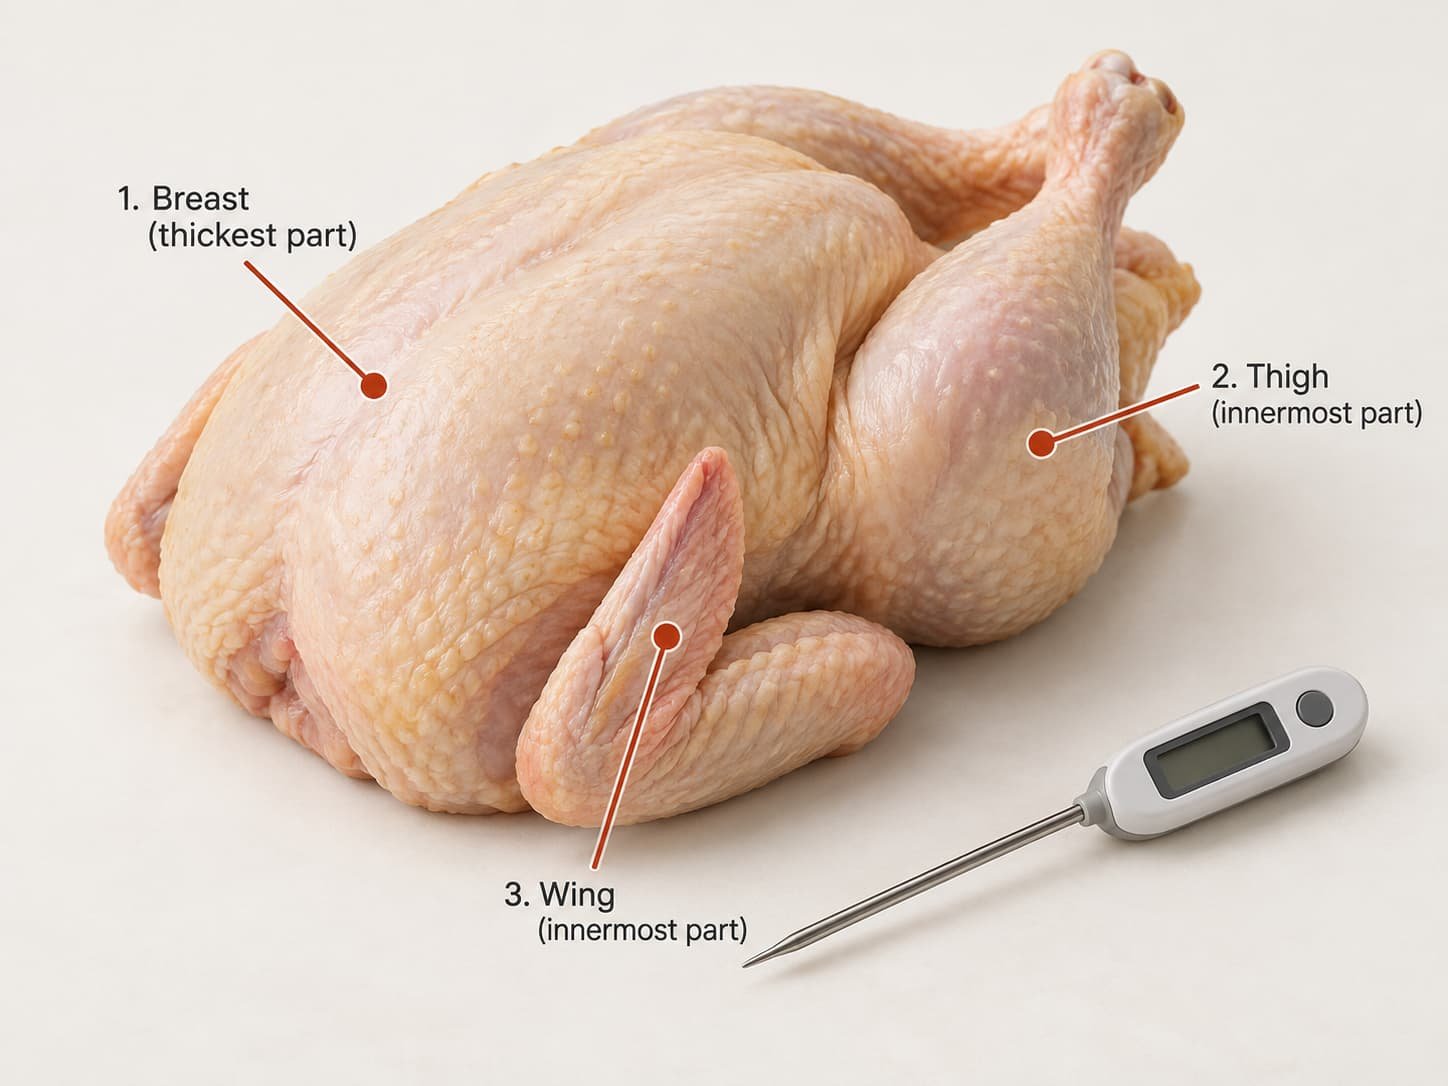
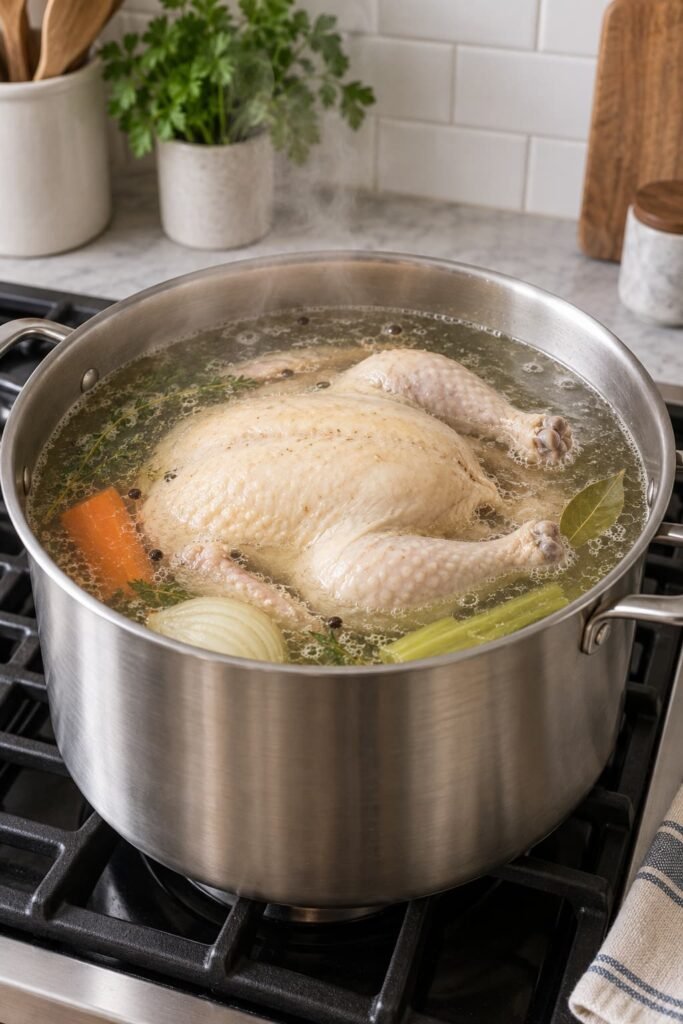
A whole chicken typically takes 60 to 90 minutes to boil, depending on its size. For the best results, bring the water to a boil, then reduce it to a gentle simmer. A smaller chicken (2½–3 pounds) usually cooks in 60–70 minutes, while a larger chicken (4–5 pounds) may need 80–90 minutes. The most reliable way to check for doneness is with a meat thermometer the thickest part of the breast or thigh should reach 165°F (74°C).
Boiling a whole chicken is one of the easiest ways to prepare tender, juicy meat while creating a rich homemade broth at the same time. Whether you’re making chicken soup, shredding chicken for meal prep, or cooking ahead for family dinners, the right cooking time helps keep the meat moist and flavorful. A gentle simmer, rather than a rapid boil, cooks the chicken more evenly and produces a clearer, better-tasting broth.
Several factors can affect the total cooking time, including the chicken’s weight, whether it’s fresh or frozen, and how steadily the water simmers. Understanding these variables helps prevent undercooked chicken, overcooked meat, and wasted effort in the kitchen.
In this guide, you’ll learn exactly how long to boil a whole chicken, how to adjust the cooking time based on the bird’s weight, and the simple steps for consistently great results. You’ll also find a boiling time chart, tips for checking doneness, advice on storing leftovers safely, and practical ways to use both the cooked chicken and the flavorful broth.
How Long Does It Take to Boil a Whole Chicken?

A whole chicken usually takes 60 to 90 minutes to cook when simmered gently, but the exact time depends on its weight. Most 2 to 3-pound chickens are fully cooked in about 60 to 70 minutes, while a 4 to 5-pound chicken typically needs 80 to 90 minutes. Larger birds may take a little longer. Rather than relying on time alone, always check that the thickest part of the breast or thigh reaches an internal temperature of 165°F (74°C) before serving.
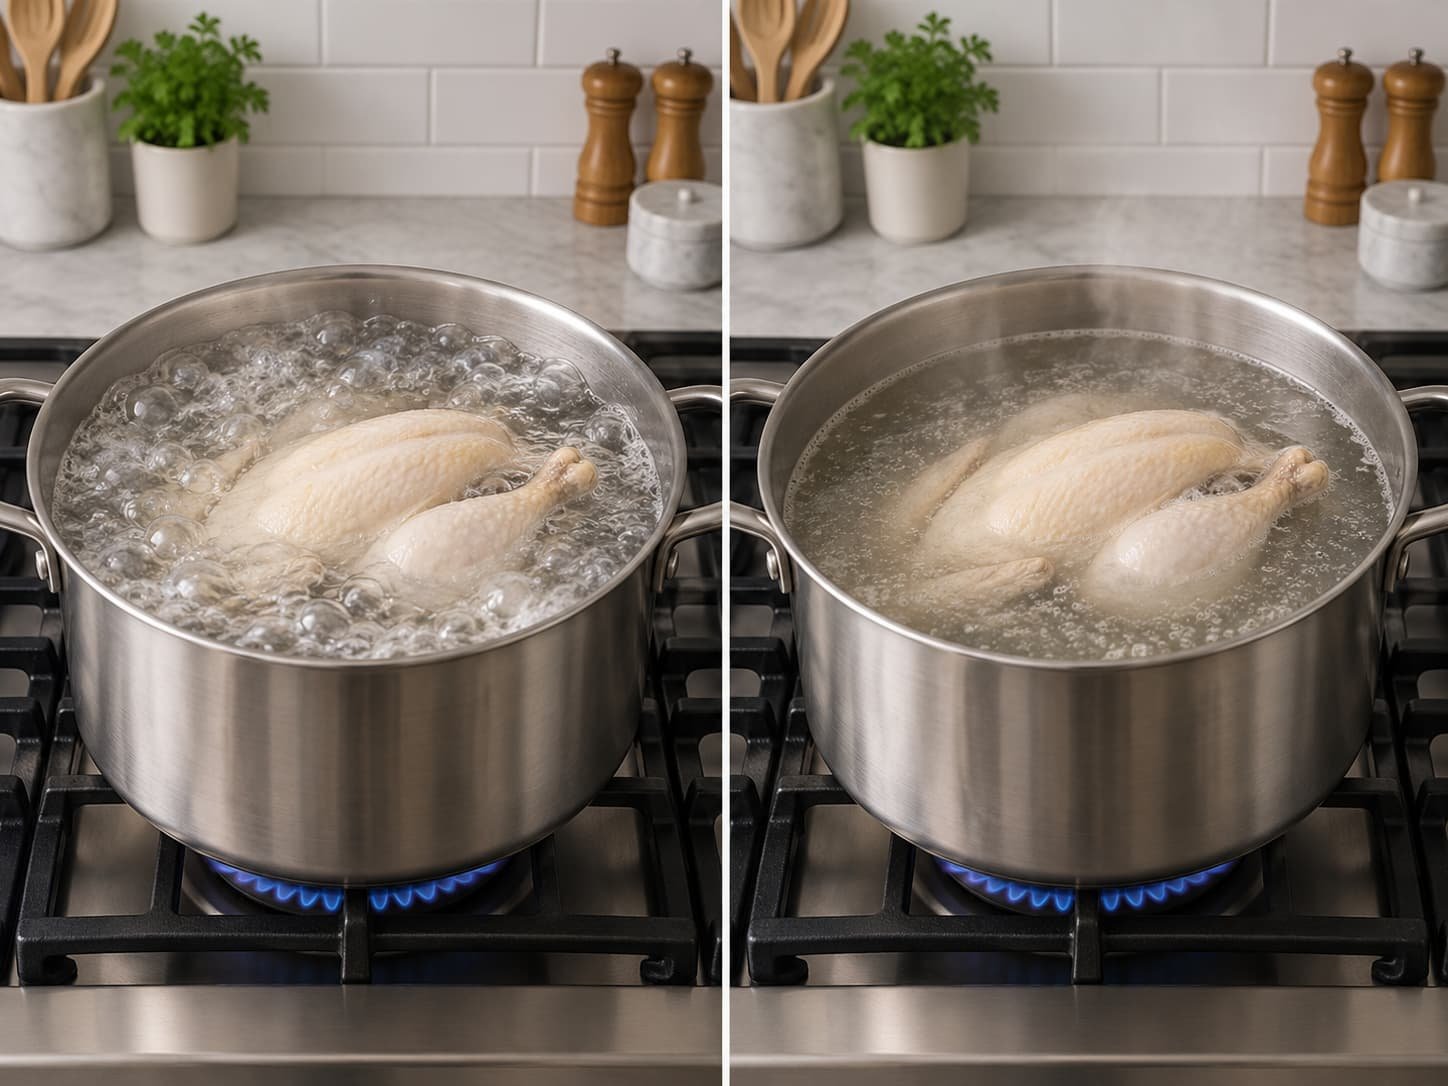
The cooking method is just as important as the cooking time. Once the water comes to a boil, reduce the heat until it reaches a gentle simmer. Keeping the water at a slow simmer allows the chicken to cook evenly, helping the meat stay moist while creating a flavorful homemade broth. A rolling boil may seem faster, but it can toughen the meat and make the broth cloudy instead of clear.
If you’re boiling a whole chicken for soup, meal prep, or shredded chicken recipes, start checking the internal temperature a few minutes before the estimated cooking time ends. Every chicken is slightly different, and factors such as its shape, fat content, and the amount of water in the pot can cause it to cook a little faster or slower than expected.
Whole Chicken Boiling Time Chart
The chart below provides a reliable starting point based on the chicken’s weight. These times are intended for a fully thawed whole chicken cooked at a gentle simmer. Remember that they are estimates, so use a meat thermometer to confirm the chicken is fully cooked.
| Chicken Weight | Simmering Time | Safe Internal Temperature |
| 2–3 lb | 60–70 minutes | 165°F (74°C) |
| 3–4 lb | 70–80 minutes | 165°F (74°C) |
| 4–5 lb | 80–90 minutes | 165°F (74°C) |
| 5–6 lb | 90–100 minutes | 165°F (74°C) |
These cooking times begin after the water returns to a gentle simmer, not from the moment the chicken is placed into the pot. If you lift the lid frequently or the water drops below a steady simmer, the total cooking time may increase slightly.
Fresh vs. Frozen Whole Chicken
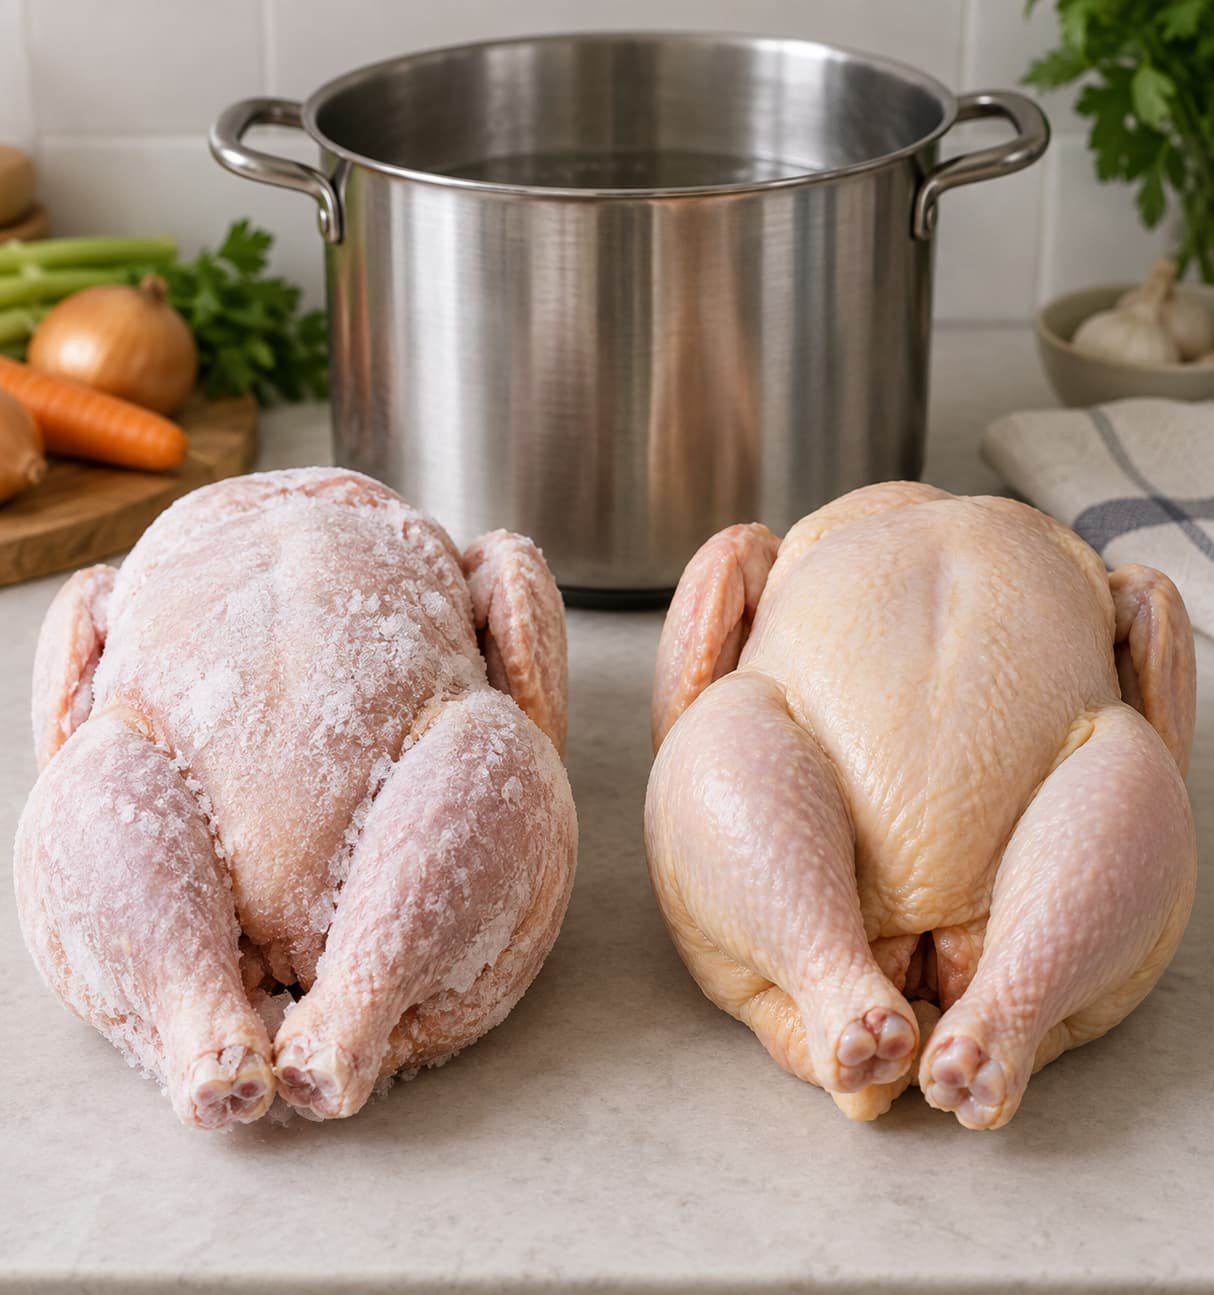
Whenever possible, boil a fresh or completely thawed whole chicken. A thawed chicken cooks more evenly from the outside to the center, making it easier to achieve tender meat and a rich, clear broth. It also allows seasonings and aromatics such as onion, garlic, celery, carrots, and herbs to infuse the chicken more effectively during cooking.
A frozen whole chicken can also be boiled, but it requires additional time because the center of the bird must thaw before it can begin cooking safely. In most cases, expect to add 20 to 30 minutes to the total cooking time, depending on the chicken’s size. If you have time, thawing the chicken overnight in the refrigerator is the better option for more even cooking and improved texture.
Regardless of whether the chicken is fresh or frozen, never rely only on the clock. A meat thermometer remains the most accurate way to confirm that the thickest part of the breast and thigh has reached 165°F (74°C).
What Affects the Boiling Time?
Several factors can change how long it takes to boil a whole chicken, even when two chickens weigh the same. Understanding these variables helps you cook the chicken more accurately and avoid dry or undercooked meat.
The weight of the chicken has the biggest impact, with larger birds naturally requiring more time to cook through. A fully thawed chicken also cooks faster and more evenly than a frozen one. The size of your pot, the amount of water, and how well you maintain a gentle simmer can all influence the final cooking time. Even lifting the lid too often allows heat to escape, which may slightly extend the cooking process.
Instead of treating the boiling time as an exact rule, think of it as a reliable guideline. Begin checking the internal temperature near the end of the recommended cooking time and remove the chicken as soon as it reaches 165°F (74°C). This simple habit helps keep the meat tender and juicy while giving you a flavorful broth that’s perfect for soups, sauces, and future recipes.
Now that you know how long it takes to boil a whole chicken, the next step is learning how to prepare the chicken correctly before it goes into the pot, ensuring the best flavor, texture, and cooking results.
How to Boil a Whole Chicken Step by Step

Boiling a whole chicken is one of the easiest ways to prepare tender, juicy meat while making a rich homemade broth at the same time. Although the process is straightforward, paying attention to a few small details can improve both the flavor of the chicken and the quality of the broth. Follow these steps for consistent results every time.
Prepare the Chicken
Remove the whole chicken from its packaging and check the cavity for the neck and giblets, which are often packed inside. Trim away any large pieces of excess fat around the opening, then pat the chicken dry with paper towels.
If the chicken has been frozen, thaw it completely in the refrigerator before cooking. A fully thawed chicken cooks more evenly, helping the breast and thighs reach a safe temperature at the same time while producing a clearer, more flavorful broth.
Kitchen Tip: There’s no need to rinse raw chicken before cooking. Patting it dry is enough, and avoiding rinsing helps prevent bacteria from splashing around your sink and countertops.
Add Vegetables
Place the chicken in a large stockpot or Dutch oven. Add:
- 1 large yellow onion, quartered
- 2 celery stalks, cut into large pieces
- 2 medium carrots, cut into large chunks
These vegetables create the classic flavor base for homemade chicken broth. Because they’ll simmer for over an hour, large pieces work just as well as finely chopped vegetables and are easier to remove once cooking is complete.
Add Herbs and Seasonings
Now add the aromatics that give the broth its rich, savory flavor:
- 4 garlic cloves, lightly crushed
- 2 bay leaves
- 3–4 sprigs fresh parsley
- 2–3 sprigs fresh thyme
- 1 teaspoon whole black peppercorns
- 1–2 teaspoons salt, or to taste
As the chicken gently simmers, these ingredients slowly release their flavors into both the meat and the broth. The result is a well-balanced stock that’s perfect for soups, gravies, sauces, shredded chicken recipes, or enjoying on its own.
If you like a brighter flavor, you can also add a few parsley stems or a small piece of lemon peel during the last 20 minutes of cooking.
Cover with Water
Pour enough cold water into the pot to cover the chicken by about 1 inch. Leave a little space at the top of the pot so the water doesn’t boil over once it begins to heat.
Starting with cold water allows the chicken, vegetables, and herbs to warm gradually. This slow heating process extracts more flavor from the ingredients and helps create a richer homemade broth.
Bring the Water to a Boil
Place the pot over medium-high heat and bring the water to a boil. As it heats, you’ll notice a light foam collecting on the surface. This is simply protein released from the chicken.
Skimming the foam with a spoon isn’t required, but doing so produces a cleaner-looking broth with a fresher flavor. Once the water reaches a boil, don’t leave it at a vigorous boil for long.
Reduce to a Gentle Simmer
Lower the heat until the liquid is barely simmering. You should see only a few small bubbles breaking the surface every few seconds.
This gentle simmer is one of the most important steps. A rolling boil can tighten the proteins in the meat, making the chicken firmer and the broth cloudy. Slow simmering allows the chicken to cook evenly, keeps the meat juicy, and develops a clear, flavorful stock.
Keep the pot partially covered while it simmers to maintain a steady temperature without allowing too much liquid to evaporate.
Check for Doneness
Start checking the chicken a few minutes before the recommended cooking time ends, especially if it’s on the smaller side. Every chicken cooks a little differently, even when two birds weigh the same.
Insert a meat thermometer into the thickest part of the thigh, avoiding the bone. When it reaches 165°F (74°C), the chicken is fully cooked and ready to remove from the pot.
If you don’t have a thermometer, the leg should move easily in its joint, the juices should run clear, and the meat should pull away from the bone without resistance. These are helpful signs, but a thermometer remains the most reliable way to check doneness.
Rest Before Carving
Carefully lift the chicken from the broth and transfer it to a cutting board or serving platter. Let it rest for 10 to 15 minutes before carving or shredding.
Resting gives the juices time to redistribute throughout the meat instead of running out onto the cutting board. The result is noticeably juicier chicken that’s easier to carve and perfect for sandwiches, salads, soups, tacos, casseroles, or weekly meal prep.
Ingredients That Add Flavor
A good homemade broth isn’t created by the chicken alone. The vegetables, herbs, and seasonings simmering alongside it build layers of flavor that make the finished broth far more satisfying. These classic aromatics work together without overpowering the natural taste of the chicken.

Onion
Yellow onion forms the savory foundation of the broth. As it softens during cooking, it adds mild sweetness and depth while blending smoothly with the other aromatics. Quartering the onion is all that’s needed.
Celery
Celery contributes a gentle earthy flavor and subtle freshness that balances the richness of the chicken. Together with onion and carrots, it creates the traditional base used in many homemade stocks.
Carrots
Carrots round out the broth with natural sweetness and help create a more balanced flavor. Rather than making the broth taste sweet, they soften its savory notes and add complexity.
Garlic
Lightly crushed garlic cloves slowly release their flavor during simmering, adding gentle savory depth without dominating the broth. Whole cloves are preferred because they’re easy to remove after cooking.
Bay Leaves
Bay leaves provide a delicate herbal aroma that becomes more noticeable as the broth cooks. One or two leaves are enough to add complexity without becoming overpowering. Remove them before serving.
Fresh Parsley
Fresh parsley brings brightness to the broth and complements both the vegetables and chicken. Don’t discard the stems they contain plenty of flavor and work just as well during simmering.
Fresh Thyme
Thyme pairs naturally with poultry, adding a light earthy note that enhances the broth without masking the chicken’s flavor. A few fresh sprigs are usually all you need.
Whole Black Peppercorns
Whole peppercorns add gentle warmth and subtle spice while simmering slowly. They create a smoother flavor than ground pepper and leave the finished broth clear instead of cloudy.
These simple ingredients work together to create a broth that’s rich enough to enjoy on its own and versatile enough to use in soups, sauces, gravies, risottos, and countless chicken recipes. Once the chicken is removed, strain the broth and store it for future mealsit’s often just as valuable as the cooked chicken itself.
How to Know When the Chicken Is Done

Cooking a whole chicken for the recommended time provides a good starting point, but time alone doesn’t guarantee that it’s fully cooked. Every chicken is slightly different, and factors such as its size, starting temperature, and how steadily the water simmers can all affect the final cooking time. Instead of relying only on the clock, use the following checks together to know exactly when your boiled whole chicken is ready.
Check the Internal Temperature
The most reliable way to tell if a whole chicken is done is with a meat thermometer. Insert the thermometer into the thickest part of the thigh, making sure it doesn’t touch the bone, as this can give an inaccurate reading. The chicken is fully cooked when the internal temperature reaches 165°F (74°C).
For extra confidence, check the thickest part of the breast as well. Although the breast often cooks a little faster, both areas should reach the safe temperature before you remove the chicken from the pot.
If the thermometer reads below 165°F (74°C), continue simmering the chicken and check again after 5 to 10 minutes. Avoid increasing the heat to speed up the process, as a gentle simmer helps the meat stay tender while the chicken finishes cooking evenly.
Look at the Juices
If you don’t have a meat thermometer, the juices offer another helpful indicator. Make a small cut where the thigh meets the body or gently pierce the thickest part of the thigh. The juices should run clear rather than pink or reddish.
Keep in mind that clear juices alone don’t always guarantee the chicken is fully cooked. They should be used alongside the meat’s appearance and texture, not as the only sign of doneness. A meat thermometer is still the safest and most accurate way to check.
Test the Leg Movement
As the chicken finishes cooking, the connective tissue around the joints softens. Hold one drumstick and gently move it back and forth. A fully cooked chicken should have a leg that moves easily and feels loose at the joint.
If the drumstick still feels firm or difficult to move, return the chicken to a gentle simmer for a few more minutes before checking again.
Check the Meat Texture
The meat should appear completely opaque with no translucent or pink areas, especially near the bone. When you pull at the meat with a fork, it should separate easily into tender, juicy pieces instead of feeling rubbery or resistant.
Once the chicken reaches 165°F (74°C), remove it from the broth instead of continuing to boil it. Overcooking won’t improve food safety, but it can dry out the meat and make the broth less delicate in flavor.
Using a meat thermometer together with these visual cues gives you the most dependable results and helps ensure your whole chicken is cooked safely while staying moist and tender.
Can You Boil a Frozen Whole Chicken?

Yes, you can boil a frozen whole chicken, but it’s usually better to thaw it first if you have the time. A frozen chicken needs longer to cook because the center of the bird must thaw before it can begin reaching a safe internal temperature. Thawing first also helps the chicken cook more evenly and produces a clearer, richer broth.
Is It Safe to Boil a Frozen Whole Chicken?
Boiling a frozen whole chicken is safe as long as it cooks continuously until the thickest part of both the breast and thigh reaches 165°F (74°C). Because frozen poultry takes longer for heat to reach the center, patience is important.
Avoid partially cooking a frozen chicken with the intention of finishing it later. Allowing the chicken to cool before it’s fully cooked can give harmful bacteria an opportunity to grow. For the safest results, keep the chicken at a gentle simmer until it reaches the recommended internal temperature.
How Much Longer Does It Take?
A frozen whole chicken generally requires 20 to 30 minutes more cooking time than a fully thawed bird of the same weight. The exact time depends on the chicken’s size, how frozen it is when it goes into the pot, and how quickly the water returns to a gentle simmer.
Instead of watching the clock alone, begin checking the internal temperature near the end of the estimated cooking time. Every chicken cooks a little differently, making a meat thermometer the most reliable way to know when it’s done.
Best Practices for Boiling a Frozen Whole Chicken
Choose a large pot that allows the chicken to remain fully submerged throughout cooking. Bring the water to a boil, then immediately reduce the heat to a gentle simmer to cook the chicken evenly without making the meat tough.
As the chicken begins to thaw, check inside the cavity and carefully remove any giblets or packaging that may have been frozen inside. Once they’re removed, add onions, carrots, celery, garlic, bay leaves, parsley, thyme, and peppercorns so the aromatics have plenty of time to flavor the broth.
If you notice the broth becoming cloudy, don’t worrythis is common when cooking frozen chicken because more proteins are released as it slowly thaws. Skimming the foam from the surface can help produce a cleaner-looking broth, but it isn’t required.
Whenever possible, thaw the chicken overnight in the refrigerator before boiling. It takes a little more planning, but you’ll usually end up with juicier meat, clearer broth, and more consistent cooking results.
Should You Boil a Whole Chicken Covered or Uncovered?
Whether you should boil a whole chicken covered or uncovered depends on what you want from the finished dish. If your goal is tender, juicy chicken, keeping the pot partially covered is usually the better choice. If you’re mainly making homemade chicken broth or stock, allowing more steam to escape can help concentrate the flavor.
In practice, many experienced home cooks use both methods during different stages of cooking. Starting with the pot partially covered helps the chicken cook evenly, while uncovering it near the end can produce a richer broth.
Is It Better to Cook with the Lid Covered?
For most recipes, yes. Keeping the pot partially covered helps maintain a steady simmer without trapping excessive heat or allowing too much water to evaporate. Leaving the lid slightly ajar lets some steam escape while keeping the cooking temperature consistent.
This method works especially well when you’re boiling a whole chicken for shredded chicken, sandwiches, salads, casseroles, or weekly meal prep because it helps the meat stay moist and tender.
When Should You Leave the Lid Off?
Cooking without a lid is a good option when the broth is just as important as the chicken itself. As steam escapes, the liquid naturally reduces, creating a broth with a deeper, more concentrated flavor.
Keep an eye on the water level throughout cooking. If the liquid drops below the top of the chicken, add a little hot water so the bird stays fully submerged and cooks evenly.
Which Method Produces the Best Results?

For most home kitchens, a partially covered pot offers the best balance. It keeps the chicken juicy, prevents excessive evaporation, and still creates a flavorful broth.
If you’re making homemade chicken stock, uncover the pot during the final 20 to 30 minutes of simmering. This simple adjustment allows the broth to reduce naturally without drying out the chicken.
Kitchen Tip: A properly simmering pot should have only a few gentle bubbles breaking the surface. If the water is bubbling vigorously, lower the heat to keep the chicken tender and the broth clear.
Common Mistakes to Avoid When Boiling a Whole Chicken
Boiling a whole chicken doesn’t require advanced cooking skills, but a few common mistakes can affect the texture of the meat, the flavor of the broth, and even food safety. Knowing what to avoid will help you get better results every time you cook.
Boiling at a Rolling Boil
One of the most common mistakes is cooking the chicken over high heat for the entire cooking time. A rolling boil causes the proteins in the meat to tighten, which can make the chicken firmer than necessary while also producing a cloudy broth.
Once the water reaches a boil, immediately reduce the heat until only a gentle simmer remains. Slow cooking allows the meat to stay juicy while giving the vegetables and herbs time to develop a richer broth.
Leaving the Foam on the Surface
As the chicken cooks, a layer of light-colored foam may appear on the surface of the water. This is completely normal and is made up of proteins released during cooking.
Although removing the foam isn’t necessary for food safety, skimming it with a spoon creates a cleaner-looking broth with a fresher taste. If you’re planning to serve the broth on its own or use it in soup, this extra step is worthwhile.
Not Seasoning the Broth Properly
Many people season the chicken after it’s cooked but forget about the cooking liquid itself. Because the chicken absorbs flavor gradually, lightly seasoning the water from the beginning produces better-tasting meat and a more flavorful broth.
Adding onion, celery, carrots, garlic, bay leaves, parsley, thyme, whole peppercorns, and salt creates a balanced flavor that develops naturally during simmering. Before serving or storing the broth, taste it and adjust the seasoning if needed.
Depending Only on the Cooking Time
Cooking times are useful guidelines, but they’re not exact. Two chickens of the same weight can finish cooking at slightly different times depending on their shape, starting temperature, and how steadily they simmer.
Always verify doneness with a meat thermometer. The thickest part of the thigh should reach 165°F (74°C) before the chicken is removed from the pot.
Cooking the Chicken Longer Than Necessary
Once the chicken reaches a safe internal temperature, continuing to simmer it won’t improve food safety. Instead, it can dry out the meat and reduce the delicate flavor of the broth.
Transfer the chicken to a cutting board and let it rest for 10 to 15 minutes before carving or shredding. Resting helps the juices redistribute throughout the meat, making each bite more tender.
Throwing Away the Homemade Broth
One of the biggest missed opportunities is discarding the cooking liquid after removing the chicken. By the end of cooking, the broth contains flavor from the chicken, vegetables, herbs, and seasonings that have simmered together for well over an hour.
Strain the broth through a fine-mesh sieve and let it cool before storing it. It can be refrigerated for several days or frozen for future meals. Homemade chicken broth is excellent for soups, stews, sauces, gravies, rice dishes, and many other recipes, making it every bit as valuable as the cooked chicken itself.
What to Do With Boiled Chicken

A boiled whole chicken can easily become the starting point for several meals, which is one of the reasons many home cooks prepare one at the beginning of the week. Once the chicken has rested, remove the meat from the bones while it’s still slightly warmit shreds more easily and saves time later. Whether you slice, dice, or shred it, the cooked chicken can be used in everything from quick lunches to family dinners.
Make a Homemade Chicken Salad
Tender boiled chicken is ideal for chicken salad because it stays moist and absorbs flavors well. Combine shredded or diced chicken with mayonnaise or Greek yogurt, celery, red onion, fresh herbs, and a squeeze of lemon juice for a fresh, protein-rich meal. Serve it in sandwiches, wraps, lettuce cups, or with crackers for an easy lunch.
Fill Tacos, Wraps, and Burritos
Warm shredded chicken with taco seasoning, salsa, or your favorite spices before adding it to tortillas. Top with lettuce, tomatoes, avocado, cheese, cilantro, or a spoonful of sour cream for a quick dinner that’s ready in minutes. The mild flavor of boiled chicken also works well in burritos, quesadillas, and rice bowls.
Turn It Into Homemade Soup
One of the best ways to use boiled chicken is to return it to the homemade broth you just prepared. Add vegetables, noodles, rice, barley, or dumplings for a comforting soup that uses every part of the chicken while reducing food waste.
Bake Comforting Casseroles
Because boiled chicken is already cooked and tender, it’s perfect for casseroles. Mix it with cooked pasta, rice, potatoes, vegetables, or a creamy sauce before baking until hot and bubbly. The chicken absorbs flavor from the sauce without becoming tough, making it an excellent choice for make-ahead family meals.
Prepare Sandwiches and Grain Bowls
Thinly sliced chicken makes a satisfying sandwich with lettuce, tomatoes, pickles, cheese, or your favorite spread. If you’re looking for a lighter meal, add sliced or shredded chicken to grain bowls with brown rice, quinoa, roasted vegetables, and a simple vinaigrette for a balanced lunch or dinner.
Use It for Weekly Meal Prep
Boiled chicken is one of the easiest proteins to prepare in advance. Divide it into meal-sized portions and pair it with rice, roasted vegetables, potatoes, pasta, or salads for ready-to-eat lunches throughout the week.
Kitchen Tip: Store shredded chicken with a few spoonfuls of homemade broth before refrigerating or freezing. The extra moisture helps keep the meat tender when it’s reheated.
How to Store and Freeze Boiled Chicken

Storing boiled chicken properly keeps it safe to eat while preserving its flavor and texture. Cooling, packaging, and reheating it the right way can make leftovers taste almost as good as the day they were cooked.
Store Boiled Chicken in the Refrigerator
Allow the chicken to cool slightly after cooking, but don’t leave it at room temperature for more than 2 hours. If you’ve prepared a large batch, divide it into smaller airtight containers so it cools more quickly and evenly in the refrigerator.
Cooked boiled chicken stays fresh in the refrigerator for 3 to 4 days. Store the meat and homemade broth in separate containers to maintain their quality, and label the containers with the storage date if you’re preparing meals ahead of time.
Freeze for Longer Storage
If you don’t plan to use the chicken within a few days, freezing is the best option. Slice, dice, or shred the meat before placing it into freezer-safe containers or freezer bags. Press out as much air as possible before sealing to help reduce freezer burn.
For the best flavor and texture, use frozen boiled chicken within 3 to 4 months. Homemade chicken broth freezes just as well. Leave about an inch of space at the top of the container because the liquid expands as it freezes.
If possible, freeze the chicken in meal-sized portions so you only need to thaw the amount required for your next recipe.
Reheat Without Drying Out the Chicken
Gentle reheating helps boiled chicken stay moist and tender. Warm it slowly in a saucepan with a splash of homemade chicken broth or water, cover the pan, and heat until the chicken reaches 165°F (74°C).
For microwave reheating, place the chicken in a microwave-safe dish and cover it with a lid or a damp paper towel to trap moisture. Stir or turn the chicken halfway through heating so it warms evenly.
Avoid reheating the same portion multiple times. Instead, reheat only the amount you plan to eat, which helps preserve both the quality and the food safety of the cooked chicken.
If the chicken has been frozen, thaw it overnight in the refrigerator before reheating whenever possible. This helps it warm more evenly and retain a better texture.