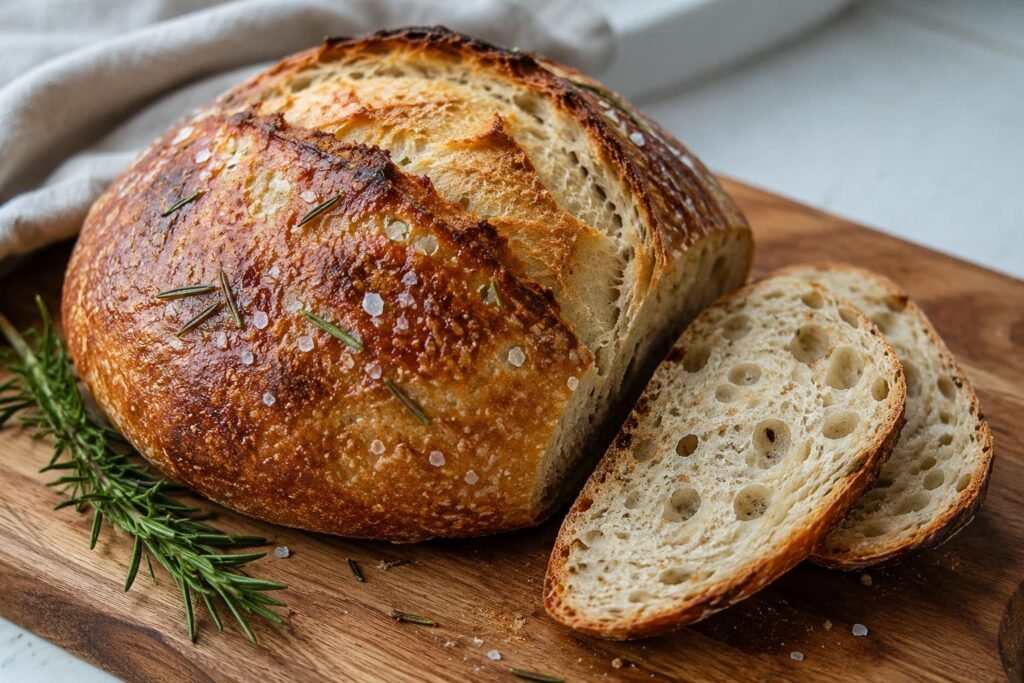
This easy rosemary sourdough bread has a crisp, deeply golden crust and a soft, chewy crumb scented with fresh rosemary. Olive oil gives the bread a mild richness and helps keep the inside tender without hiding the natural tang of the active sourdough starter. A small amount of flaky sea salt on top adds extra flavor and a pleasant contrast to the crust.
The recipe is designed for home bakers who already have an active starter but want a simple flavored loaf with limited hands-on work. The dough is naturally leavened without commercial yeast and baked in a preheated Dutch oven, which helps trap steam during the early stage of baking and supports better oven spring.
The process takes place over two days, but most of that time is inactive. After mixing and folding, the dough ferments at room temperature, is shaped, and then proofs overnight in the refrigerator before baking the next day.
Quick Rosemary Sourdough Recipe Snapshot
Sourdough fermentation does not follow one fixed schedule. Starter strength, room temperature, dough temperature, flour type, and hydration can all affect how quickly the dough rises. Use the times below as practical estimates, but rely on the dough’s volume, texture, and visible bubbles to decide when it is ready for the next step.
| Recipe detail | Information |
| Active preparation time | About 35 minutes |
| Bulk-fermentation range | Approximately 4 to 7 hours |
| Overnight cold proof | 8 to 16 hours |
| Baking time | 45 to 50 minutes |
| Total elapsed time | Approximately 14 to 24 hours |
| Yield | 1 medium round loaf |
| Difficulty | Beginner-friendly for bakers with an active starter |
| Baking method | Covered and uncovered Dutch oven baking |
| Recommended Dutch oven size | 5 to 6 quarts |
| Main flavor | Rosemary, mild olive oil, sourdough tang, and sea salt |
| Starter requirement | Active sourdough starter at or near peak rise |
Why This Rosemary Sourdough Bread Recipe Works
This rosemary sourdough bread recipe uses olive oil to help create a slightly softer, more tender crumb while preserving the pleasant chew of naturally leavened bread. The oil adds mild richness without covering the fresh rosemary or the natural tang of the active sourdough starter.
Finely chopped rosemary spreads more evenly through the dough and reduces the chance of large, woody pieces ending up in one part of the loaf. This gives each slice a balanced herbal flavor rather than a few overly strong bites.
Fine sea salt seasons the dough evenly, while a small amount of flaky sea salt on the surface adds texture and contrast to the crust. Used lightly, the topping strengthens the rosemary and olive oil flavors without making the bread taste too salty.
Instead of traditional kneading, a series of gentle stretch-and-folds gradually strengthens the gluten network. This improves elasticity and helps the dough hold the gas produced during fermentation, giving the loaf better structure with limited hands-on work.
An overnight cold proof allows the flavor to develop while making the dough firmer and easier to handle. Chilled dough is easier to score cleanly and is less likely to spread while it is transferred into the preheated Dutch oven.
During the first stage of baking, the covered Dutch oven traps moisture released by the dough and creates steam around the loaf. This keeps the crust flexible long enough for the bread to expand. Once the lid is removed, the crust can brown fully and become crisp.
Ingredients You Will Need
Good rosemary sourdough bread depends less on a long ingredient list and more on using the right ingredients in the right condition. A lively starter gives the dough its rise, bread flour provides strength, and fresh rosemary, olive oil, and sea salt shape the loaf’s flavor.
Sourdough is sensitive to small changes, so accurate measurements matter. Flour type, water absorption, starter strength, and room temperature can all affect how the dough feels and how quickly it ferments.
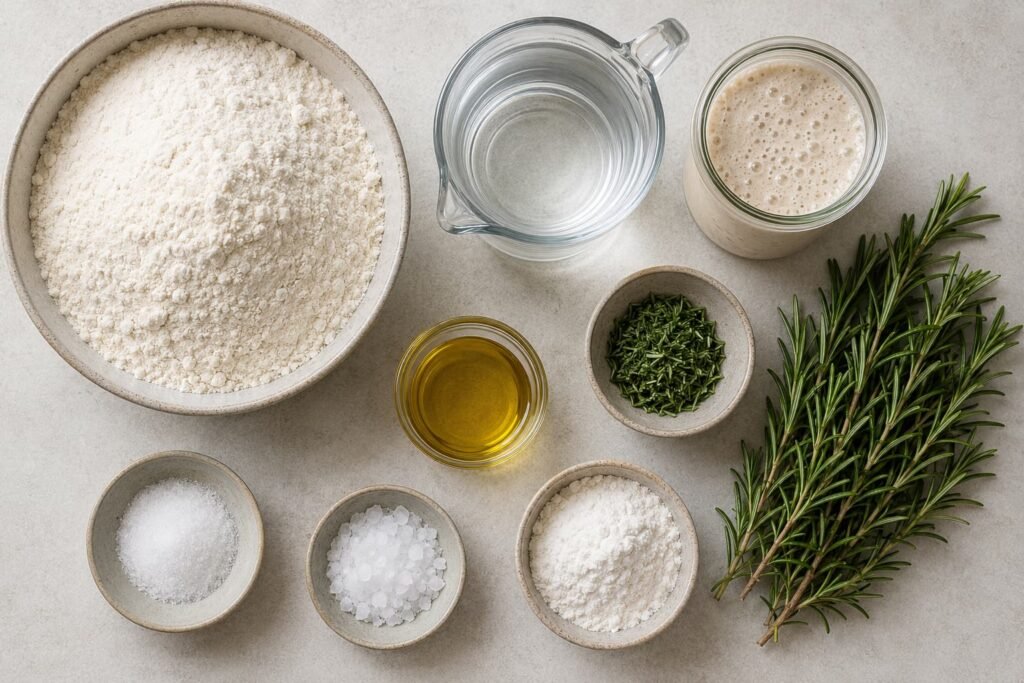
Active Sourdough Starter
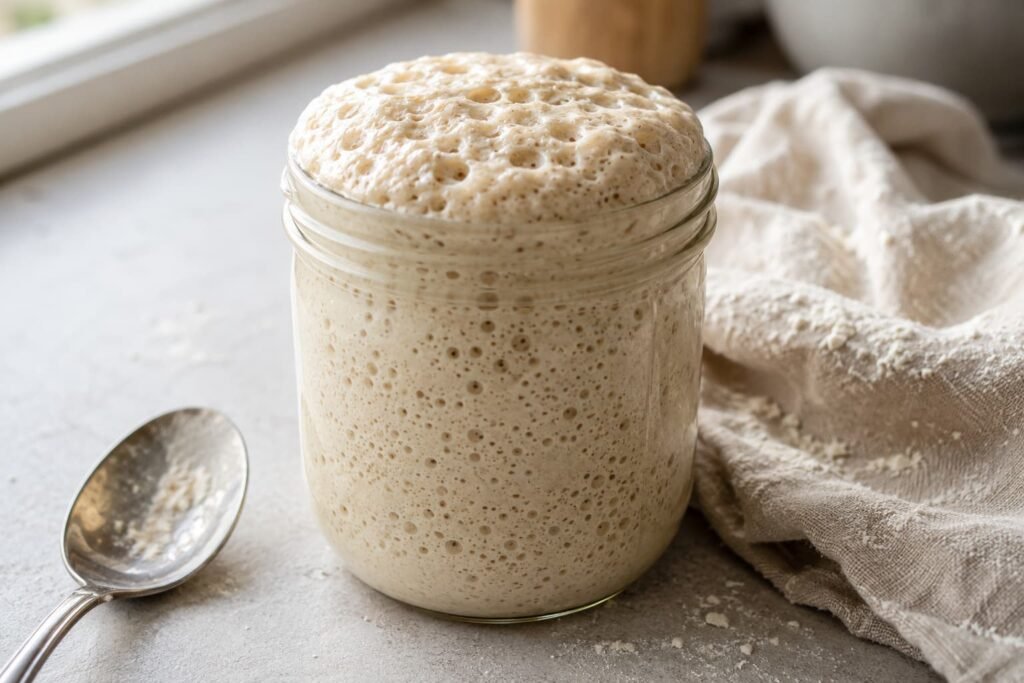
Use a recently fed starter that looks airy and has bubbles throughout. It should rise noticeably in its container and appear slightly domed when it is near peak activity.
The best time to use it is at or just before its highest rise, when it smells pleasantly tangy and slightly yeasty. A starter that has already collapsed may still work, but it is usually slower and less predictable.
Inactive sourdough discard is not a direct substitute for an active starter because it does not provide the same lifting power. Discard should only be used in a bread recipe specifically developed for it, often with another leavening method or a different fermentation plan.
Bread Flour and Water
Bread flour is preferred for this rosemary sourdough bread recipe because its higher protein content helps the dough build a stronger gluten network. That strength helps the loaf hold the gas produced during fermentation and supports better shape, oven spring, and chew.
All-purpose flour can sometimes be used, but it usually absorbs less water and may create a softer, looser dough. If you make that substitution, the water may need to be reduced slightly. Do not assume both flours will behave the same.
Water absorption varies between brands, protein levels, milling methods, and storage conditions. This is why the same recipe can feel slightly wetter or firmer from one kitchen to another.
A digital scale is more reliable than measuring cups. Flour can become compacted during scooping, while weighing the ingredients makes the recipe easier to repeat and helps keep the dough hydration consistent.
Fresh Rosemary
Remove the leaves from the thick woody stems before chopping. The stems stay tough after baking and can leave unpleasant pieces in the crumb.
Chop the leaves finely so the rosemary spreads evenly through the dough. Long needles can create overly strong bites and may tear the dough slightly during folding or shaping.
If the rosemary has been washed, dry it well before use. Wet leaves are more likely to clump together, which can lead to uneven flavor distribution.
Fresh rosemary gives the loaf a brighter herbal flavor, but the exact amount matters. Too little may disappear into the bread, while too much can overpower the sourdough and leave the crumb tasting harsh.
Olive Oil and Sea Salt
Olive oil adds mild richness and can help the crumb feel slightly softer. Its flavor should support the rosemary rather than dominate the loaf.
In this recipe, fine sea salt is mixed into the dough so it dissolves and seasons the bread evenly. It also helps control fermentation and supports dough strength.
Flaky sea salt is reserved for the crust, where it adds texture and a light burst of flavor. Use it sparingly. Too much can overwhelm the rosemary and make the top of the loaf unpleasantly salty.
How to Add Rosemary to Sourdough Bread
Rosemary needs to be measured and prepared carefully so its flavor spreads through the loaf without creating harsh, woody bites. Fresh and dried rosemary can both work in this recipe, but they should not be used in equal amounts because dried rosemary has a more concentrated flavor.
For this loaf, the rosemary is added during the initial mix. Adding it at the beginning allows the chopped leaves to distribute through the dough as the flour, water, active starter, olive oil, and salt come together.
How Much Rosemary Should You Use?
For a loaf made with 750 grams of flour, use tested fresh rosemary weight grams of fresh rosemary, or approximately tested tablespoon amount tablespoons after the woody stems have been removed and the leaves have been finely chopped.
For the dried alternative, use tested dried rosemary weight grams of dried rosemary, or approximately tested teaspoon amount teaspoons. Lightly crush the dried leaves between your fingers before adding them. This breaks up stiff pieces and helps the herb spread more evenly through the dough.
When deciding how much rosemary to add to sourdough bread, avoid adding a large handful by eye. Too much rosemary can cover the natural sourdough flavor and make the bread taste harsh, resinous, or overly piney.
The answer to how much fresh rosemary to add to sourdough bread also depends on the strength of the herb, but the tested quantity should remain the main guide. Measure the rosemary after removing the stems rather than increasing the amount based only on aroma.
Fresh Rosemary vs. Dried Rosemary
Fresh and dried rosemary create different flavors in the finished loaf. Fresh leaves are brighter and more aromatic, while dried rosemary tastes stronger and slightly earthier.
| Type | Flavor | Amount for 750 g flour | Preparation |
| Fresh rosemary | Bright, aromatic, and mildly piney | tested amount g, about tested amount tbsp | Remove the stems, dry the leaves, and chop finely |
| Dried rosemary | Stronger, earthier, and more concentrated | tested amount g, about tested amount tsp | Crush lightly before mixing |
Do not replace fresh rosemary with the same volume of dried rosemary. Because dried rosemary is more concentrated, an equal-volume substitution can overpower the bread.
Fresh rosemary is the better choice for a clean herbal aroma and softer pieces in the crumb. Dried rosemary is a practical alternative when fresh herbs are unavailable, but it must be measured carefully.
When Should Rosemary Be Added?
For this rosemary sourdough bread recipe, add the prepared rosemary during the initial mix. Combine it with the other dough ingredients according to the final recipe instructions.
Adding rosemary at this stage gives it time to spread through the dough during mixing and the later stretch-and-fold sessions. This produces more even flavor and reduces the chance of concentrated herb patches in individual slices.
Fresh rosemary should be finely chopped and dry before it goes into the bowl. Long leaves can create sharp, strongly flavored bites, while wet clumps may remain concentrated in one area of the dough.
Equipment for Dutch Oven Sourdough Bread
You do not need a long list of specialist tools to make this Dutch oven sourdough bread, but a few reliable pieces of equipment make the dough easier to measure, handle, shape, and bake.
Use a large mixing bowl with enough space for the dough to expand during bulk fermentation. A digital kitchen scale is strongly recommended because sourdough is more consistent when the flour, water, starter, and salt are measured by weight. Measuring cups can pack flour unevenly and change the final dough consistency.
A flexible dough scraper helps release sticky dough from the bowl and makes shaping easier without adding unnecessary flour. For the final proof, use a banneton or a medium bowl lined with a clean kitchen towel. Dust the basket or towel well so the dough releases cleanly after chilling.
A bread lame or sharp razor is useful for scoring the loaf before baking. Parchment paper can act as a sling, making it easier to lower the cold dough into the hot pot. Once the bread is baked, place it on a cooling rack so air can move underneath and the crust does not soften from trapped moisture.
The most important tool is a heavy Dutch oven with a close-fitting, heat-safe lid. During the first part of baking, the covered pot traps moisture released by the dough. This creates steam around the loaf, helping the surface remain flexible while the bread expands.
What Size Dutch Oven Works Best?
For a round loaf made with 750 grams of flour, a Dutch oven in the 5- to 6-quart range is generally a practical choice. The exact fit will depend on the shape of the pot, the final dough weight, and how much the loaf expands in the oven.
A pot that is excessively wide may give a weak or loosely shaped dough more room to spread. However, pot size alone does not determine loaf height. Fermentation, gluten strength, shaping, and proofing have a much greater effect on whether the bread rises upward or spreads outward.
A Dutch oven that is too small can restrict expansion and may allow the dough to touch the lid or sides as it rises. The loaf should have enough space around it for oven spring without being crowded.
To load the bread safely, place the scored dough on parchment paper and use the paper as a sling. Lower it slowly into the preheated pot while keeping your hands and forearms away from the hot rim. Avoid dropping the loaf, since this can disturb its shape and increase the risk of burns.
Both enameled and bare cast-iron Dutch ovens can produce good results. Bare cast iron transfers heat efficiently but may contribute to a darker bottom crust. Enameled cast iron is usually easier to clean, although its knob and interior coating must be rated for the baking temperature. Always check the manufacturer’s heat limits before preheating the pot.
Can You Bake It Without a Dutch Oven?
Yes. You can bake rosemary sourdough bread without a Dutch oven on a preheated baking stone, baking steel, or heavy metal tray while using a separate pan to create steam.
Place an empty, sturdy metal pan on a lower oven rack during preheating. After transferring the loaf to the hot baking surface, carefully add boiling water to the metal pan and close the oven door immediately. Remove the steam pan after the first stage of baking so the crust can dry, brown, and become crisp.
This method can work well, but an uncovered oven usually loses steam faster than a sealed Dutch oven. Do not pour water directly onto the oven floor, oven glass, a light bulb, or a glass baking dish, since sudden temperature changes can cause damage or dangerous breakage.
Equipment for Dutch Oven Sourdough Bread
You do not need a long list of specialized equipment to make this Dutch oven sourdough bread, but a few dependable tools make the dough easier to measure, handle, shape, and bake.
Use a large mixing bowl with enough room for the dough to expand during bulk fermentation. A digital kitchen scale is strongly recommended because sourdough is more consistent when flour, water, starter, and salt are measured by weight. Measuring cups can pack flour unevenly and leave the dough much drier than intended.
A flexible dough scraper helps lift sticky dough from the bowl and makes shaping easier without adding unnecessary flour. For the final proof, use a banneton or a medium bowl lined with a clean kitchen towel. Dust it with rice flour, or a mixture of rice flour and bread flour, to reduce sticking after the dough has chilled.
A bread lame or a sharp blade secured in a proper holder gives you better control when scoring the loaf. Parchment paper can be used as a sling for lowering the cold dough into the hot pot, but check the manufacturer’s maximum temperature before baking. After the loaf comes out of the oven, place it on a cooling rack so air can circulate underneath and the crust stays crisp.
The most important tool is a heavy Dutch oven with a close-fitting, heat-safe lid. During the first stage of baking, the covered pot traps moisture released by the dough. This creates steam around the loaf, keeping the surface flexible while the bread expands.
What Size Dutch Oven Works Best?
For a round loaf made with 750 grams of flour, a Dutch oven in the 5- to 6-quart range is usually a practical starting point. The best fit also depends on the pot’s diameter, depth, total dough weight, and final loaf shape.
A pot that is much wider than the shaped dough may give a weak or loosely shaped loaf more room to spread. However, Dutch oven size is not the main factor controlling loaf height. Starter strength, gluten development, fermentation, shaping, and proofing have a much greater effect on whether the dough rises upward or spreads outward.
A pot that is too small can restrict oven spring and may allow the dough to touch the lid or sides as it expands. There should be enough room around the shaped loaf for it to rise without becoming crowded.
To load the bread safely, place the scored dough on parchment paper and use the paper as a sling. Lower it slowly into the preheated Dutch oven while keeping your hands and forearms away from the hot rim. Wear long oven gloves and avoid dropping the dough, since this can damage its shape and increase the risk of burns.
Both enameled and bare cast-iron Dutch ovens can produce good results. Bare cast iron is durable, while enameled cast iron is often easier to clean. Either type can create an overly dark bottom crust if the pot sits too close to the lower heating element.
If the bottom browns too quickly, place a heavy baking sheet on the rack below the Dutch oven or move the pot one level higher. Always confirm that the lid knob, handles, and interior finish are rated for the temperature used in the recipe.
Can You Bake It Without a Dutch Oven?
Yes. You can bake rosemary sourdough bread without a Dutch oven on a preheated baking stone, baking steel, or heavy metal tray while using a separate source of steam.
Place a sturdy, heat-safe metal pan on a lower oven rack during preheating. After transferring the loaf to the hot baking surface, carefully pour a small amount of boiling water into the pan and close the oven door immediately. Wear long oven gloves and keep your face and hands away from the burst of steam.
Use only a heavy metal pan that is designed for high oven temperatures. Never use glass, thin disposable trays, or containers that may warp or crack. Check the oven manufacturer’s instructions before using added steam.
The water should mostly evaporate during the early stage of baking. Avoid carrying a pan filled with boiling water out of a hot oven. Once the steam has reduced, briefly vent the oven if needed so the crust can dry, brown, and become crisp.
This method can produce good bread, but an open oven usually loses steam faster than a covered Dutch oven. Do not pour water directly onto the oven floor, oven glass, heating element, light bulb, or any glass baking dish.
Step 2: Mix the Dough
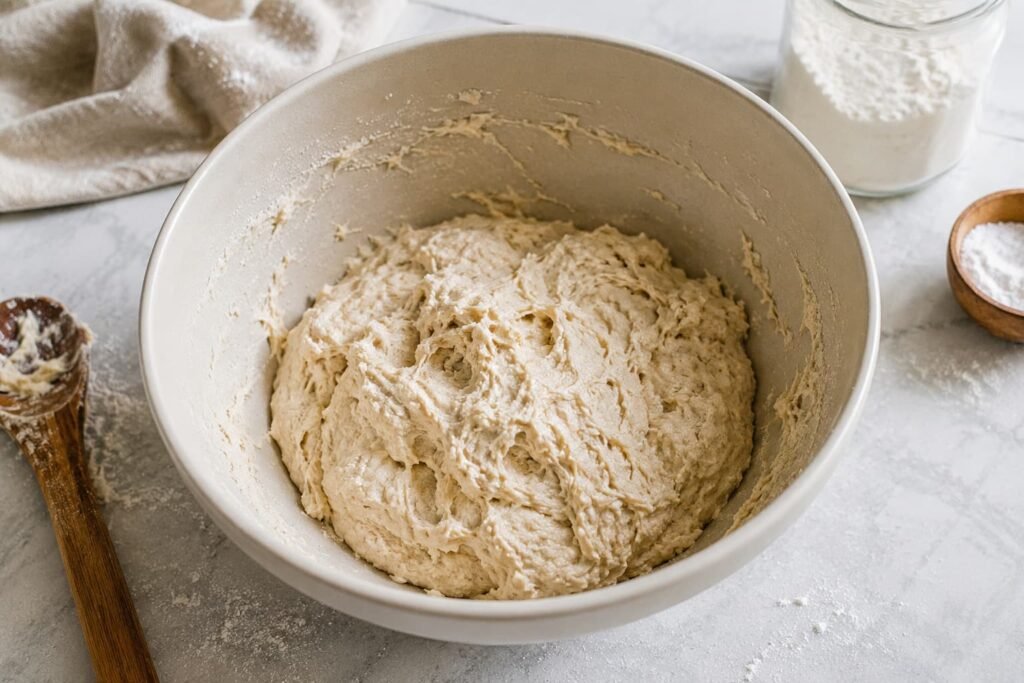
Add the bread flour, water, and active sourdough starter to a large mixing bowl. Mix with your hand or a sturdy spoon until all the flour is moistened and no dry patches remain.
The dough will look rough, sticky, and shaggy at this stage. It is not supposed to feel smooth or elastic yet, and a few firmer areas are normal. Resist the urge to add extra flour, since doing so can make the finished loaf dry and dense.
For this method, the rosemary, olive oil, and salt are added after the initial rest. Mixing the flour and water first gives them time to combine before the remaining ingredients are worked into the dough.
Step 3: Rest the Dough
Cover the bowl and leave the dough to rest for tested rest time minutes. This short rest allows the flour to absorb the water and helps the dough begin developing strength without traditional kneading.
By the end of the rest, the dough should feel more cohesive and slightly easier to stretch. It may still look uneven, but it should no longer feel as rough as it did immediately after mixing.
This stage is mainly about hydration and early dough development. Do not expect a noticeable rise yet.
Step 4: Add the Rosemary, Olive Oil and Salt
Sprinkle the fine sea salt and finely chopped rosemary evenly across the rested dough. Drizzle the olive oil over the surface rather than pouring it into one concentrated spot.
With damp fingers, pinch the dough gently between your fingers and fold it over itself. Continue until the salt and rosemary are distributed and no visible pools of olive oil remain in the bowl.
The dough may feel slippery or appear to separate slightly when the oil is first added. This is normal. Continue folding gently, turning the bowl as you work, until the dough comes back together.
Spread the rosemary as evenly as possible so the finished loaf does not contain a few intensely flavored patches. Avoid forceful kneading or tearing the dough, since the later stretch-and-fold sessions will build the remaining strength.
Step 5: Perform Stretch-and-Folds
Complete tested number sets of stretch-and-folds, leaving approximately tested interval minutes between each set. Keep the bowl covered during the rests so the surface of the dough does not dry out.
To complete one set, lift one side of the dough until you feel light resistance, then fold it over the center. Rotate the bowl and repeat from the other sides until you have worked around the dough.
During the first set, the dough may feel sticky, loose, and uneven. With each later set, it should become smoother, more elastic, and better able to hold its shape.
Stretch only until the dough begins to resist. Stop before it tears. Once it feels stronger, stretches smoothly, and settles into a rounded mass instead of spreading flat immediately, leave it undisturbed to finish bulk fermentation.
Step 6: Complete Bulk Fermentation
After the final stretch-and-fold, cover the bowl and allow the dough to continue fermenting at room temperature. The exact time will depend on starter strength, room temperature, dough temperature, and the flour used.
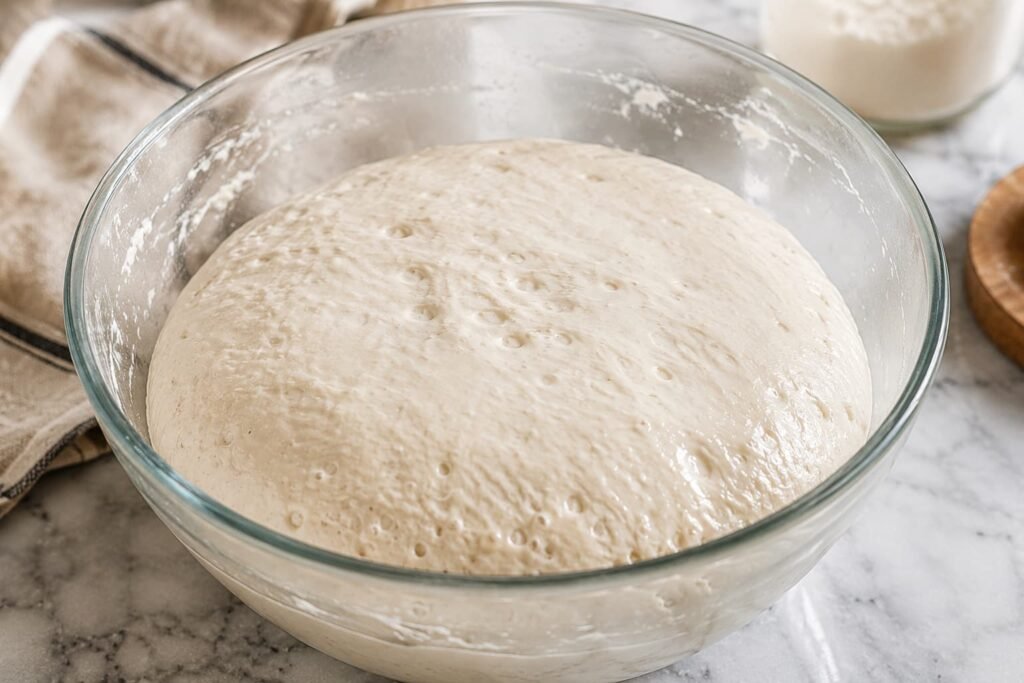
Use the clock as a guide, but judge the dough by its condition. By the end of bulk fermentation, it should have increased by approximately tested rise percentage rather than necessarily doubling.
The surface should look smoother and slightly rounded. The edges should appear curved where the dough meets the bowl, and small bubbles may be visible along the sides or beneath the surface.
When the bowl is moved gently, the dough should feel lighter and may jiggle slightly. It should still hold together as one soft mass rather than spreading into a loose, shapeless mixture.
Dense, tight dough with little visible expansion usually needs more time. Dough that becomes extremely sticky, weak, and difficult to handle may have fermented too far.
The dough is ready for shaping when it looks expanded and aerated, has visible signs of fermentation, and releases from the bowl as a soft mass without collapsing immediately.
Step 7: Pre-Shape and Final Shape
Lightly dust the work surface, then turn out the fermented dough carefully. Handle it gently, but do not worry about pressing out a few large surface bubbles while shaping.
Use a dough scraper to bring the dough into a loose round. Draw it gently across the work surface to create light tension on the outside, then leave it to rest for tested bench-rest time minutes. Cover it lightly if the surface begins to dry.
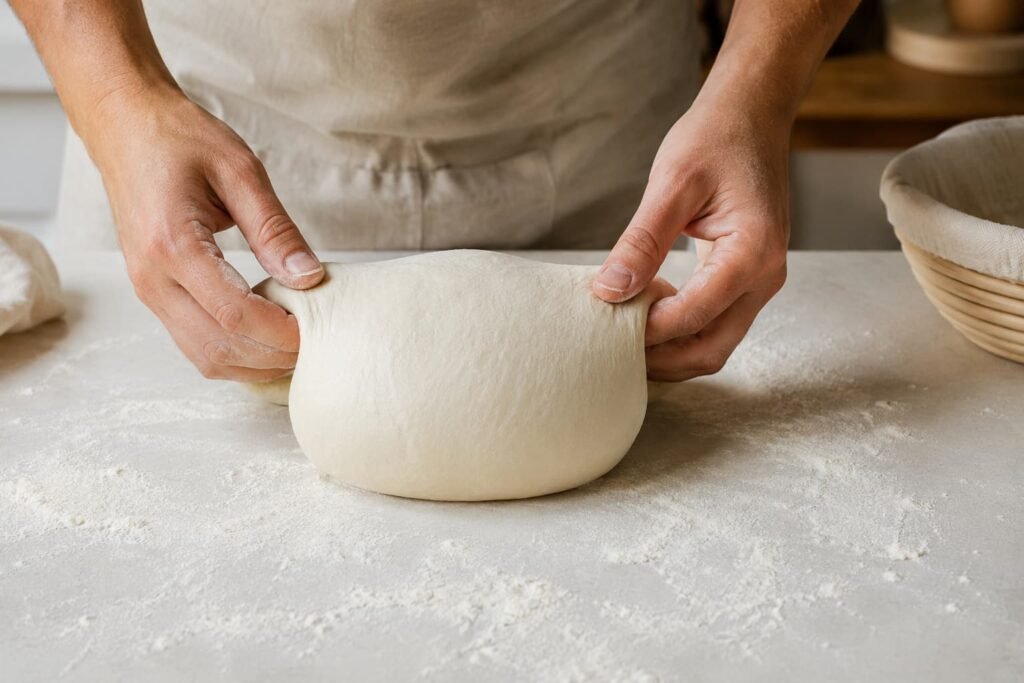
After the rest, turn the dough over so the smoother side faces down. Fold the lower edge toward the center, fold the two sides inward, then bring the top edge down over the dough. Turn it seam-side down and draw it toward you in short movements, rotating it as needed to form a tighter round.
The goal is to create a smooth outer skin that helps the loaf hold its shape. Use enough tension to tighten the surface, but stop if the dough begins to tear. A few large bubbles near the surface can be gently pressed out, while the smaller bubbles inside should remain undisturbed.
Place the shaped loaf seam-side up in a banneton or towel-lined bowl dusted with rice flour.
Step 8: Cold-Proof Overnight
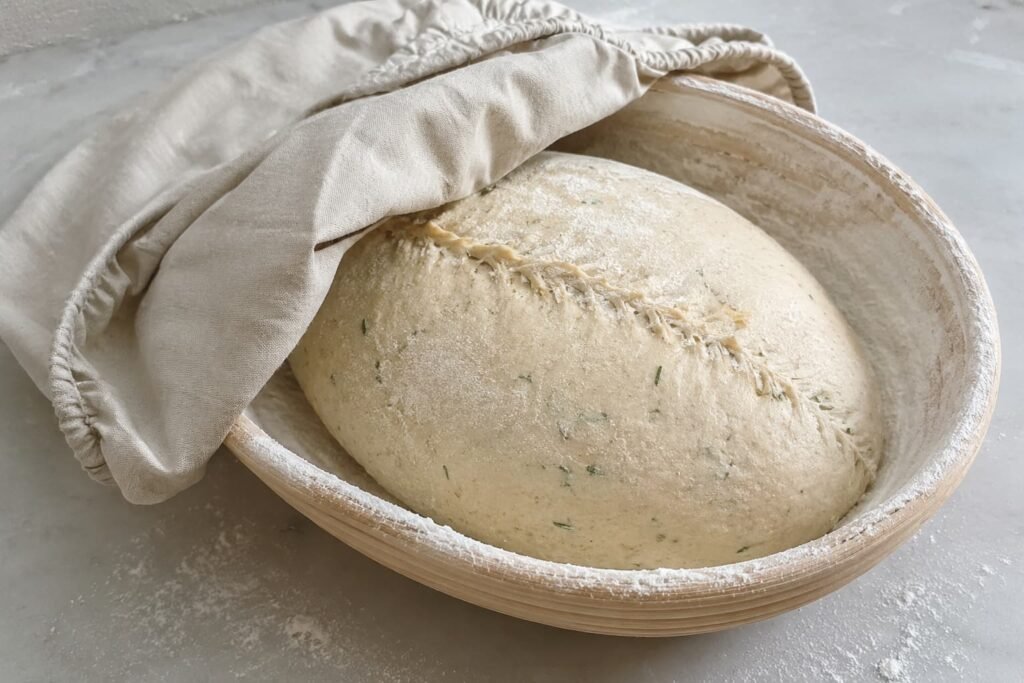
Cover the banneton with a reusable cover, clean bag, or loose wrap so the dough does not dry out in the refrigerator. The covering should sit above the loaf rather than pressing against its surface.
Refrigerate the dough at the tested refrigerator range for tested minimum proof time to tested maximum proof time. This overnight cold proof slows fermentation, develops the sourdough flavor, and firms the dough before baking.
Cold dough is easier to remove from the banneton and usually holds its shape better while being scored. Its firmer surface also gives the blade more control, helping create a cleaner cut without dragging through soft dough.
The loaf should still look rounded and supported when it comes out of the refrigerator. If it appears very loose, deflated, or unable to hold its shape, it may have fermented too far before or during the cold proof.
A longer refrigerator rest is not automatically better. The correct range depends on how far bulk fermentation progresses and how cold the refrigerator remains.
Step 9: Preheat and Score
Place the Dutch oven and its heat-safe lid in the oven, then preheat them to tested oven temperature for tested preheating time minutes. Confirm that the pot, handles, lid knob, and parchment paper are rated for the temperature used.
When the oven is fully heated, take the dough directly from the refrigerator and turn it onto a sheet of heat-safe parchment paper. Use the parchment as a sling when lowering the loaf into the hot pot.
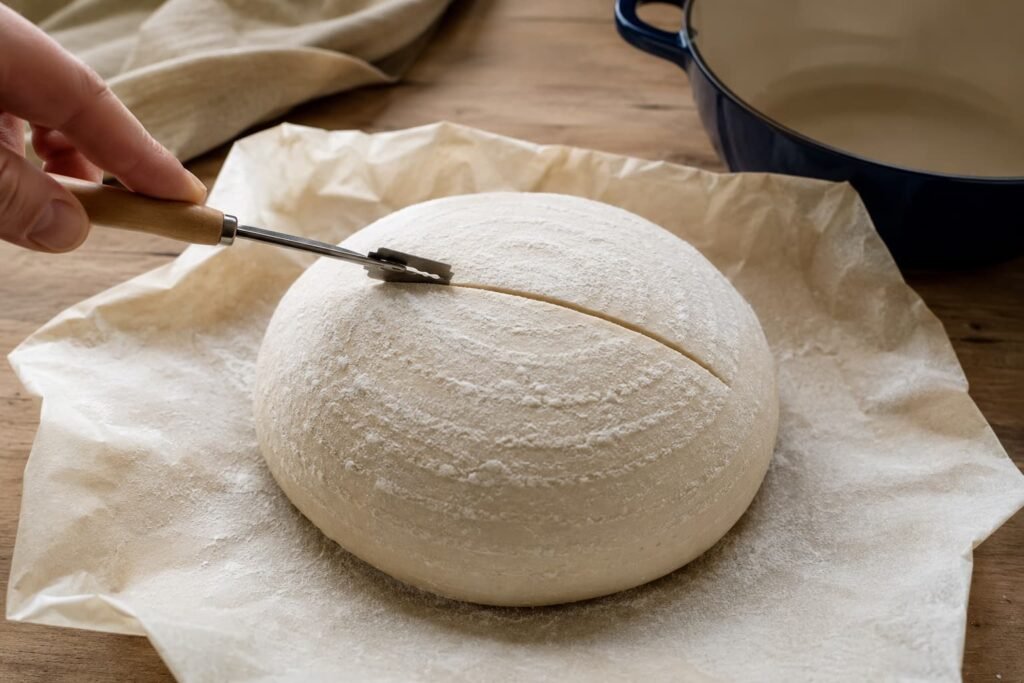
For a more pronounced ear, hold the bread lame at a shallow angle and make one confident cut about tested scoring depth deep. For a wider, more even opening, hold the blade more upright. Use the scoring style that matched the tested loaf rather than making several deep decorative cuts.
Move the blade smoothly without sawing repeatedly. The score should open the surface cleanly without pressing down hard enough to flatten the dough.
If the tested recipe includes an exterior olive-oil coating or flaky sea salt, apply it in the amount stated in the recipe card. Avoid adding extra oil or salt by eye because both can affect browning, crust texture, and final flavor.
Step 10: Bake Covered, Then Uncovered
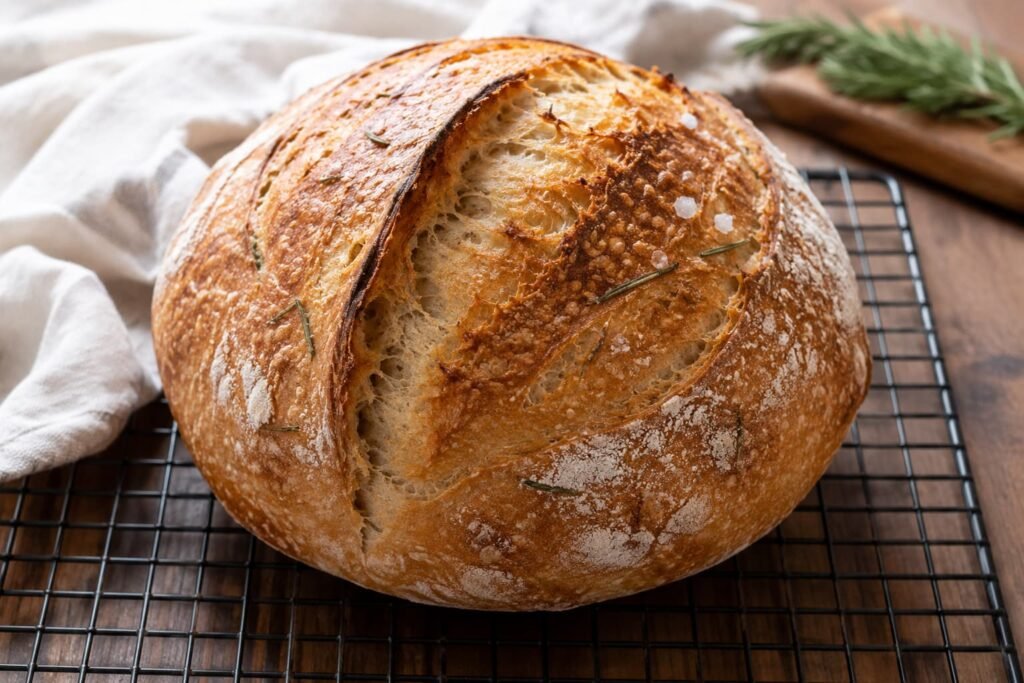
Lower the scored loaf carefully into the preheated Dutch oven. Cover it with the lid and bake at tested oven temperature for tested covered time minutes.
During the covered stage, moisture released by the dough becomes trapped inside the pot. This steam keeps the surface flexible, allowing the loaf to expand before the crust becomes firm.
Remove the lid carefully while keeping your face and hands away from the escaping steam. Continue baking uncovered for tested uncovered time minutes so the crust can deepen in color, dry properly, and become crisp.
The bread is ready when the crust is deeply golden brown, the score has opened clearly, and the sides feel firm rather than pale or soft. Check the internal temperature by inserting an instant-read thermometer into the center from the side or bottom.
The center should reach tested internal temperature before the loaf is removed from the oven. Transfer it to a cooling rack and leave it untouched for at least tested cooling time so the crumb can finish setting before slicing.
Step 11: Cool Before Slicing
Transfer the baked loaf to a cooling rack and leave it undisturbed for at least tested minimum cooling time before slicing.
The crumb continues setting after the bread leaves the oven. Internal steam gradually redistributes and escapes while the starches and gluten cool. Cutting the loaf too early releases that moisture and compresses the still-soft interior, which can make the crumb appear sticky, gummy, or underbaked.
A browned, firm crust does not mean the center is ready. Letting the loaf cool properly produces cleaner slices and makes it easier to judge the true texture of the crumb.
Wait for the full tested cooling time before cutting, even when you plan to serve the bread slightly warm.
How to Know When Bulk Fermentation Is Finished
Bulk fermentation is one of the most difficult stages in a beginner sourdough bread recipe because dough does not develop at the same speed in every kitchen. Starter strength, flour, hydration, room temperature, and dough temperature all influence fermentation.
Do not wait for the dough to double unless the tested formula specifically requires it. Instead, compare several signs at the same time, including volume, bubbles, surface shape, movement, and strength.
| Dough condition | What the dough looks and feels like | Likely meaning |
| Not ready | Dense, tight, and heavy, with limited rise and few visible bubbles | Underfermented |
| Ready | Puffy and aerated, with a smoother surface, rounded edges, visible bubbles, and gentle movement | Properly fermented |
| Too far | Weak, very loose, excessively sticky, flattening quickly, or beginning to collapse | Overfermented |
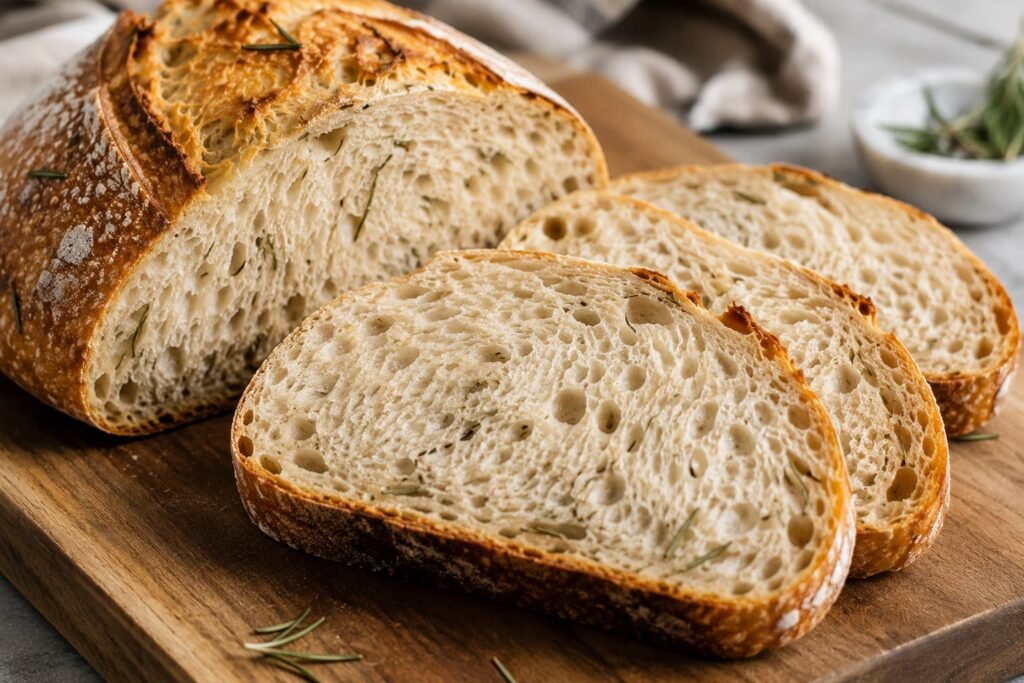
Properly fermented dough should look noticeably fuller than it did after mixing. The surface may appear slightly domed, and the edges should look rounded where the dough meets the bowl. Small bubbles may be visible along the sides or just beneath the surface.
When the bowl is moved gently, the dough may wobble slightly, although lower-hydration dough will move less than wetter dough. It should still hold a rounded shape rather than spreading into a loose, shapeless mass.
Underfermented dough usually remains tight, heavy, and resistant during shaping. Overfermented dough often feels fragile and difficult to tighten because its structure has begun to weaken.
No single sign is reliable in every kitchen. The best decision comes from comparing the dough’s rise, bubbles, texture, and strength together.
Common Rosemary Sourdough Problems
Why Did My Bread Turn Out Dense?
A dense rosemary sourdough bread is most commonly caused by a weak starter or insufficient bulk fermentation.
The starter should be used when it is active, airy, and close to its peak rise. A starter used too early, or long after it has collapsed, may ferment the dough slowly and produce weak oven spring.
Dough that still feels heavy, tight, and short of visible bubbles usually needs more bulk-fermentation time. A suggested schedule is only a guide. Cold water, cool room conditions, or a low dough temperature can extend fermentation considerably.
Too much flour can also create a stiff dough and tight crumb. This often happens when extra flour is added during mixing because the dough feels sticky. During shaping, use a dough scraper and only a light dusting of flour rather than repeatedly coating the dough.
Rough shaping is usually a secondary cause, but squeezing or flattening the dough aggressively can remove much of the gas built during fermentation. Handle it firmly enough to create surface tension without pressing out the entire interior.
Do not automatically blame density when the crumb looks gummy. Cutting hot bread can compress the soft interior, but underbaking, underfermentation, or excessive hydration can cause similar results. Let the loaf cool for the tested time before deciding what went wrong.
Why Did the Dough Spread?
A rosemary sourdough loaf can spread because of fermentation, weak dough strength, excessive hydration, warm dough, or loose shaping. The Dutch oven may influence the final shape, but it is rarely the only cause.
Use the table below to identify the most likely problem.
| Symptom | Likely cause | What to improve next time |
| Dough is very loose and sticky after bulk fermentation | Bulk fermentation went too far | End bulk fermentation earlier, especially in a warm kitchen |
| Dough tears easily and lacks elasticity | Gluten development was insufficient | Complete the tested stretch-and-fold schedule and allow the dough to rest between sets |
| Dough stays unusually wet and difficult to handle | The flour absorbs less water or the hydration is too high | Hold back part of the water during mixing and add it only if the dough can support it |
| Shaped loaf quickly becomes wide and flat | Surface tension was too weak | Tighten the outside gently during final shaping without tearing the dough |
| Chilled dough softens while waiting to bake | The loaf became too warm | Keep it refrigerated until the Dutch oven is fully preheated |
| Dough looks puffy but collapses during transfer | The shaped loaf was overproofed | Shorten the cold proof or begin shaping earlier |
A properly shaped loaf should have a smooth, supported outer surface. It may relax slightly after leaving the banneton, but it should not immediately flatten into a wide, shapeless mass.
Why Is the Crumb Gummy?
A gummy crumb usually points to a problem with baking, fermentation, hydration, or cooling. Adding more flour is not automatically the solution.
| Symptom | Possible cause | What to do |
| Crumb sticks to the knife | The loaf was sliced while still hot | Let it cool for the full tested time before cutting |
| Center feels wet or doughy | The loaf was underbaked | Check the center with an instant-read thermometer and follow the tested baking time |
| Crumb looks shiny, compressed, and sticky | The dough may be underfermented, underbaked, or sliced too soon | Review fermentation signs, baking temperature, and cooling time together |
| Interior remains excessively moist | Hydration may be too high for the flour | Reduce the water slightly during the next test |
| Crust darkens before the center is done | The loaf browned too quickly | Reduce direct heat and continue baking until the center reaches the tested temperature |
Cutting hot sourdough can make a properly baked loaf appear underdone because the crumb is still soft and moist. Cooling will not, however, correct bread that was genuinely underbaked or poorly fermented.
Why Did the Bottom Burn?
A burned bottom usually means the base of the Dutch oven received too much direct heat.
| Likely cause | What happens | Practical adjustment |
| Dutch oven sits too close to the lower heating element | The base darkens before the rest of the loaf finishes | Move the pot one rack higher |
| Pot was preheated longer than necessary | The base stores excessive heat | Follow the tested preheating time |
| Heavy cast iron and strong lower heat combine | The bottom crust browns too quickly | Place a heavy baking sheet on the rack below the Dutch oven |
| Oven temperature is too high | The crust burns before the center finishes baking | Use the tested temperature instead of increasing the heat |
| Oven runs hotter than its setting | Browning happens earlier than expected | Check the oven with a separate oven thermometer |
Both bare and enameled cast iron can produce a dark bottom crust. Rack position, oven calibration, pot thickness, and preheating time usually matter more than the color of the cookware.
A heavy baking sheet placed on the rack below the Dutch oven can reduce direct heat without interfering with the steam trapped inside the pot.
Why Did the Rosemary or Salt Fall Off?
Exterior rosemary and flaky sea salt need a slightly tacky surface to stay attached, but the loaf should not be coated with a heavy layer of oil.
If the tested recipe uses an exterior topping, brush the dough with a very thin film of olive oil. The surface should look lightly coated rather than wet or glossy. Sprinkle the topping evenly, then pat it on gently without pressing down hard enough to flatten the loaf.
Use finely chopped rosemary and a restrained amount of flaky salt. Large rosemary pieces are more likely to fall off or burn before the loaf is fully baked, while heavy salt flakes can create harsh bites and detach as the crust expands.
Simple Flavor Variations
The rosemary, olive oil, and sea salt combination should remain the main flavor of the bread. These optional ideas can be tested in small amounts when you want a different savory loaf.
Roasted garlic adds a mellow, slightly sweet flavor. Cool it completely and blot away excess oil before folding it into the dough.
Finely grated hard cheese adds depth and saltiness. Use a modest amount and reduce the added salt if the cheese is strongly seasoned.
Chopped olives provide a briny contrast to the rosemary. Drain and pat them dry so they do not add unnecessary moisture to the dough.
Fresh thyme can be combined with rosemary for a softer herbal flavor. Keep rosemary as the dominant herb so the loaf does not taste crowded or unfocused.
What to Serve with Rosemary Sourdough Bread
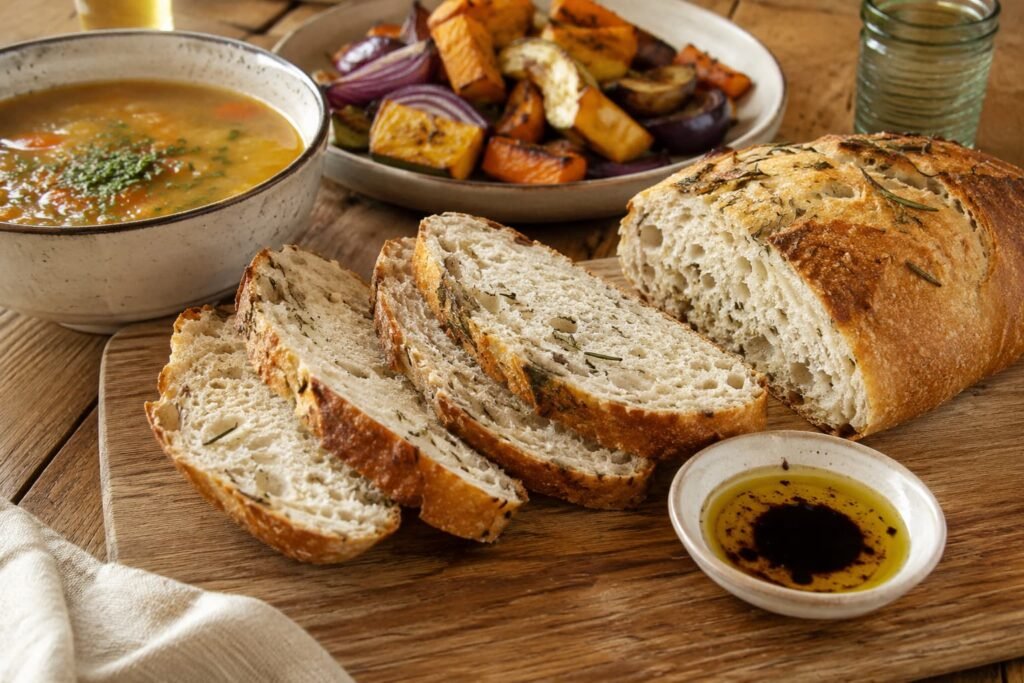
If you are wondering what to eat with rosemary sourdough bread, pair it with foods that complement its herbal flavor, chewy crumb, and mild olive oil richness.
This bread is especially good with soups and slow-cooked meals. Serve thick slices with tomato soup, creamy potato soup, vegetable soup, or beef stew. The firm crumb holds up well when dipped into broth, gravy, or sauce.
Rosemary sourdough also works well with pasta. Serve it warm beside baked pasta, tomato-based sauces, or a simple olive oil and garlic dish. For an easy appetizer, cut the loaf into small pieces and serve it with olive oil and a light splash of balsamic vinegar.
For lunch, use the bread for turkey, chicken, roasted vegetables, or cheese sandwiches. Evenly cut slices also make a flavorful grilled cheese without becoming too heavy.
Toasted slices are a practical choice for breakfast or brunch. Top them with avocado, eggs, or a small amount of soft cheese. The crisp surface supports moist toppings while the rosemary adds more flavor than plain sourdough.
For a simple sharing board, serve thin slices with cheese, olives, roasted peppers, and cured meats. Avoid pairing the bread with too many strongly seasoned foods at once, or the rosemary flavor may become lost.
Storage, Freezing and Reheating
Allow the rosemary sourdough bread to cool completely before storing it. Sealing a warm loaf traps condensation, which softens the crust and can leave the surface damp.
Room-Temperature Storage
Store the cooled loaf at room temperature for tested room-temperature storage time in a bread box, paper bag, or clean kitchen towel.
Paper and cloth help preserve a crisp crust, but they also allow the crumb to dry more quickly. An airtight bag keeps the inside softer but will gradually soften the crust. Use the storage method that best matches the texture you prefer and the result confirmed during testing.
Keep the bread in a cool, dry place away from direct sunlight and heat. If mold appears anywhere on the loaf, discard the entire loaf rather than cutting away the visible area.
Should Rosemary Sourdough Be Refrigerated?
Refrigeration is usually not the best option for everyday storage because the crumb can become firm and stale more quickly.
In a very hot or humid kitchen, refrigeration may help slow mold growth, but the bread should be wrapped tightly to prevent drying and odor absorption. For longer storage, freezing usually preserves the texture better.
Freezing a Whole Loaf
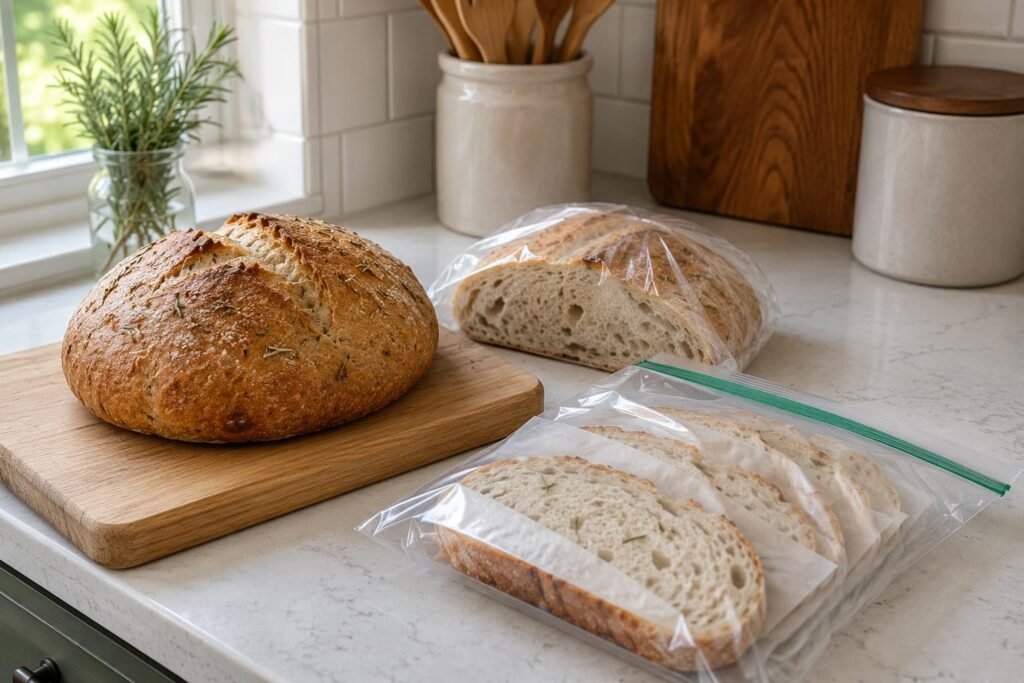
Cool the bread completely before freezing. Wrap the whole loaf, or two smaller halves, tightly in food-safe wrap and place it inside a sealed freezer bag or airtight container.
Remove as much excess air as possible without crushing the bread. Label the package with the freezing date and use it within tested freezer-storage time for the best texture.
Freezing the loaf in halves is often more practical than freezing it whole because you can thaw only the amount you need.
Freezing Individual Slices
For easy single portions, arrange the slices in one layer on a tray and freeze until firm. Transfer them to a sealed freezer bag, placing parchment between the layers if necessary.
This prevents the slices from sticking together and makes it easy to remove one or two pieces at a time.
Reheating Individual Slices
Frozen slices can go directly into a toaster or toaster oven. Heat them until the edges are crisp and the center is warmed through.
For a softer result, thaw the slices at room temperature before warming them briefly. Avoid prolonged heating because thin sourdough slices can become hard and dry.
Refreshing a Whole Loaf
Thaw a frozen loaf before reheating it. Lightly dampen the crust with a small amount of clean water, then place the bread in a preheated oven at tested reheating temperature for tested reheating time.
The loaf is ready when the crust feels crisp and the center is warm. Place it on a cooling rack for a few minutes before slicing so excess steam can escape.
Frequently Asked Questions
Can I use dried rosemary instead of fresh rosemary?
Yes, but use less dried rosemary because its flavor is more concentrated.
For a loaf made with 750 grams of flour, replace tested fresh rosemary amount grams of fresh rosemary with tested dried rosemary amount grams of dried rosemary. Crush the dried leaves lightly before adding them so they spread more evenly through the dough.
Fresh rosemary gives the loaf a brighter, cleaner aroma. Dried rosemary has a stronger, earthier flavor and can taste harsh when overused.
Can I make this rosemary sourdough in one day?
A same-day loaf may be possible when the starter is strong, the dough stays warm, and fermentation moves quickly. However, the overnight method is more predictable for this recipe.
Cold proofing gives the loaf more time to develop flavor, helps the shaped dough stay firm, and makes scoring easier. Bakers with less sourdough experience should follow the two-day schedule rather than trying to force the dough into a fixed same-day timeline.
Can I use all-purpose flour?
All-purpose flour may work, but it usually absorbs less water and builds less dough strength than bread flour. The dough may feel softer, spread more easily, and produce a slightly less chewy loaf.
If you use all-purpose flour, hold back part of the water during mixing and add it gradually only if the dough can support it. Do not list this as a confirmed substitution until the exact flour and water adjustment have been tested.
Can I use sourdough discard?
Sourdough discard is not a direct replacement for an active starter.
An active starter has been recently fed and contains enough fermentation activity to raise the dough. Discard is usually past its peak and may not provide reliable lifting power on its own.
Use discard only in a bread formula specifically developed for it. Replacing the active starter with discard in this recipe may produce a dense loaf.
What size Dutch oven should I use?
A 5- to 6-quart Dutch oven is generally suitable for this round loaf made with 750 grams of flour.
The best fit also depends on the pot’s diameter, depth, and total dough weight. See the equipment section for safe loading, pot selection, and bottom-crust guidance.
Why is my rosemary sourdough not rising?
The most common causes are a weak starter, cold dough, or insufficient fermentation time.
Use the starter when it is bubbly, airy, and near its peak rise. If the dough remains cool, fermentation may take much longer than the suggested schedule.
Before shaping, the dough should look fuller, smoother, and more aerated, with visible bubbles and rounded edges. If it still feels dense and tight, it probably needs more time.